
![]()
EIQ Server Configuration Tool
Version 8.0.0.490
EIQ
Server Configuration Tool Features EIQ
Server Configuration Tool Overview Launching
the EIQ Server Configuration Tool EIQ
Server Configuration Tool Features Defining
a New Virtual Data Source Building
Link Indexes and Master Data Registering
a remote SDF Configurations as a data source: Taking
resources Offline and bringing back Online Configuring
an EIQ Indexed Adapter Configuring
an EIQ Conventional Adapter Configuring
an EIQ Hybrid Adapter Configuring
an EIQ Federation Server This document describes the features used to configure SDF
using the EIQ Server Configuration Tool. This document covers the following topics: The EIQ Server Configuration Tool is a client administration
tool that helps admins configure and manage SDF query servers locally or via a
network. The EIQ Server Configuration Tool includes features to: 1) Connect
to EIQ Servers (either locally or across networks). 2) configure
SDF configurations; including EIQ Indexed Adapter, EIQ Hybrid Adapter, EIQ
Conventional Adapter, and EIQ Federation Server. 3) Manage
business data dictionaries using standard data models. 4) Register
data sources. 5) Configure
entities for Link Indexing. 6) Initiate
Link Indexing. 7) Set
advanced server settings. 8) Monitor
and manage connection pooling and client sessions. 9) Manage
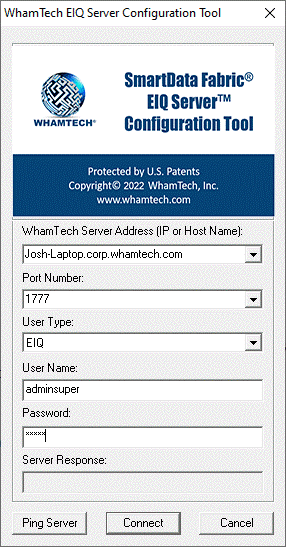
users and user roles. Start the EIQ Server Configuration Tool and connect to
the EIQ Server by entering the EIQ Server address and user credentials. Note: Make sure the
EIQ Product Server is running. The EIQ Server Configuration Tool has various tabs.
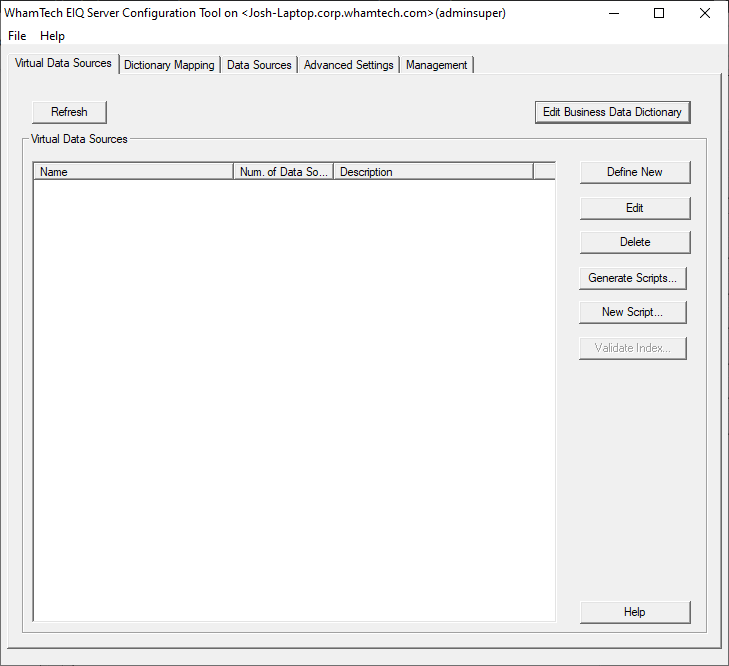
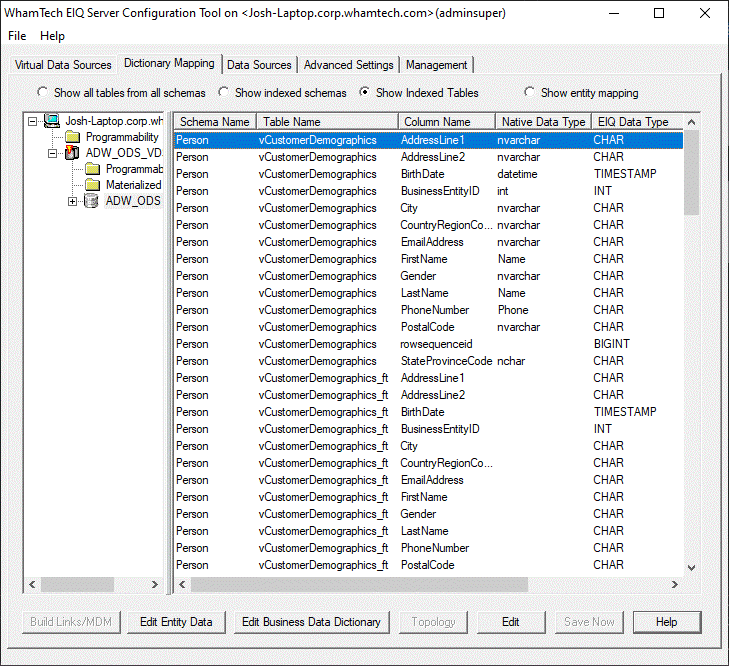
Each of the tabs and their main functionality is described below: The' EIQ Server Virtual Data Sources' tab provides
functionality for viewing existing Virtual Data Sources, creating new ones, or
editing and deleting existing ones. For a description of the concepts behind
VDSs and virtual schema views, see SmartData Fabric® Configurations Introduction. The tab also allows users to create and edit the standard
data model used by VDSs through the 'Edit Business Data Dictionary'
button. The business data dictionary holds the standard data model
information needed for building business data views. Business data views hide
data source specific column names and data types from clients. In business data
views, columns from a standard data model are mapped against data source
specific columns containing corresponding data through a business data view
mapping. See the 'Dictionary Mapping' Tab section below for more details
regarding mapping. Business data views provide the following functions: ·
Assign a commonly understood meaning to columns
(semantic mapping). For example, a column named 'esal'
may not mean much to someone unfamiliar with the data source. When it is mapped
to a standard data model column named 'Employee Salary', it becomes much more
meaningful. ·
A data type definition. They define the data in
more commonly understood terms. ·
A data format definition. They define the format
in which the data should be returned for the column. The National Information Exchange Model (NIEM), HL7, FHIR
and eXtensible Business Reporting Language (XBRL) are
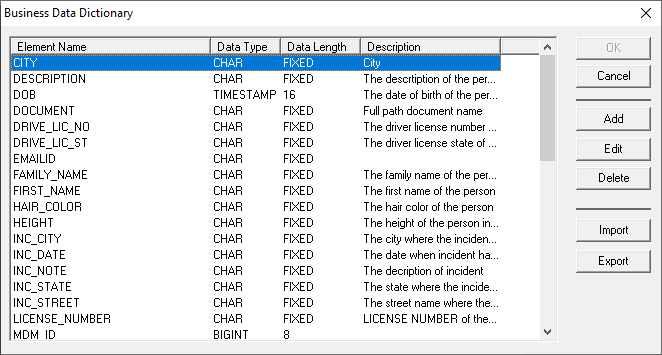
examples of standard data models. The 'Edit Business Data Dictionary' button opens a
dialog with the list of columns from a standard data model and their data type
details. Users can add, delete, or edit items in the list. They can also import
a standard data model from an existing CSV formatted file on the file system or
export the list to a file. A standard data model can be imported in two ways: 1) through the 'Import' feature in the 'Edit Business Data
Dictionary' dialog 2) by replacing the default STANDARDNAMES.CSV (comma
delimited) file under '\WhamTech\Settings\EIQConfig\' folder in the install path before
starting the EIQ Server service for the first time. Supported data types for these columns include: BIGINT,
CHAR, DATE, FLOAT, INT, REAL, SMALLINT, TIME, and TIMESTAMP. The lengths of the
data types are generally predetermined and cannot be modified. The CHAR data
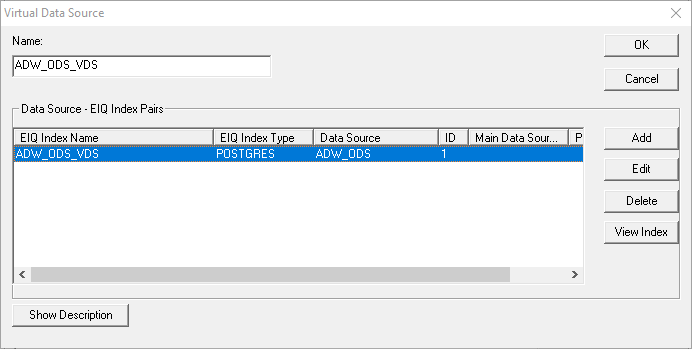
type length is variable and accommodates up to 256 characters in length. To define a new Virtual Data Source, click "Define
New". This opens a dialog for configuring a VDS. Name: The name of the virtual data source. This name will be given
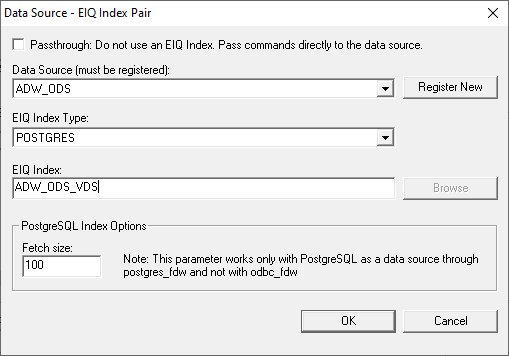
to the clients in a list of available data sources at SDF query server. Data Source - EIQ Index Pairs: For EIQ Indexed Adapter, EIQ Hybrid Adapter, and EIQ
Conventional Adapter configurations, the data source is paired with
a corresponding EIQ Index (in the case of EIQ Conventional
Adapter, EIQ Conventional Adapter Indexes). The pairing notifies the server to
execute queries on the EIQ Indexes and go to the corresponding data source
only for retrieving results. For EIQ Conventional Adapters, EIQ Conventional
Adapter Indexes provide data source schema information and any transforms that
need to be applied on the results. Users click 'Add', select the data source from the combo
list (or click 'Register new' to add a new data source), browse by clicking
'Browse', and select the corresponding EIQ Indexes for the data sources. Note: The data source
needs to be registered first as described under the Data Sources
tab below. In an EIQ Conventional Adapter configuration, users
must select the "Passthrough command" checkbox so queries can be
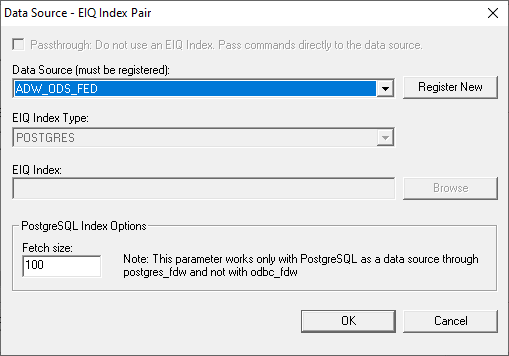
passed directly to the data source for execution. For EIQ Federation Server configurations, there is no
pairing needed. However, the remote data sources need to be added for a VDS
through the same 'Data Source - EIQ Index Pair' dialog. In this case, only a
remote data source is selected. Viewing Index Properties: Users can view EIQ Index details at any time after
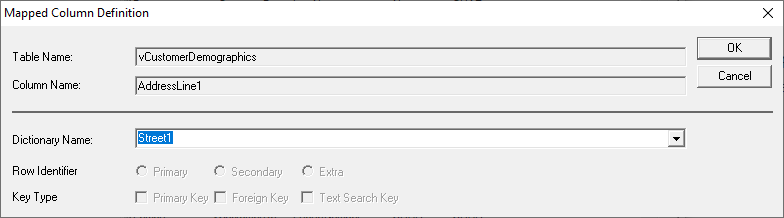
configuration by clicking 'View Index'. Users can map business data view columns to data source
columns using a business data view mapping. In the left pane, users can expand the Virtual Data Source
tree hierarchy and select any registered data source name to map a business
data view. The column details for this data source are shown in the right
pane. Users can select and double-click on the data source column
or right-click and select 'Edit'. A dialog opens where users can
select the corresponding standard data model name from the 'Dictionary Name'
list. Note: The 'Dictionary Name' list
is dynamically adjusted to display only the business data view column names
that match the selected data source column type. Business
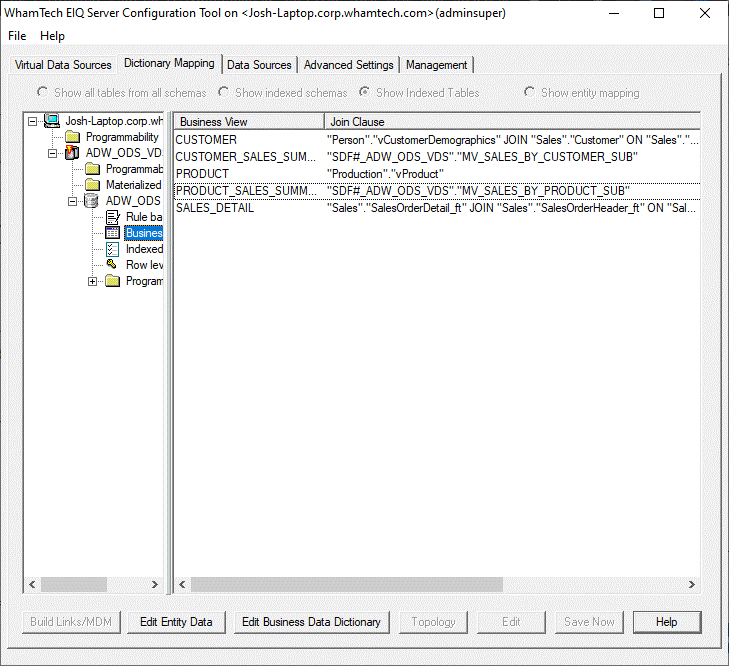
Views are views created based on the dictionary mapping that define columns
that can be queried. Business Views are created under the dictionary mapping
tab. Creating
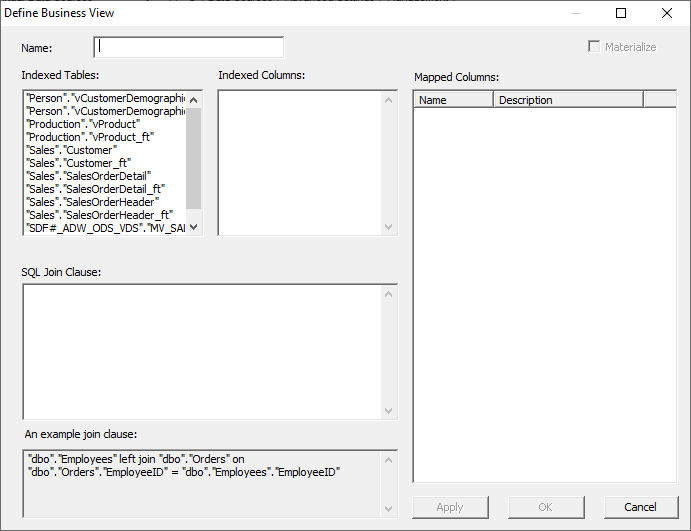
a new view is relatively simple within the 'Define Business View' dialog
window. Open this screen by right-clicking within the Business View pane and
selecting "New Table...". Here's a
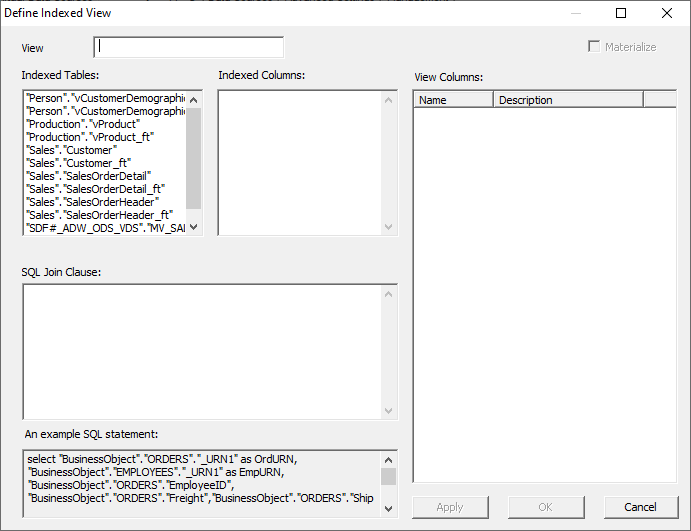
brief breakdown of the various dialog boxes within the window. Name The
name of the Business View. Indexed Tables This dialog
lists the names of the indexed data source tables and any materialized views
that were created. Selecting a table will display indexed column names in the
adjacent dialog. Indexed Columns This
dialog list the names of the indexed columns, or columns within a
materialized view. JOIN SQL Clause The
SQL clause that specifies any required JOIN rules. For many configurations,
this may just be one table. Mapped Columns This
dialog will show the list of columns that have a dictionary mapping within
the view. Only mapped columns will appear here. Users
can create a view by double-clicking the tables and columns necessary to
complete the JOIN rule, or a JOIN rule can be copied and pasted into the
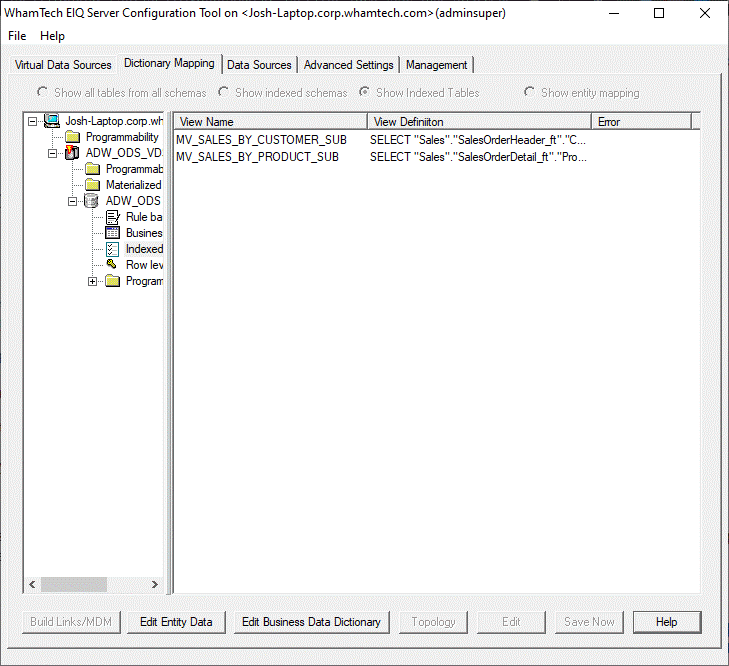
dialog. Materialized
Views can be created in the EIQ Server Configuration Tool in a similar fashion
as Business Views. Materialized Views are critical to EIQ Hybrid Adapter
configurations, as they accelerate query performance while queries are resolved
in the adapter. Materialized Views are also created in the 'Dictionary Mapping'
tab. Like with
Business Views, users can create Materialized Views by right-clicking the
Materialized View pane and selecting "New Indexed View" from the
context menu. Here's a
brief breakdown of the various dialog boxes within the window. Name The
name of the Materialized View. Indexed Tables This
dialog lists the names of the indexed data source tables and any materialized
views that were created. Selecting a table will display indexed column names
in the adjacent dialog. Indexed Columns This
dialog list the names of the indexed columns, or columns within a
materialized view. JOIN SQL Clause The
SQL statement that will define the columns and tables necessary to create the
Materialized View. A wide array of SQL commands can be defined here, such as
selecting columns as a different name or selecting the sum of one or multiple
columns. Mapped Columns This
dialog will show a preview of the columns that will appear in the
Materialized View. When a
Materialized View is created it is inserted into the adapter as a table with
mappable columns under an SDF specific schema. Users will need to return to the
dictionary mapping screen and preform a dictionary mapping on the Materialized
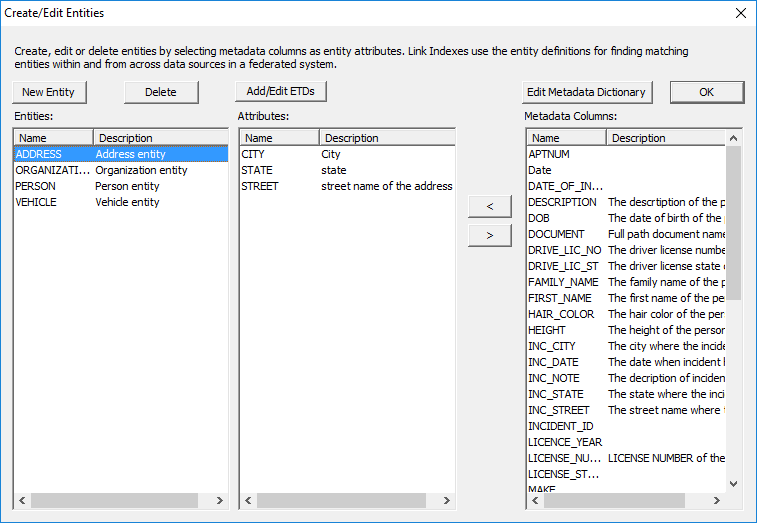
View. Admins can define the entities used in Link Indexing by
clicking 'Edit Entity Data' at the bottom of the 'Dictionary Mapping' tab. This
opens the 'Edit Entities' dialog which provides features for adding, deleting,
and modifying entities. Entities consist of attributes as represented by
business data view column names listed under the Business Data Dictionary.
For example, an 'Address' entity is a combination of city, state, and street
attributes (as represented by the 'CITY', 'STATE', and 'STREET' columns
below). EIQ Federation Server admins can build Link Indexes
and/or Master Data for a VDS that federates one or more EIQ Indexed Adapter or
EIQ Hybrid Adapter VDSs by clicking 'Build Links\MDM' at the bottom of the
'Dictionary Mapping' tab. This button is disabled unless users select 'Show
entity mapping'. See Link Indexes Help for
more details on Link Indexes. See Master Data Help for
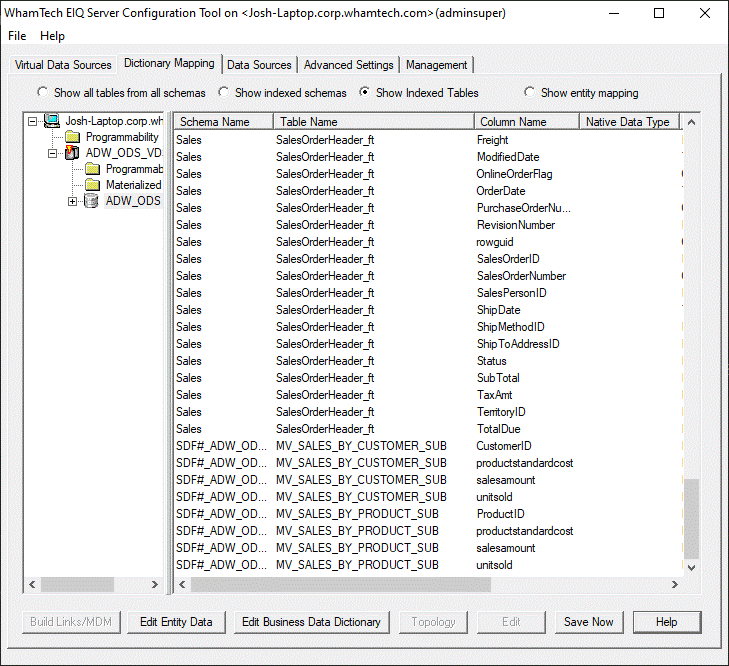
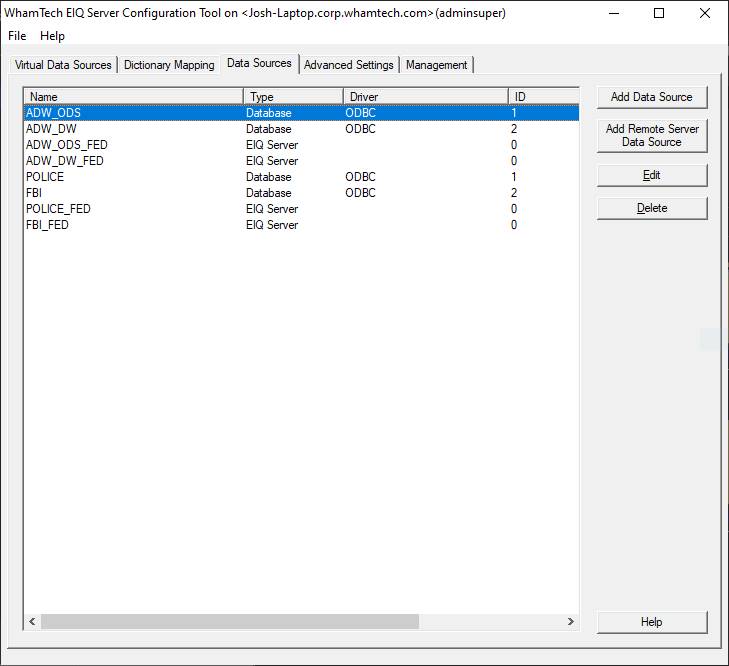
more details on building Master Data. Admins use the 'Data Sources' tab to register data
sources requiring access through SDF. Registered data sources can either
be third-party data sources (Oracle, SQL Server, etc.) or other instances
of SDF configurations (EIQ Federation Server, EIQ Indexed Adapter, EIQ Hybrid
Adapter, and EIQ Conventional Adapter). Users can view all registered data sources,
add a new data source and test the connections, and edit or delete an
existing registered data source. Users register a data source by clicking 'Add Data Source'.
It opens the 'Data Source Registration' dialog containing the following
entry fields: Alias This name is unique and is used by SDF for this data source.
(Required) ID This is a data source ID which is unique and specific to
the data source. Data
Source Type The connection driver for the data source. The supported types are: ODBC - Any data source
that supports ODBC connections DB2 - For IBM DB2 data sources (data source connections
will be through DB2 native client driver) ORACLE - For Oracle data sources (data source connections
will be through Oracle native client driver (CLI)) DOCUMENTS - For special data source built through EIQ
Server RTI Tool for searching documents on a file system. THUNDERBOLT - For special data sources built through EIQ
Server RTI Tool (Native EIQ Non-Virtual Indexes) Data
Source Name The data source system specific name for the data
source. For ODBC connections, this is the data source name (DSN)
listed under ODBC Data Source Administrator (see ODBC administration
documentation for more details). For ORACLE connections, this is the name of TNS service
name (see ORACLE administration documentation for more details). Connect
String Data source system specific connection string. User
Name If login credentials are required for connecting to the
data source, use the user name for the data source system. Password If login credentials are required for connecting to the
data source, use the password for the data source system. Schema
Name If the data source requires the schema name in queries,
the EIQ Server system will use this value to automatically format SQL
commands to the data source accordingly. Oracle data sources require schema
name. Using the 'Test Connection' button verifies that the
connection to the data source is working properly. EIQ Federation Servers provide a single interface for
accessing multiple data sources. In a typical EIQ Federation Server
configuration, multiple data sources belonging to remote EIQ Indexed Adapters
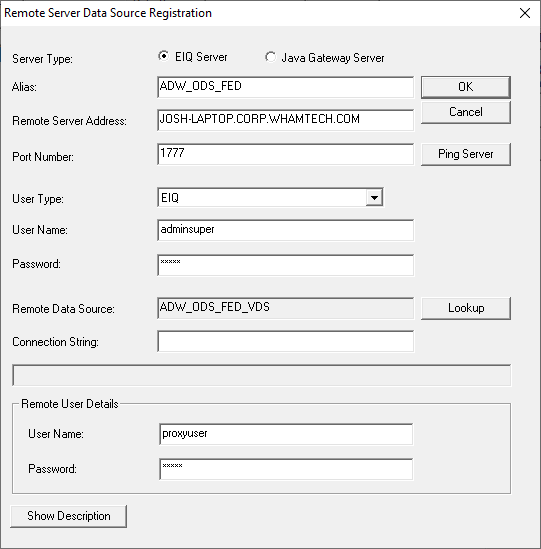
are registered for access through a VDS. Users can register a remote SDF
Configuration as a data source by clicking 'Add Remote Server Data
Source'. It opens the 'Remote Server Data Source Registration'
dialog containing the following entry fields: Alias This name is unique and is used by the SDF for this data
source. (Required) Remote
Server Address The machine name or IP address where the remote EIQ
Product server resides. Remote
Data Source The data source name as registered with the remote server. User
Name Login username required for connecting to the remote EIQ
Product server. Password Login password required for connecting to the remote EIQ
Product server. Remote
User Details The user name and password for the proxy user. Proxy user
is vital for Federation Server configuration and valid credentials must be
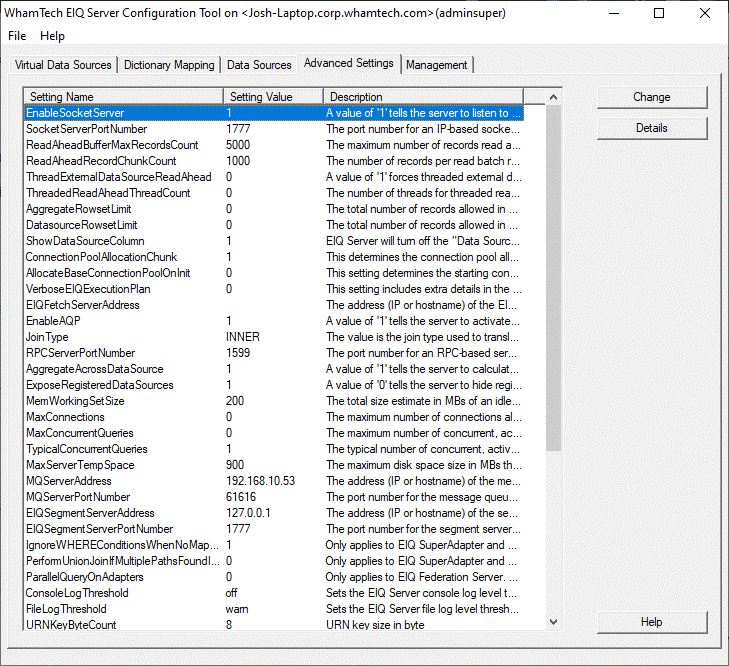
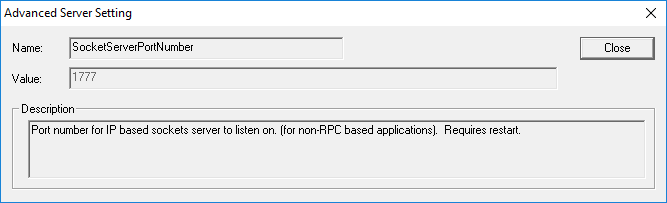
used to complete the setup. The 'Advanced Settings' tab provides admins with
various options to modify the server behavior. They can select and double-click
on any of the items for editing (or select and click 'Change'). A detailed description of each of the settings is provided
in the dialog for that setting. The EIQ Server Configuration Tool provides features for
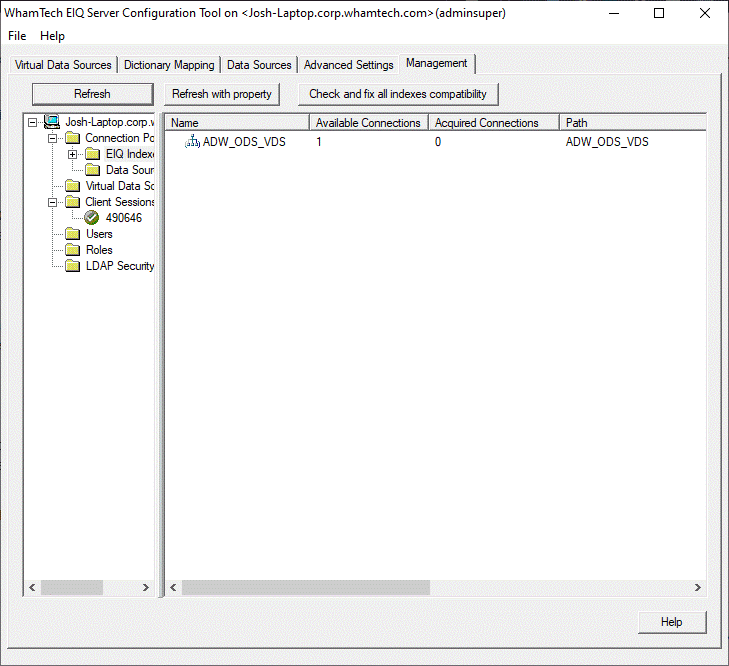
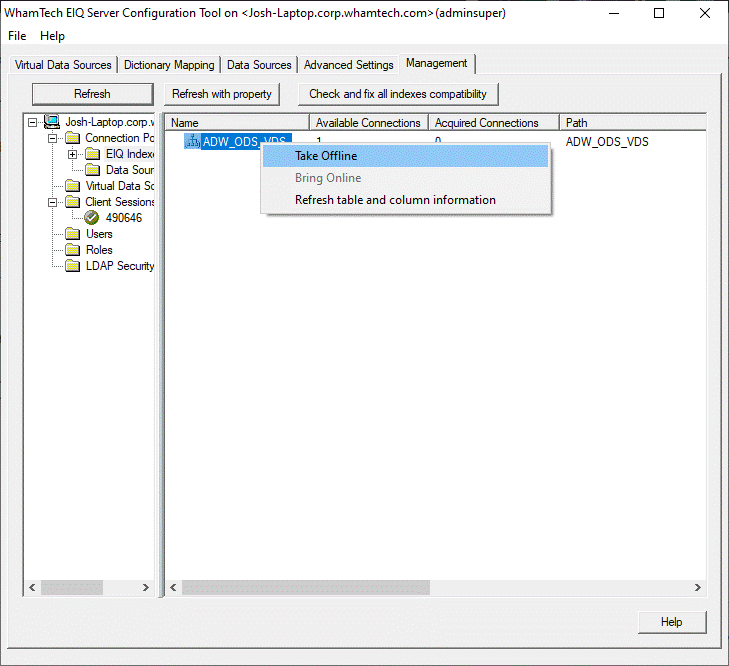
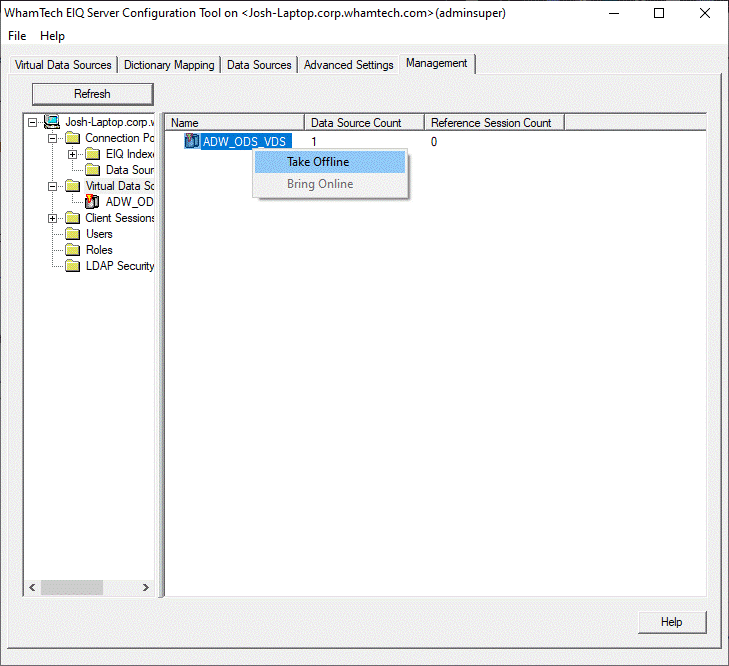
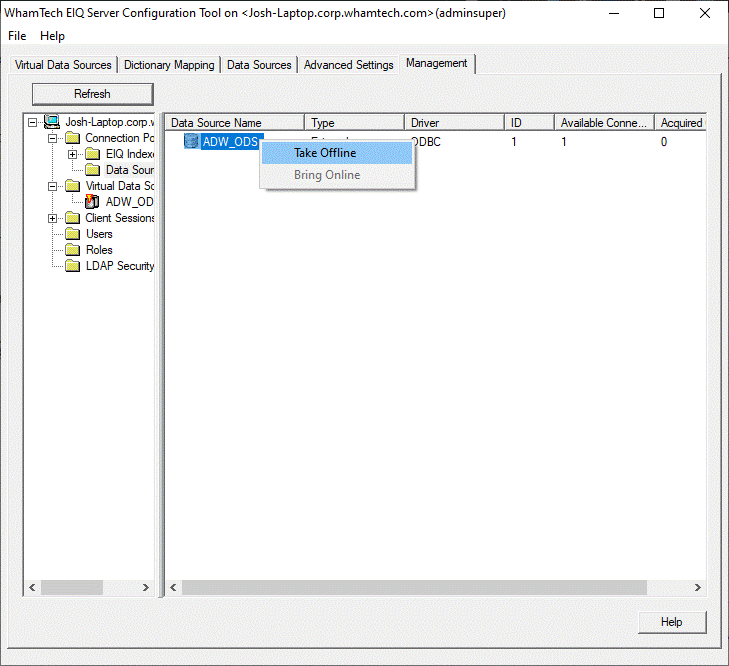
admins to monitor and manage various SDF resources such as: The management functions include taking any selected VDS,
registered data source, or EIQ Index online or offline for maintenance
operations. Apart from the above resources, admins can also manage users and
user privileges. Admins can view the resources (Connection Pool and Virtual
Data Sources), client sessions, and users by expanding the tree in the left
panel. Monitoring Resource Usage: If users select a resource (EIQ Indexes or Data Sources
under Connection Pool tree item) node in the left pane, the right pane shows
the details. The 'Available' column shows the number of idle connections in the
connection pool that are available for the selected resource. The 'Acquired'
column shows the number of connections currently in use. To make changes to existing
EIQ Indexes or to take backups, admins must disconnect any open
connections, take indexes offline, and then bring them back online. Similarly,
they may take down VDSs and data sources to make configuration changes and
bring them back online. An example is when accessing Mainframe Data Files
through the WhamTech MDF ODBC Driver. If changes
are to be made to the MDF DSN configuration XML file, then the MDF data
source must be taken offline first. Note: Before taking
EIQ Indexes or data sources offline, the corresponding VDS must be taken
offline. Taking resources offline: From the tree in
the left pane, admins can select a resource folder (Virtual Data Sources,
Connection Pool->EIQ Indexes, Connection Pool->Data Sources). In the
right pane, from the list of available resources, admins can select a
resource to bring down by right-clicking the desired node and selecting
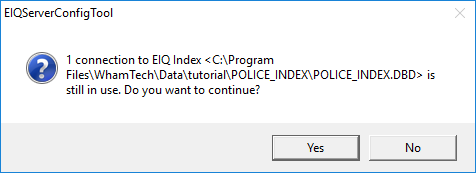
'Take Offline' from the menu. If there is a connection in use for the selected EIQ Index, a dialog
opens asking whether the user would like to proceed with the 'Take offline'
action or not. If the user clicks 'Yes', it will take the index offline.
This action might affect client sessions that are still using the index. For
example, it may terminate results-retrieval for a query that was being
processed. If the user clicks
'No', no action will be taken. Taking resources online: Similarly, admins can bring resources back online by right-clicking
the resource and clicking 'Bring Online’. Note: Before bringing
VDSs online, the corresponding EIQ Indexes and data sources need to be brought
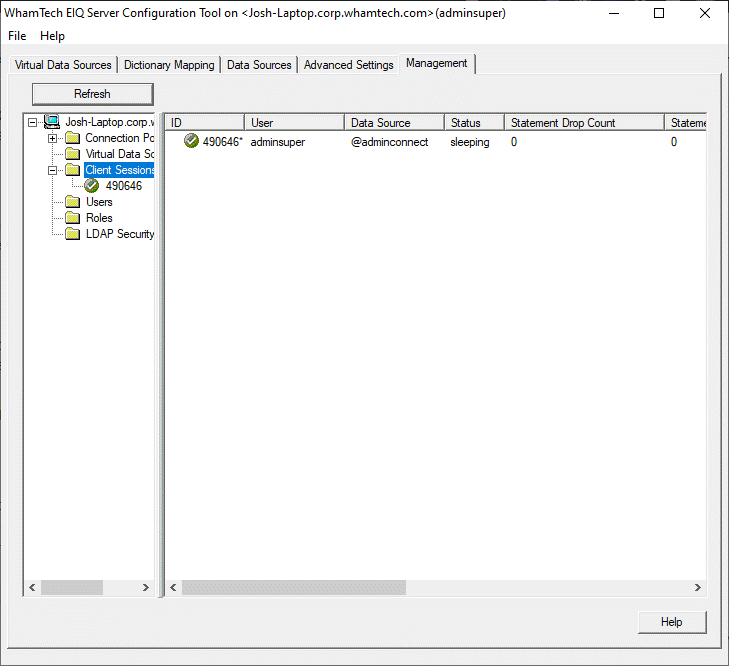
online. Users can view a list of
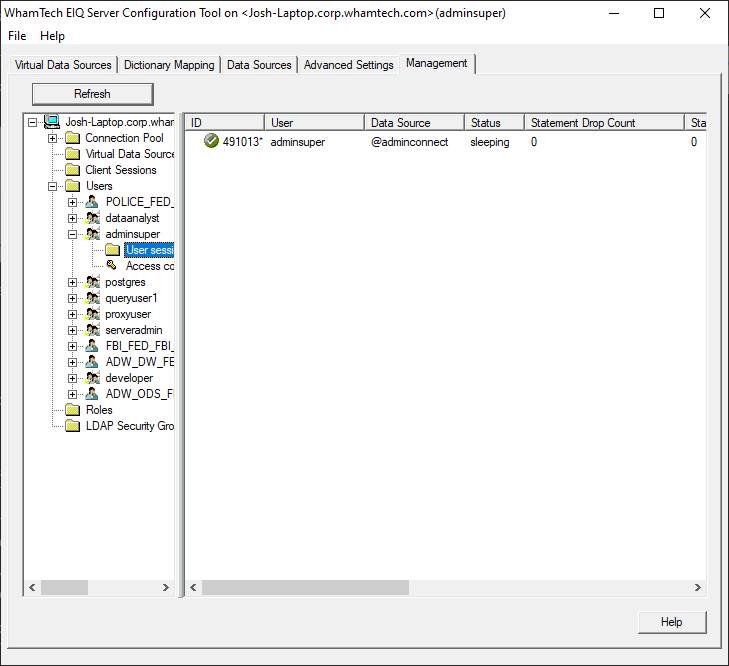
all client connections to the server by selecting the 'Client Sessions'
folder in the left pane tree. In the right pane, for each connection,
information such as the Username, Data Source, status of the connection, IP
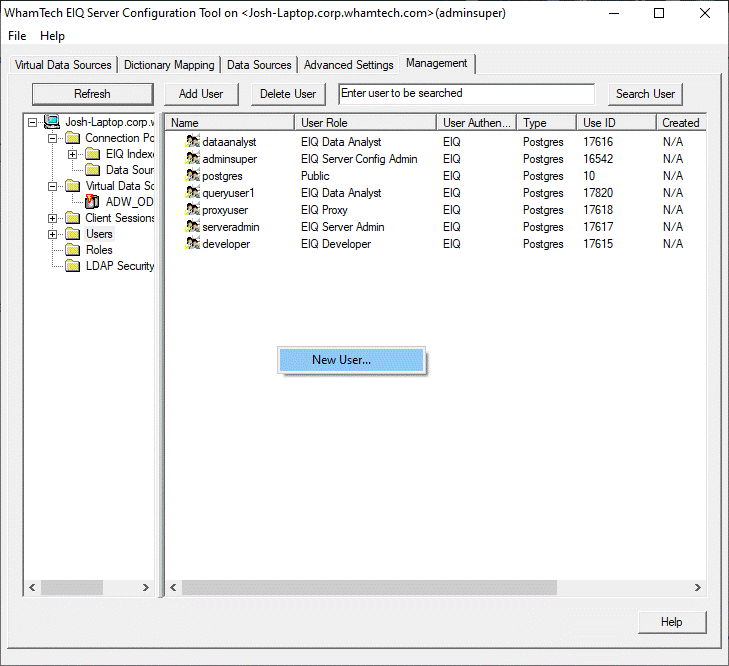
Address of the client machine, and login time is displayed. Admins can manage users, user
credentials, and user access roles by selecting the 'Users' tree node. From
here, they can view all existing users, add a new user, delete an existing
user, and modify user roles. SDF comes with these pre-configured user roles: public, eiqdeveloper, eiqdataanalyst and eiqadmin. These roles restrict user access to certain types
of SDF tools. For more information on access control, see EIQ Data Security and Access Control.
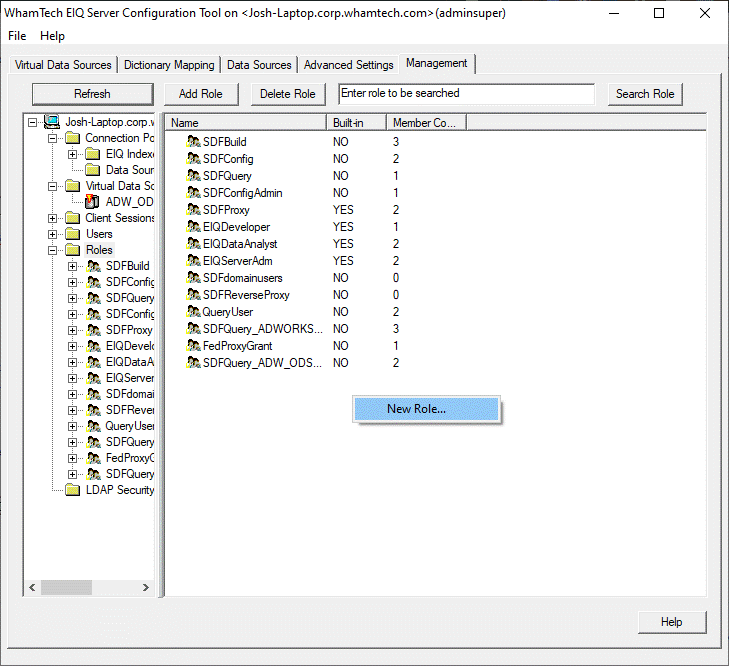
New roles can also be added to provide a more finely tuned security grant
delegation based on an organization’s needs. ServerAdmins
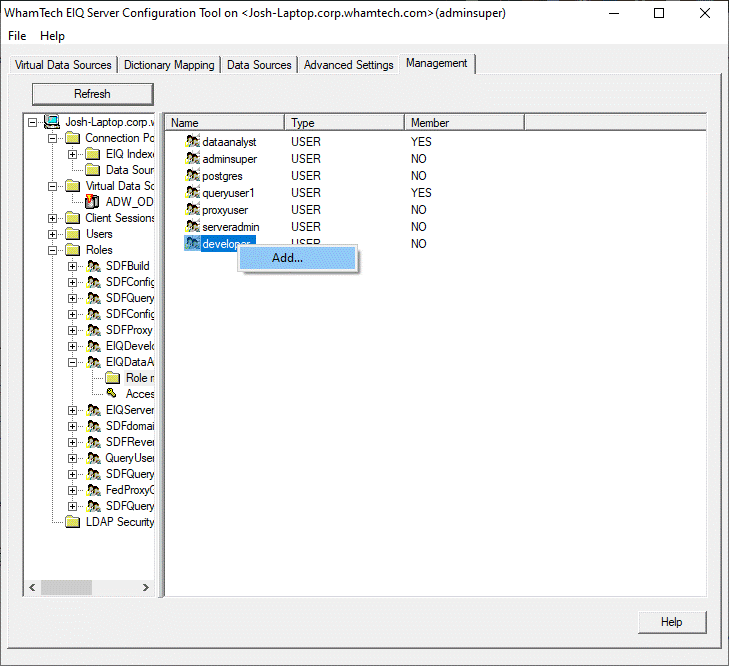
can create new roles using the "Roles" tree node. Users can then be
added to a role by expanding the node for the role, right-clicking the user,
and selecting "Add..." from the context menu. Removing a user from a
role works the same way. By selecting a specific user node from the tree, they can also
view the details of any connections from that user. The following section gives an outline of major steps
required for various SDF configurations.
i. Build
indexes for a data source.
ii. Optionally,
apply data transforms and data cleansing.
i. Register
the data source with the EIQ Server.
ii. Create
a VDS.
iii. Pair
the data source with corresponding EIQ Indexes.
iv. Map
standard data model column names to a business data view.
v. Create
a Business View to query mapped columns.
i. Setup
update tasks for updating EIQ Indexes for the data source.
i. Build
EIQ Conventional Adapter Indexes for a data source. EIQ Conventional Adapter
Indexes are special indexes that contain only the metadata information for the
data source and any transforms on results.
ii. Optionally,
apply data transforms.
i. Register
the data source with the EIQ Server.
ii. Create
a VDS.
iii. Pair
the data source with corresponding EIQ Conventional Adapter Indexes.
iv. Map
standard data model column names to a business data view.
i. Build
EIQ Indexes for the data source.
ii. Optionally,
apply data transforms and data cleansing
i. Register
the data source with the EIQ Server.
ii. Create
a VDS.
iii. Pair
the data source with EIQ Indexes.
iv. Map
business data view columns to data source columns using a Business Data View
mapping.
v. Create
any Materialized Views for accessing source data directly.
vi. Create
a Business View to query mapped columns.
i. Setup
update tasks for updating EIQ Indexes for the data source.
i. Register
Virtual Data Sources (VDS) from EIQ Indexed Adapters and other EIQ Adapters as
data sources with the EIQ Server.
ii. Create
a new VDS.
iii. Select
one or more registered data sources of "Remote EIQ Server" type
(typically EIQ Indexed Adapter VDSs).
iv. Optionally,
define entities for Link Indexing, and
v. Initiate
Link Index build process. EIQ Server Configuration Tool Features
EIQ
Server Configuration Tool Overview
Launching
the EIQ Server Configuration Tool
EIQ
Server Configuration Tool Features
EIQ
Virtual Data Sources Tab
Business Data Dictionary
Defining
a New Virtual Data Source
Dictionary
Mapping Tab
Business
data view mapping
Creating Business Views
Creating
Materialized Views
Entity Configuration
Building Link Indexes and Master Data
Data
Sources Tab
Registering
a data source

Not required for ODBC,
THUNDERBOLT and DOCUMENTS types.
Registering
a remote SDF Configurations as a data source:
Advanced
Settings Tab
Management
Tab
Taking
resources Offline and bringing back Online
Monitoring
Client Sessions
Managing
Users and Roles
SDF Configurations
Configuring
an EIQ Indexed Adapter
Configuring
an EIQ Conventional Adapter
Configuring
an EIQ Hybrid Adapter
Configuring an EIQ Federation
Server
Copyright
© 2023 , WhamTech, Inc. All rights reserved. This document is
provided for information purposes only and the contents hereof are subject to
change without notice. Names may be trademarks of their respective owners.