
![]()
EIQ Data Security and Access Control
Version 8.0.0.490
Configuring Role-based Security Configuring Column Permissions Querying with Role-based Security Configuring Row-Level Security The EIQ Product
Suite allows Admins to control how data is accessed, how data is viewed, and
who is allowed to view specific data. This function is provided through the EIQ
Server Configuration Tool under the ‘Management’ Tab. Keeping data secure is
vital to organizational functionality and day-to-day operations. EIQ Servers are accessed by four different types of users: Public – A user that can query from client
tools. Public users only have access to the EIQ Server Query Tool. EIQ Developer – A user that can operate EIQ development tools.
EIQ Developers only have access to the EIQ Server RTI Tool and EIQ Server Query
Tool. EIQ Data Analyst – A user that can operate EIQ data
analysis tools. EIQ Data Analysts have limited access to the EIQ Server
Configuration Tool, meaning they cannot create or modify link indexes or manage
user roles. They have full access to the EIQ Server RTI Tool, the EIQ Server
Query Tool, and the EIQ Update Configuration Tool. EIQ Server Admin – A user that can operate all EIQ
tools. EIQ Server Admins have limited access to the EIQ Server Configuration
Tool, meaning they cannot manage user roles. They have full access to all other
tools. Sysadmin,
the user created during installation of the EIQ Product Suite, is the only user
that has full access to every tool, including creating and modifying link
indexes and managing user roles. All users
have access to the EIQ Diagnostics Tool. It has no user restrictions because it
is used for diagnostic purposes. Users can only diagnose issues related their
specific roles. For example, a public user would only be able to use the EIQ
Diagnostic Tool for basic diagnostics or diagnostics related to the EIQ Server
Query Tool. Because they don't have access to use the other tools, they can't
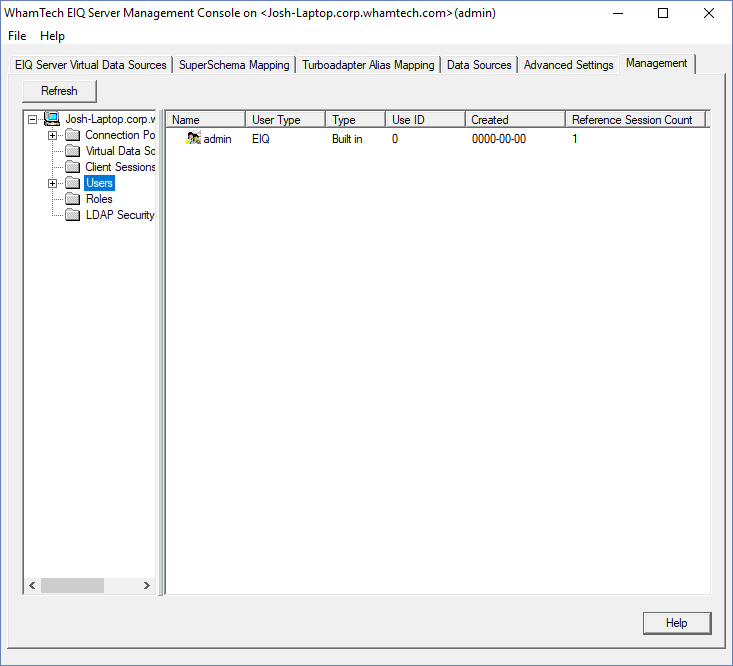
diagnose problems related to the other tools. When a sysadmin needs to create a new user, open the EIQ
Server Configuration Tool and go to the ‘Management’ tab. In the left pane,
click the folder called ‘Users’. The right pane will show all of the users that have been
created for the EIQ Server. It displays the name, the user type (EIQ, built in,
and EIQ Server), the date the user was created, and the reference session
count. Right-click anywhere in the right pane and select ‘New User’ from the
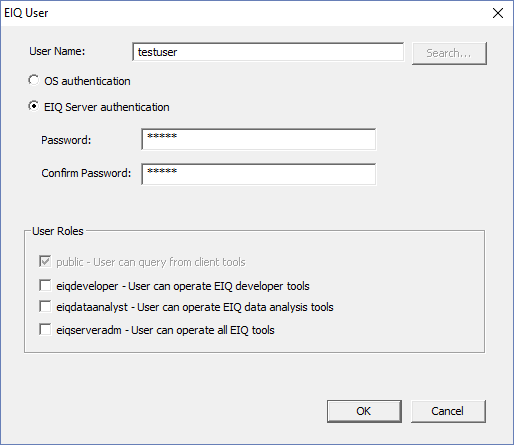
context menu to create a new user. Enter a name for the new user and select the authentication
method. OS authentication is the system log on credentials for a domain user.
It requires the domain user name of a user connected to the LDAP Server or
Active Directory (see below). EIQ Server
authentication creates an EIQ Server specific log on. If EIQ Server
authentication is selected, create a user names and enter a password for the
new user. This demonstration creates an EIQ
Server authenticated user. The new user appears in the right pane after clicking ‘OK’. Users can be grouped into specific roles that grant
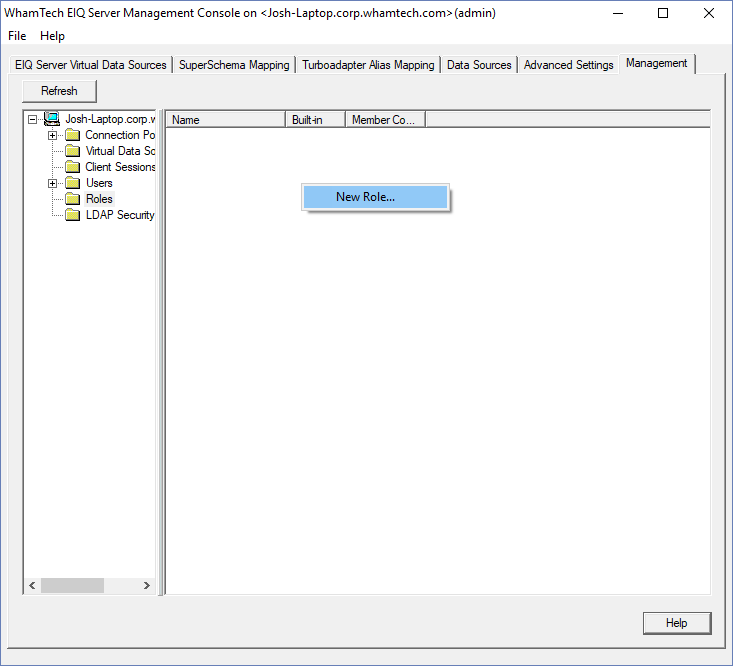
permissions to specific data sources, virtual data sources or tables. When a
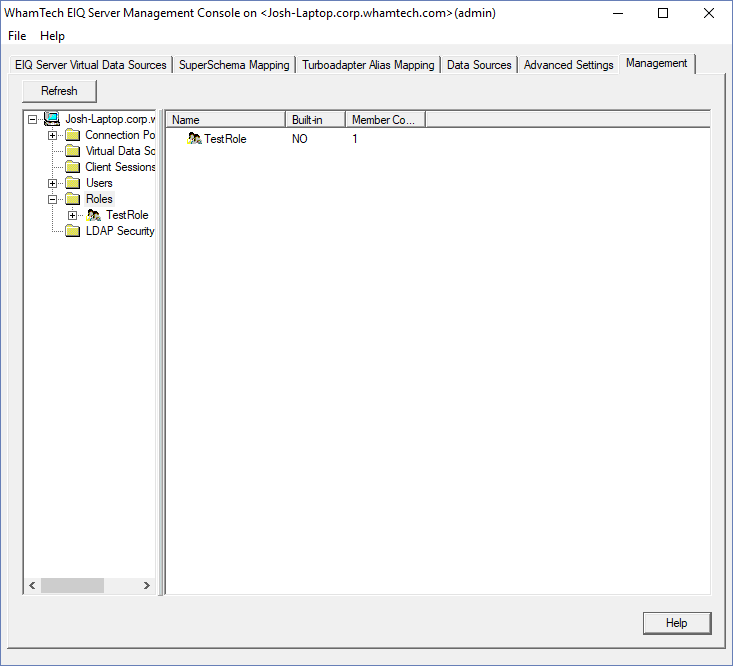
new role is needed, click the ‘Roles’ folder in the left pane of the
‘Management’ tab. This screen shows admins the names of all the roles, whether
or not the role was built into the product or not, and how many users are part
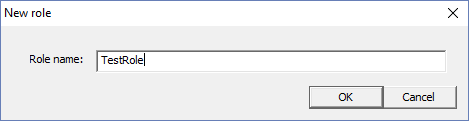
of that role. Now, right-click and select ‘New Role’. In the ‘New role’ window, type the name of the new role. Then
click ‘OK’. The new role now appears in the right pane. This window
displays the name of the role and the number of users that are members of that
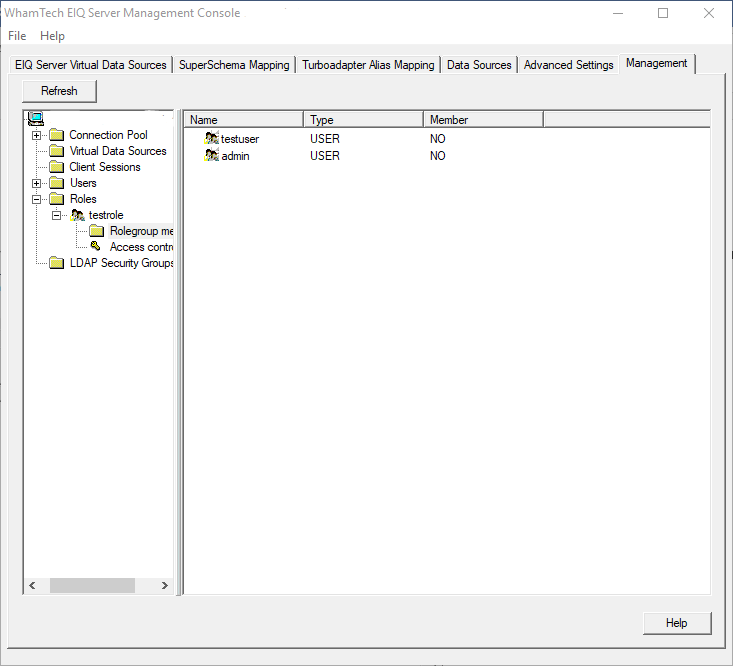
role. Once
a role is created, Users can be added to the roles. This is done by expanding
the specific role tree in the management tab and going to ‘Rolegroup
Members’. This
will list all of the available user that can be added to the Role. Right-click
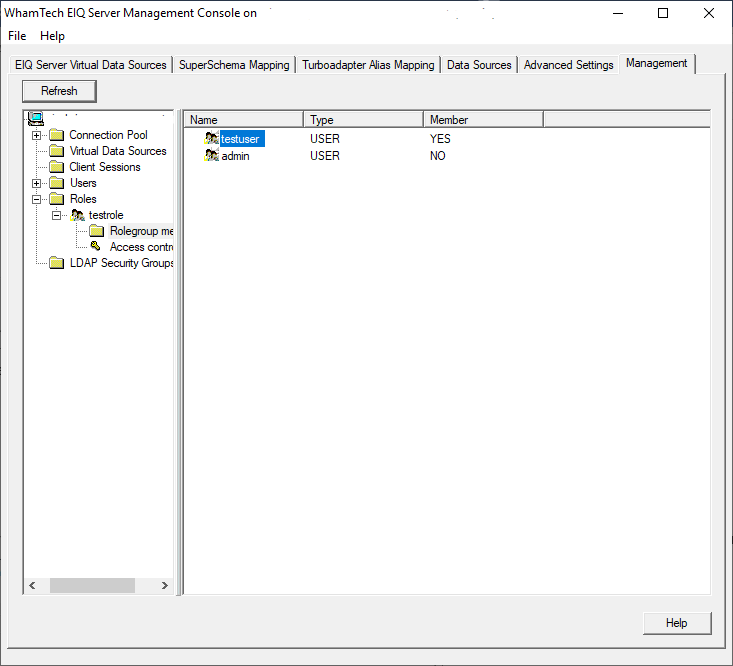
the desired users and select ‘Add…’ from the context menu. The
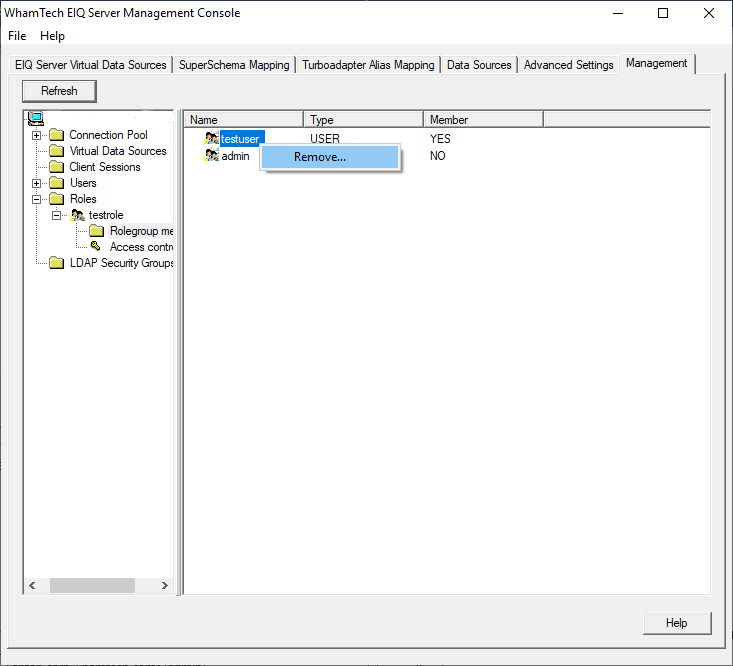
‘Member’ column will update to show the user is now a member of this role. This
same screen is also used to remove users from roles. Right-click the users that
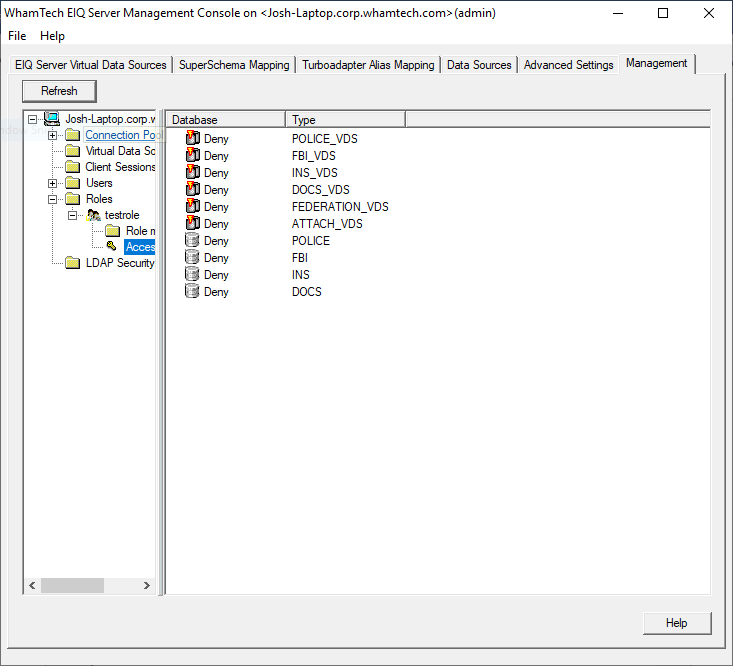
need to be dropped from the role and select ‘Remove…’ from the context menu. Through role-based security, sysadmins can set and alter
what users and roles have permission to access and view. These settings can be
viewed and changed using the ‘Access control’ menu item under the expanded user
tree or role tree. The first thing you need to do is give the new role access
to the POLICE_VDS. Go to ‘Access Control’ under the role tree. This is required
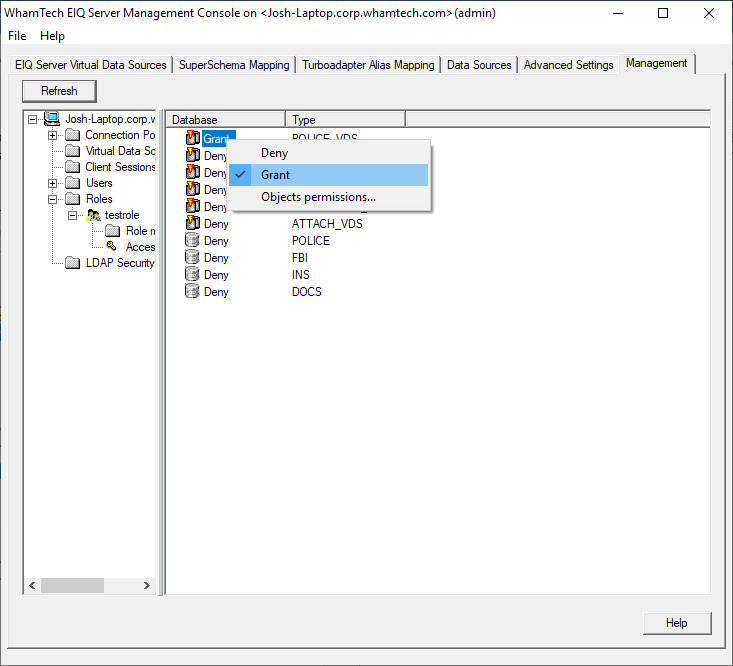
for a new user to query the index. Right-click the POLICE_VDS node and select Grant. This
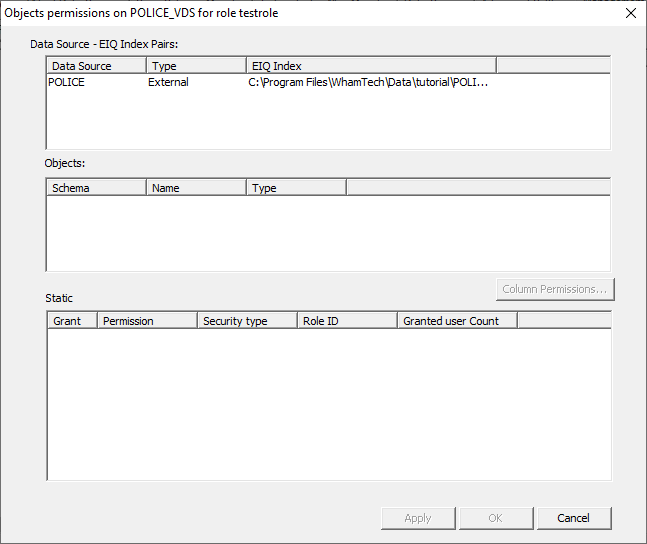
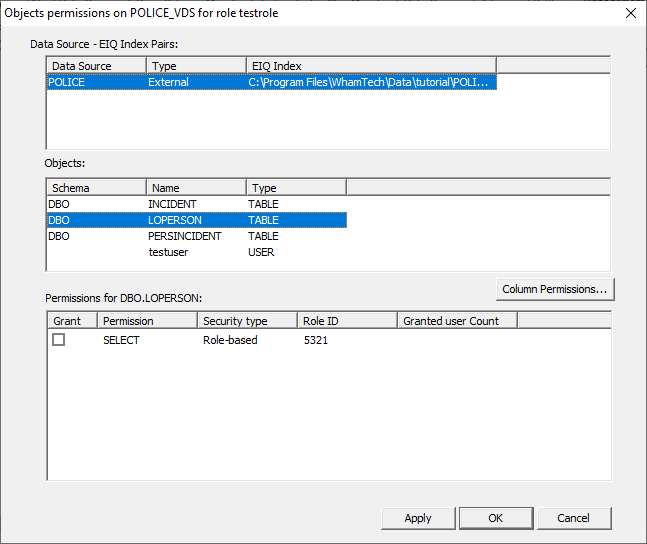
grants access privileges to all users in the role to the VDS. Once a role is granted permission to the VDS, the object
permissions become available. Double-click an item to open the ‘Object
Permissions’ window. This dialog displays three boxes; the Data Source- EIQ Index
Pairs, an Objects box (which is the tables in the specific index selected or a
role that already has predetermined permissions), and a Static box (which is
the permission the users have). The sysadmin needs to select the desired
pairing, the table they want to add or remove a permission from, and the
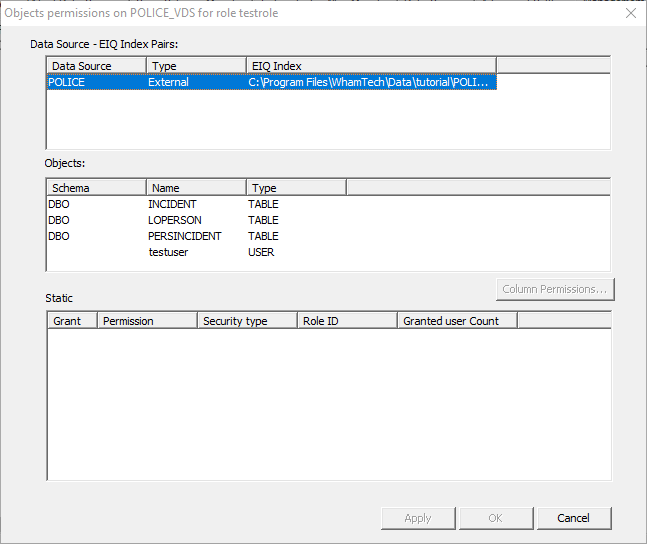
specific permission. The POLICE index pairing shows you the three tables that
were indexes, their names, and the schema associated with them. Other
information like roles and users can also appear in this list, if they are
associated with the pair. Select one of the specific tables to see the grant
permissions. This presents the option to grant
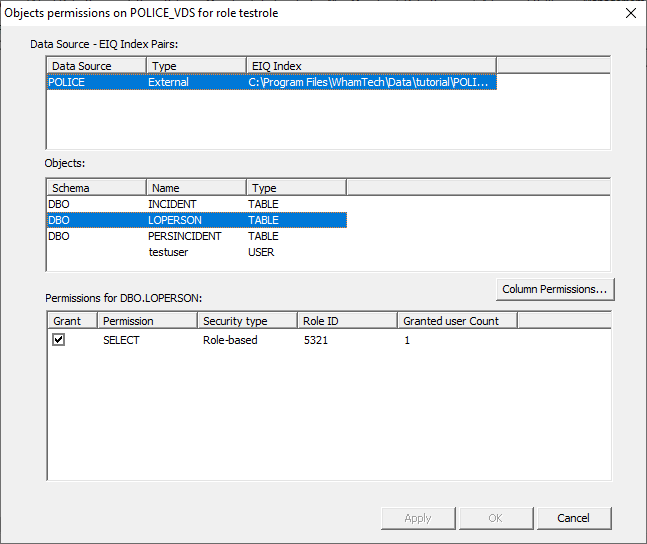
SELECT permissions for the LOPERSON table to the TestRole. Check the box in the ‘Grant’ column to provide the
permissions. The security type shows the current access setting. Role-based
means that the privilege is currently assigned to a named role. Grant-based
means that the privilege has been granted to a user. Not granted means the
privilege has not been granted to a user. The Role ID shows the ID of the role that has the privilege.
The Granted user Count shows the number of users that currently have that
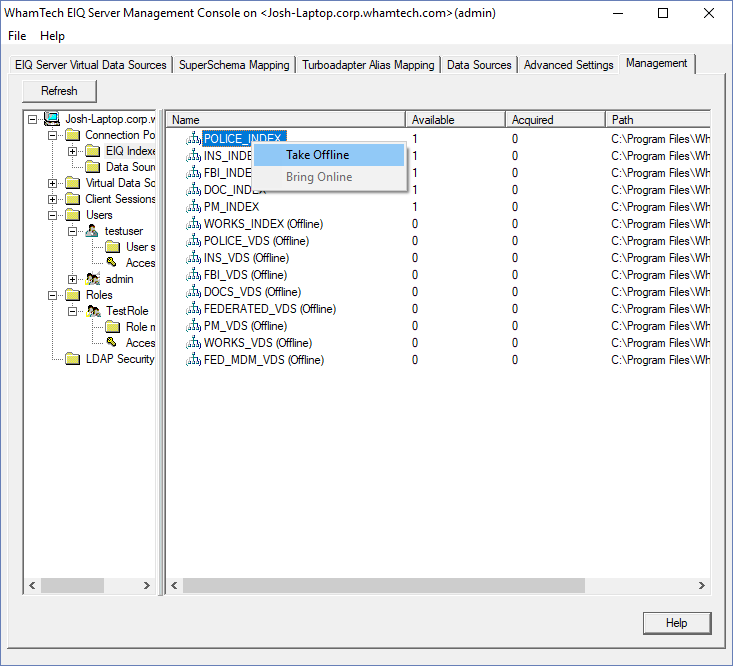
privilege. The Role ID will not update automatically, and by default
appears as 0 because a role has yet to be assigned privileges. For this to
update, you will need to take the index offline and then bring it back online.
This can be done in the management tab as well. Returning to the ‘Object Permissions’ window for the
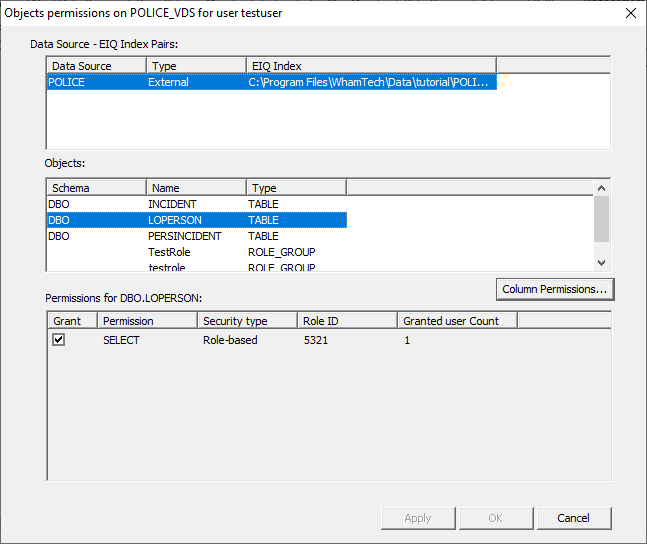
POLICE_VDS will now show the updated Role ID. Object permissions can also be viewed for a specific user.
Once the user is granted permission through the role, double-click the item to
open the ‘Object Permissions’ window. This window shows that the current user is a member of the testrole with access to the loperson
table. Column permissions can be configured on the user level or
the role level, depending on need and how access privileges have been configured.
If a user is assigned to a role, column permissions cannot be configured on the
user level for that user in that particular VDS or data source. In this
example, configure column permissions for the POLICE_VDS on the role level. ·
Open the ‘Object Permission’ window for the
POLICE_VDS under the ‘TestRole’ access control. ·
Select the POLICE index pairing and the LOPERSON
table. ·
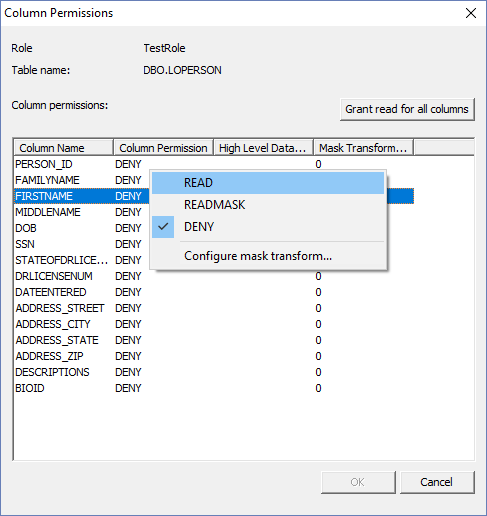
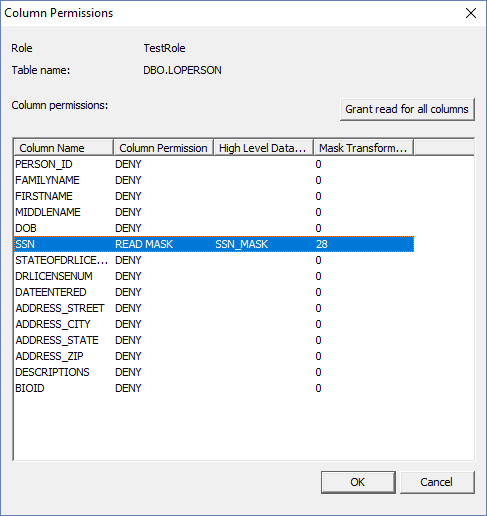
Click ‘Column Permissions…’ There are three different permissions that can be assigned;
READ, READMASK and DENY. READ gives full reading permissions to that column.
READMASK gives read permissions, but the column will have a configured mask for
the user. DENY will remove read privileges for that column. All columns are set
to ‘DENY’ by default. You can either grant read for all columns at the same
time using the specified button, or you can grant read permissions manually by
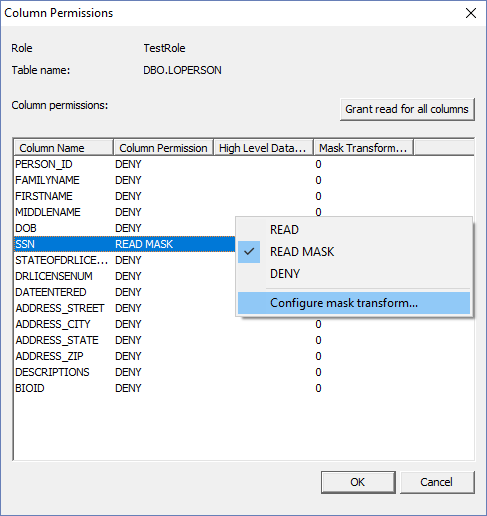
right-clicking the columns and selecting READ from the context menu. There is also an option to configure masking transforms on
columns. For example, set the social security number column to READMASK. Then select ‘Configure mask transform…’ from the context
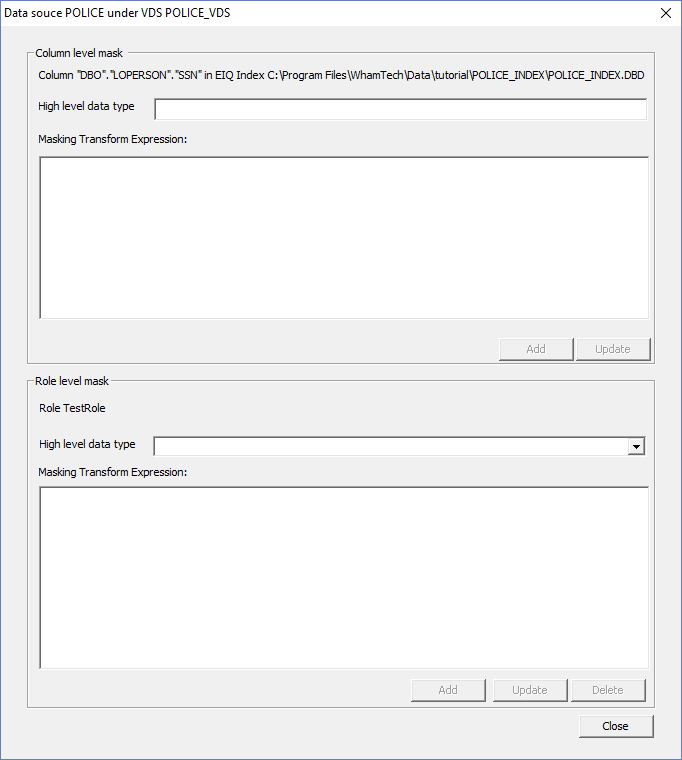
menu. This opens the Mask Transform Configuration window. There are two parts to column mask transforms. 1.
High-level data type: which is a name associated
with the combination of a low-level type and a business rule or legal
requirement. 2.
The transform body: which is an arbitrary SQL
expression that applies a business rule or legal requirement to the value of a
column. There are three levels of masking. ·
Level 1: User-Level Mask ·
Level 2: Role-Level Mask ·
Level 3: Column-Level Mask – required and default The column-level mask is the default transform and must be
defined in order to apply mask transforms. It is replaced by a role-level mask
if a role-level mask with the same high-level data type exists. The role-level
mask is replaced by a user-level mask if a user-level mask with the same
high-level data type exists. A Mask Transform is an arbitrary SQL expression that applies
a business rule or legal requirement to the value of a column. Here, the
sysadmin can define the transforms. The example transform defines a mask for
the SSN column for the TestRole. This is helpful when
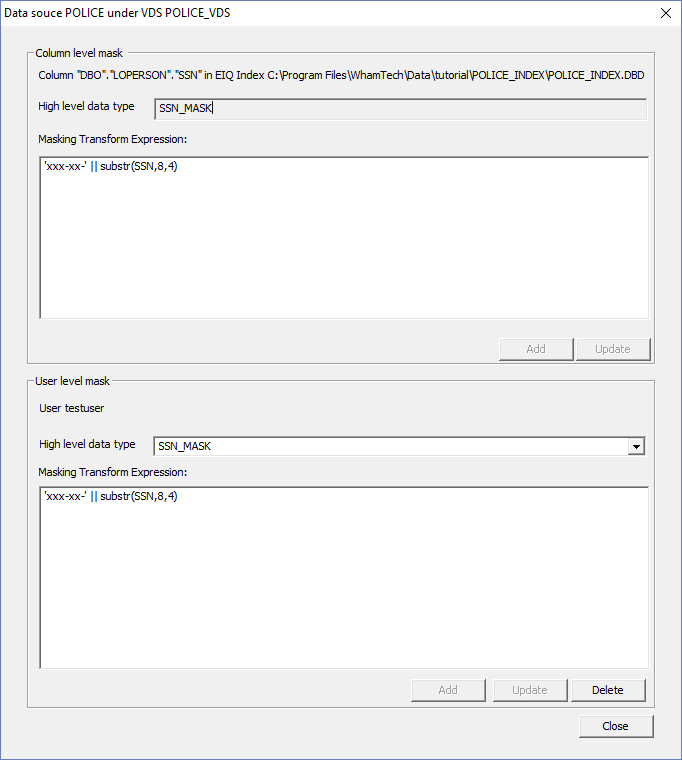
trying to limit who sees classified or valuable information. As the name, enter SSN_MASK. Then, input an arbitrary SQL
expression to define the mask. Use ‘xxx-xx-‘ || substr(SSN,8,4).
Click ‘Add' to add the data type and the expression when finished. Then, go to back to the access control for the ‘testuser’ and configure the same expression on the user
level. You’ll notice that the expression already appears under the ‘Column level
mask’. Copy and paste it into the ‘User level mask’. Click ‘Close’. The mask information now appears in the
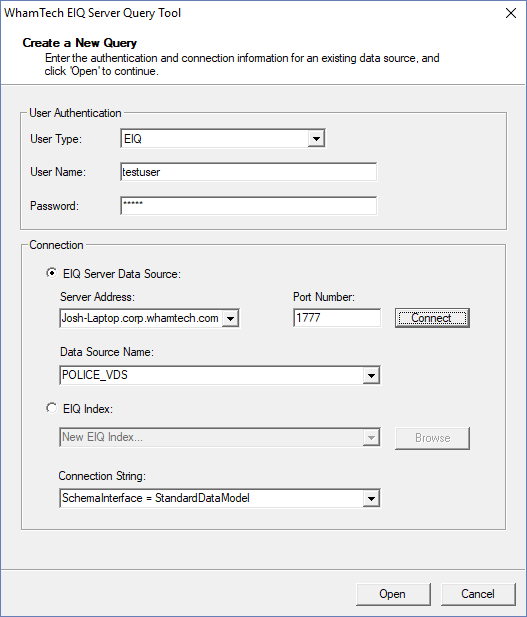
‘Column Permissions’ window. With role-base security set up, you can go to the EIQ Server
Query Tool and test it. Open the tool and log in with the credentials for a
user with the ‘TestRole’ role. Connect to the POLICE_VDS
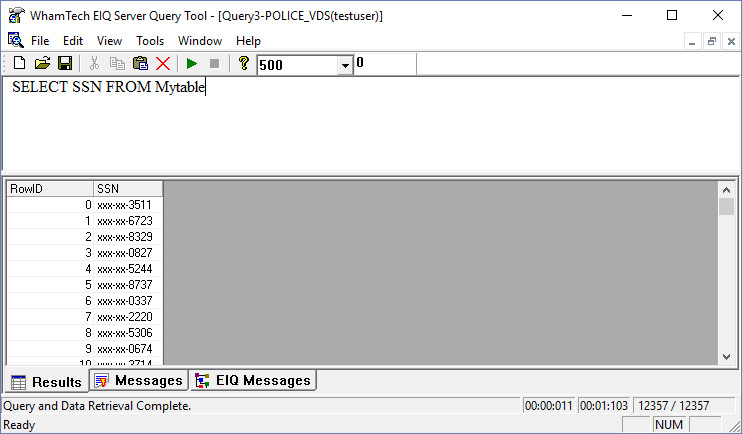
and select ‘SchemaInterface = StandardDataModel’. Now, query for the SSN information from the POLICE_VDS. Use
the query ‘SELECT SSN FROM Mytable’. The social security numbers in the LOPERSON table are
now masked for the user ‘testuser’ until the sysadmin
changes the privileges for that user or the role that user is assigned to. The above features focus on securing data by masking the
data based on users and roles or just denying access to a table or index all
together. Another data access control feature provided by the EIQ Product Suite
is Row-level security. Row-level security enables administrators to control
access to specific rows in a database table based on the user executing the
query. What differentiates this method of security is that users can still
access all of the tables, but specific rows are hidden to them defined by a
view that preforms a security check based on user attributes. Nurses can only
see their patients’ data, department heads can only see the information for the
employees in their department, and etc. These queries can be SELECT, DELETE,
and UPDATE statements. For the EIQ Server, SELECT queries are enforced by Row-level
security(RLS) on the EIQ Index, filtering the results to match the users
performing the query. DELETE and UPDATE queries are enforced at the data source
level. SELECT queries need to be enforced by RLS because that is where the
everyday users are mainly interacting with the product. This enforcement is a
security predicate that is automatically applied to any and all queries on a
table and defined through CREATE | ALTER | DROP SECURITY POLICIES that create,
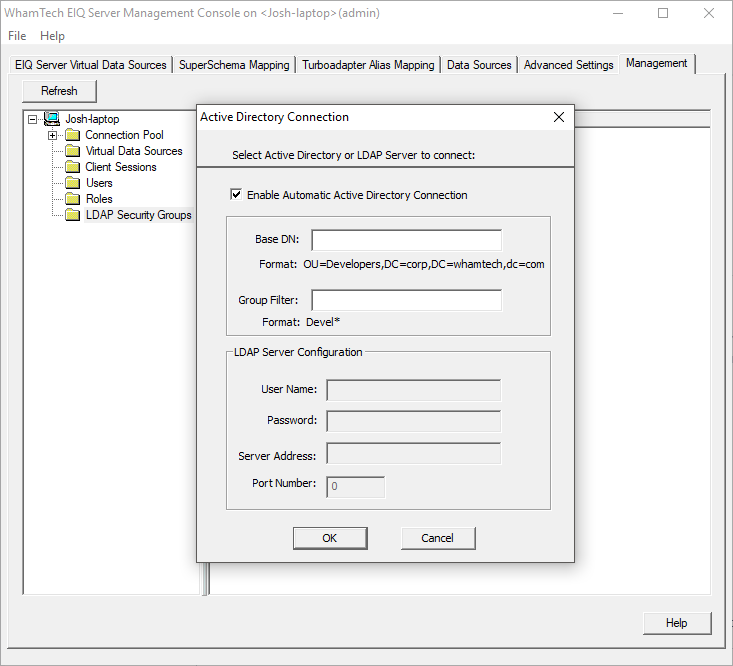
change, or delete security predicate functions. In order to define row level security views, the admin needs
to specify an active directory connection or connect to an LDAP server. This
can be done through the Management tab. Expand the machine node and select ‘LDAP Security Groups’.
This will open a new window. This window lets the admin either tell this EIQ Server
instance to connect to the Active Directory on this machine or connect to an
LDAP Server. This specification is important because creating a filter uses
either an Active Directory or LDAP server to obtain the user attributes.
Deselect ‘Enable Automatic Active Directory Connection’ to configure an LDAP
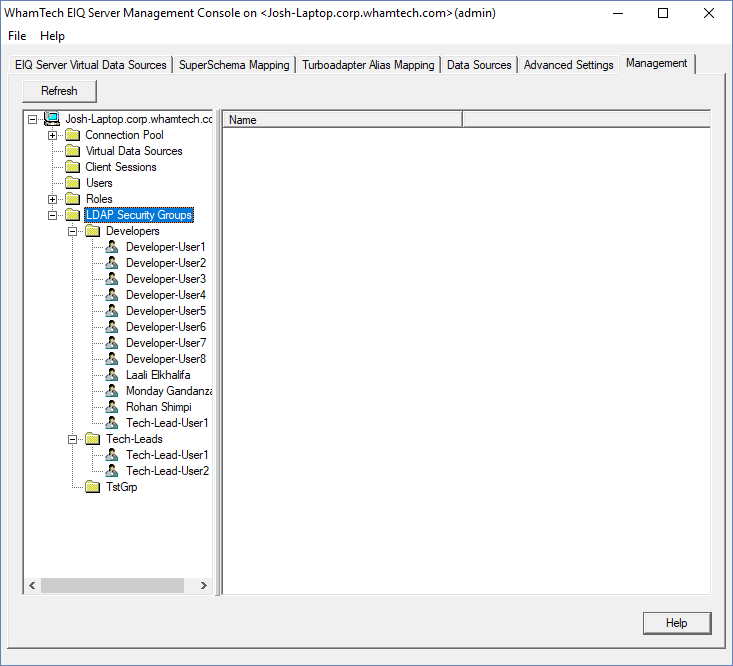
server instead. Use the example format to connect to an active directory. OU=___________,DC=________,DC=________,DC=_________ A dialog appears if the connection is successful. The LDAP Server Configuration folder will now show users and
user groups. In another document we’ve established creating new users with OS
Authentication. This section also gives administrators another way to create
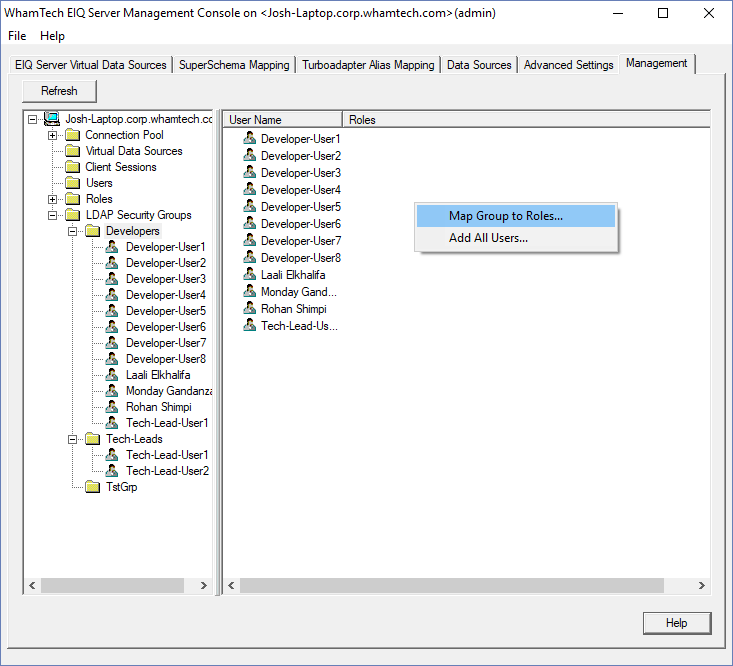
new users. Selecting a group folder displays the users in that group in
the right pane. Right-clicking in this pane will give administrators the
option to map the group to roles or add all users to this group. Select which
action you want to take from the context menu. The same options are presented
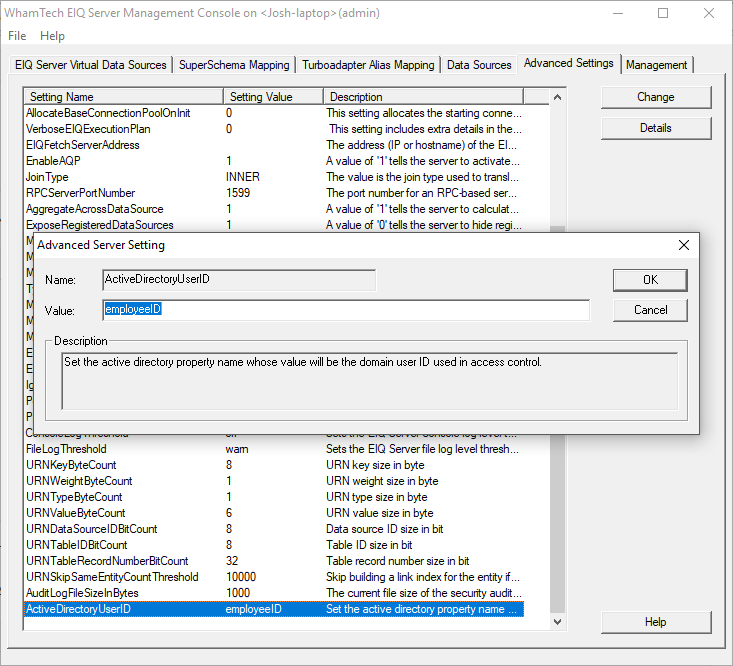
in every group folder. The Advanced Settings tab allows the admin to set the Active
Directory property name that will be the domain user ID during access control.
Double-click this setting to edit or change which property name will be the
domain user ID. This tab can also preconfigure the active directory property
name attributes. This helps reduce memory usage because instead of the EIQ
Server and EIQ RTIS sending a request to the LDAP server every time, these
attributes are stored. Stored attributes are found in the registry under EIQServer/ADAttributes. Move attributes from the left side of the dialog to the
right side using the arrow buttons. Press ‘OK’ to save those attributes in the
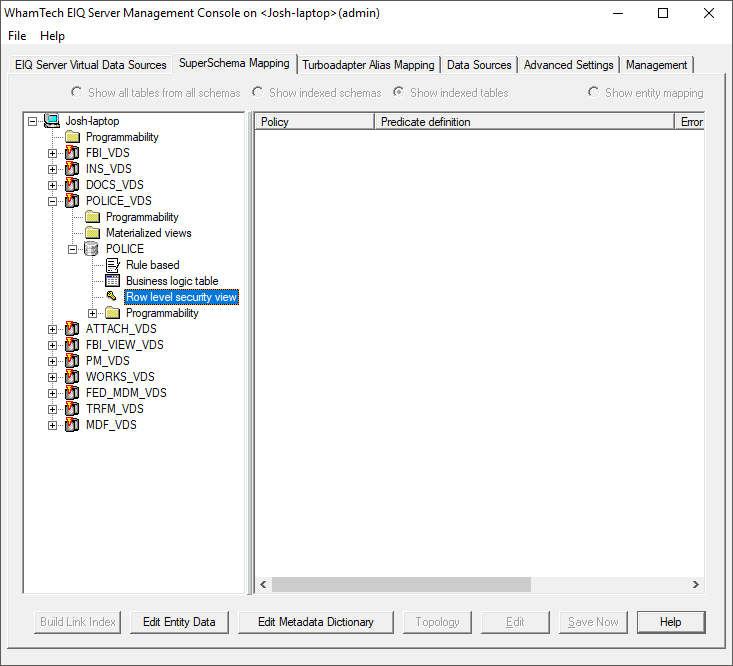
registry. The SuperSchema Mapping tab provides
the means to configure row-level security. Expand the VDS and Data Source nodes
to find the option. The admin can use this window to define a non-material view
as a SELECT statement where user characteristics are used as the filter to
isolate records that user is allowed to access. This non-material view is then
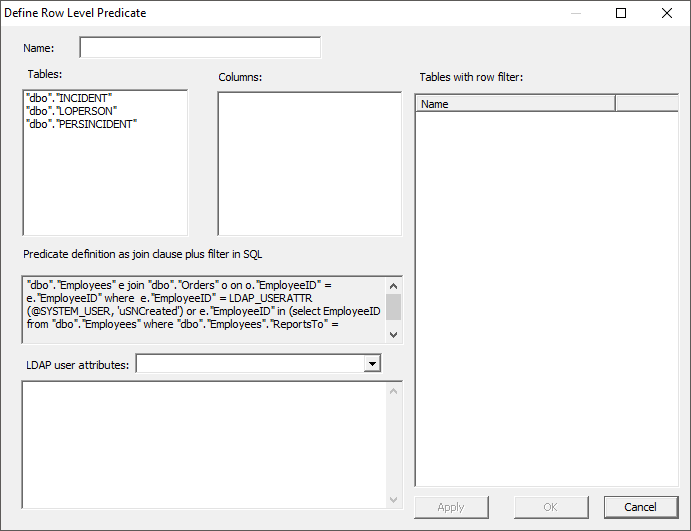
joined to the desired table in an EIQ Index. An example statement is: Select * "dbo"."Employees" e join "dbo"."Orders" o on o."EmployeeID" = e."EmployeeID"
where e."EmployeeID"
= LDAP_USERATTR(@SYSTEM_USER, 'uSNCreated') or
e."EmployeeID" in (select EmployeeID from "dbo"."Employees"
where "dbo"."Employees"."ReportsTo" = LDAP_USERATTR(@SYSTEM_USER, 'uSNCreated')) LDAP_USERATTR(username, attrbutename)
is a built-in SQL function that fetches the user attribute from the active
directory. Username is the user name in the active directory and attrbutename is the user attribute defined in the LDAP.
This definition is stored in the SYS#_VIEWS table with the view type RLS_VIEW_SELECT to differentiate the
indexed view. An enum of the view type is
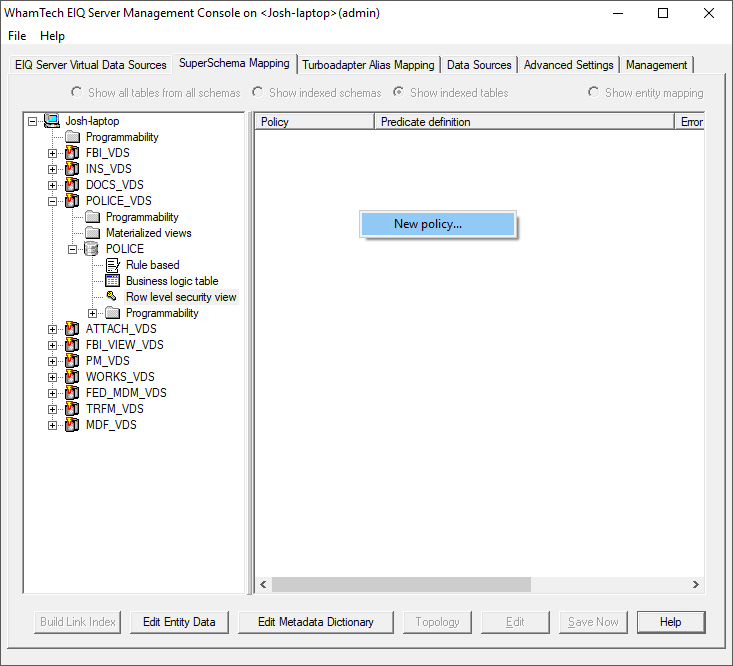
defined in ..\Common\include\tbdrv\tbdrv_schema_defs.h. typedef enum SYS_VIEWS_TYPE { INDEXED_VIEW = 0, RLS_VIEW_SELECT = 1, RLS_VIEW_DELETE = 2, RLS_VIEW_UPDATE = 3, }SYS_VIEWS_TYPE; Define a new policy by right-clicking the right side of the
tool and selecting ‘New policy...”. This will open the “Define Row Level Predicate” window. This window presents users with the available tables in this
data source and the selectable LDAP user attributes. Enter a name for the new
policy and begin selecting the tables and columns that this policy will cover.
When a table is selected in the ‘Tables’ dialog, the list of available columns
will appear in the ‘Columns’ dialog. The ‘LDAP user attributes’ drop-down menu
will show the available user attributes to filter on. Press ‘Apply’ when you
have completed defining the predicate; all of the filtered tables will then
appear in the ‘Tables with row filter’ dialog. Once the predicate has been
created and applied, you can close the window. The new policy now appears under
the ‘Row level security view’ menu. Once a policy is created, users can go back and edit them if
they need to. Right-click the policy and select ‘Edit’ from the context menu to
open the same ‘Define Row Level Predicate’ window as before. When you finish
making changes, make sure to click ‘Apply’ again so the appropriate tables with
a row filter appear in the far-right dialog. Then click ‘OK’ to close the
window. Because we define these policies on the EIQ Index level, the
security check is passed through to the adapters and any federation server. No
matter how the user tries to connect to the data source, if they are going
through an EIQ Index they will only see the filtered tables. Row level security
needs to be defined for each domain user that uses the tables.Security and Access
EIQ
User Groups
Creating
an EIQ User


Creating
a New Role
Adding
Users to Roles

Configuring Role-based
Security
User Permissions
Configuring Column Permissions

Querying
with Role-based Security
Row-Level Security
Active Directory and LDAP


Configuring Row-Level Security
Copyright
© 2023 , WhamTech, Inc. All rights reserved. This document is
provided for information purposes only and the contents hereof are subject to
change without notice. Names may be trademarks of their respective owners.