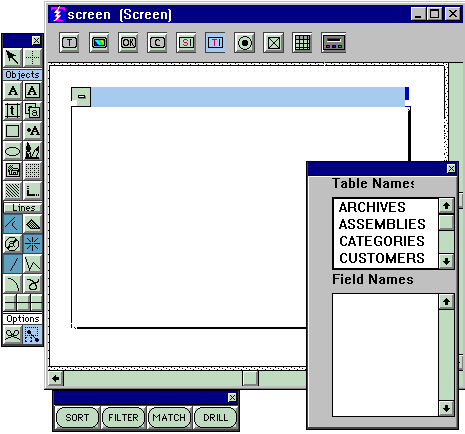

A two-part list object pops up alongside your definition. The top half has all of the table names in the data base. The bottom half will show fieldnames as soon as you select one of the tables.
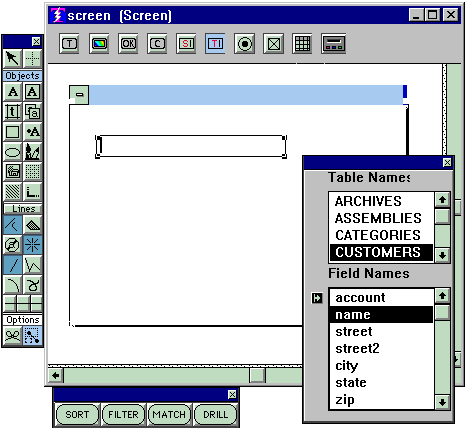
For this example we selected CUSTOMERS, and the fields from the Customers table appear in the bottom half. The idea is to select a field from the field list, then go click inside the frame. You will see something similar to Figure 2, shown below. The control to the left of "account" tells you that field has either an alias or is broken into sub fields, or both. Click on that control and you see the breakdown.
There are some important things to note:
The most important is that this is the preferred way to get your transfer fields. (It is not a good idea to use the click, click, click duplicating method to generate multiple transfer fields.) Two things happened here:
First, the name of the field is known, and it will already be in the field properties when you see them.
Second, the size generated for the field is correct since we know what size the field is. (For large fields like x(200) a box that will show the first 40 or so characters is generated, then later when the user enters data, it slides within that box in order to contain the full size.)
Figure2

So when you are placing transfer fields, click in the fieldname list, then click in the frame. Repeat the process for the next field, and so on. Do not worry about how the fields line up. You can do gross alignment, no need to be exact, later you will use the grid
to line them up.
Field Labels
Use Text Objects
to label each of the transfer fields.
Field Properties
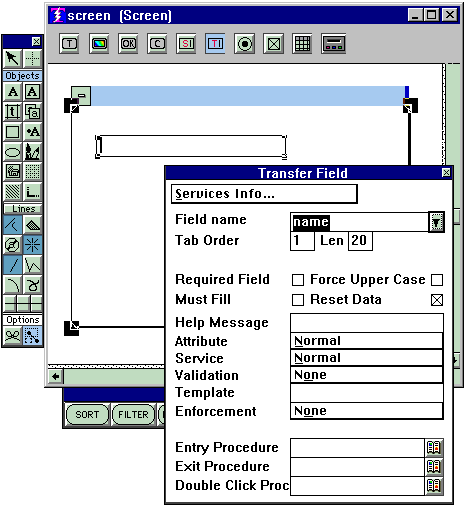
To get properties for your transfer fields, put the cursor anywhere inside the field and right-click. You will see:

The name is known. You can change this if you want, but be advised that the size may no longer be correct for a different name. The little control to the right of the name is to get the two-part list of Tables and Fields back in case you had closed it.
The length is known. If you change the name to a different one you will note that the length changes also, but the size of the box does not.
Tab Order is the order that the cursor will visit fields when the screen is in use. The default Tab Order for screen types 1 and 3 is the order in which you created the transfer fields.
If you want to insert a new field between two existing fields, look at the Tab Order of the field that will be just before the new field. Then change the Tab Order of the new field to be one greater (you will observe that before you change it, it was slated to be last in order), all the others will automatically resequence.
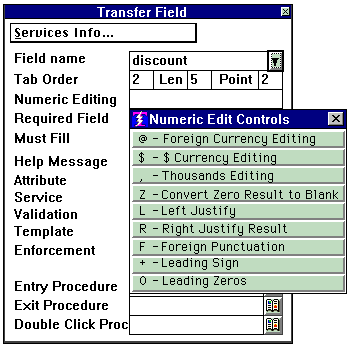
When the transfer field is numeric, another property, "Numeric Editing," appears just after tab order. This is where you can specify extra editing to dress up the display of numeric fields with things like right justification, comma or currency editing, etc. Each of these specification is done with the single character indicators shown below. To request an indicated edit, put that charater in the "Numeric Editing" field in any order with respect to any other edit characters you put there.
The remainder of the field properties, The Validation and Special Procedures sections, is discussedin the topic "Field Services
."

Copyright © 2019 , WhamTech, Inc. All rights reserved. This
document is provided for information purposes only and the contents hereof are
subject to change without notice. Names may be
trademarks of their respective owners.