
![]()
OpenSSL
Version 8.0.0.490
Generate Self Signed SSL Keys and Certificates Local and Remote Client Configuration Launching GUI Clients with SSL Launching CLI Clients with SSL OpenSSL is used in applications to create secure
communications over computer networks and inhibit eavesdropping. It is also
used to ascertain the identity of the client at the other end of a connection. SDF uses OpenSSL to enable secure communications across SDF
server and client modules. Client module
here also includes EIQ Server instances communicating with other remote EIQ
Servers. The following steps need to be followed to enable TLS/SSL
communications between SDF client and server modules. The first step is to download and install OpenSSL for
Windows. Once installed, make sure the path to the .dll
files are added to the %path% environment variable for the Windows user
account. Next, open the command prompt. Type the command "openssl --version" to check if OpenSSL environment
variable is set up correctly. If the command works, proceed with creating a
working directory. Now that the directory has been changed, use OpenSSL to
generate a key and certificate. Create a script (Linux e.g. createCerts.sh) or batch file (on
Windows e.g. createCerts.bat) in the working directory with the following
content: openssl genrsa -out ca.key 2048 openssl req -new -x509 -key ca.key
-out trusted.pem openssl genrsa -out key.pem 2048 openssl req -new -key key.pem
-out server.csr openssl x509 -req -in server.csr
-CA trusted.pem -CAkey ca.key -CAcreateserial -out cert.pem openssl genrsa -out clientkey.pem 2048 openssl req -new -key clientkey.pem
-out client.csr openssl x509 -req -in client.csr
-CA trusted.pem -CAkey ca.key -CAcreateserial -out clientcert.pem Go to the working directory and run the batch file. There are 3 sets of similar questions, listed below, to
answer. Answer the first set of
questions based on the information for the Certification Authority (CA) (such
as Verisign). Answer the second and the third sets of questions based on
the information for the organization running SDF servers and the organization
running SDF clients respectively. Note: Your actual
answers to these questions will not affect the ability to run SDF. Country Name [US] State or
Province [TX] Locality
Name [Dallas] Organization
Name [WhamTech] Organization
Unit Name [Whatever you want, such as Development] Common
Name [Maybe your machine name] Email
Address [Enter an email address] The output of the previous steps generates 5 files: Server Related Files ·
key.pem ·
cert.pem Client Related Files ·
clientkey.pem ·
clientcert.pem File needed by both Server and Client ·
trusted.pem The first 2 files (key.pem, cert.pem) strictly relate to the server. The next 2 files (clientkey.pem, clientcert.pem)
strictly relate to the client. The trusted.pem file
is needed both at the server and client side. Stop EIQ Server if it is running. On the client machine, create a ".eiq" subdirectory under user account's home directory: If client is not running on the same
machine as the server machine: If client and server programs are both
running on the same machine, clientkey.pem and clientcert.pem are not needed. Since, client is local to the server: The CSR is a simple text file which
begins with the header: -----BEGIN CERTIFICATE-----. It is followed by a section of cryptic text. It then ends with a footer: -----END
CERTIFICATE-----. If the client needs to connect to both the local and
remote server instances; then trusted.pem needs to include both the Certificate Signing Requests (CSR) for
each of the local and remote server instances. If the client needs to connect to multiple local or
remote server instances, the CSRs from each of the server that client wishes to
connect needs to be copied into the client's trusted.pem file. An example of a trusted.pem file where client is interested to connect to both
local and remote EIQ Server instances: -----BEGIN CERTIFICATE----- MIIDvzCCAqegAwIBAgIJAJN5DfI2Tlh8MA0GCSqGSIb3DQEBBQUAMHYxCzAJBgNV BAYTAlVTMQswCQYDVQQIDAJUWDEPMA0GA1UEBwwGRGFsbGFzMREwDwYDVQQKDAhX aGFtVGVjaDELMAkGA1UECwwCT1UxETAPBgNVBAMMCHdoYW10ZWNoMRYwFAYJKoZI hvcNAQkBFgdrQHYuY29tMB4XDTE5MDgyODE3MTY1OFoXDTE5MDkyNzE3MTY1OFow djELMAkGA1UEBhMCVVMxCzAJBgNVBAgMAlRYMQ8wDQYDVQQHDAZEYWxsYXMxETAP BgNVBAoMCFdoYW1UZWNoMQswCQYDVQQLDAJPVTERMA8GA1UEAwwId2hhbXRlY2gx FjAUBgkqhkiG9w0BCQEWB2tAdi5jb20wggEiMA0GCSqGSIb3DQEBAQUAA4IBDwAw ggEKAoIBAQCU7tNSDIlR6CIh2VYnfZIhmCaRI1kAV8BZMaRkR34P+i2PSaQU5MGA kCwmKDKtDqSXvWwzc8hBgpbVMaIh3d2NYOMTDAPShtCieDwO4AHN0J2pb3YUQboP pBvHDryNdN1ecxixJTK9JdoL+/JlGEw5rA0yz7NTcuQdib35CKEapf7IILsnJM0Z 0bTyQPHgOGQSywduDs5gYOVQ2VepsCKp9AGKoTzvTltLOYHYysZg4kL4haB/JCSd e1ZtkrYHmx9CTKlWrgnqWrqAHVtl9N0jYeLuU6pHMIZTsHyXMQrs1Xp+OmmvonwB 5wgypWANOyeYpv/l8uCy7eLkUR5Mogo7AgMBAAGjUDBOMB0GA1UdDgQWBBR06LGK j41FSyGpSMYE9MlEGRTPpjAfBgNVHSMEGDAWgBR06LGKj41FSyGpSMYE9MlEGRTP pjAMBgNVHRMEBTADAQH/MA0GCSqGSIb3DQEBBQUAA4IBAQCDqnieFspcDN3ALlVV bIaUEitYc8uGFuEFD0WnLjf6a/HBWcsRSsnVqztRYNDpOual6GZ98x1cKSP98ROE erLidzzqtiOmBWsxozBGB1n0m70VkFa6oJz1ZaW1831u+Ua+tXUy1qbZs/KsMqjr L2L2rr3TnBxNvKJcRUk77EvMBNzEysjpgsnc+/fHK36LD7jCicklsBq6hZW5Unp7 kpIMMUIZiF7EZIw3Ord60ri1VeFRmDo+Ymdd9ugbAxAgTmvRyTBwfpKECV2UIG/c FsqE9PLm7zoLpUuVKfcRB93ze2zxjnK5F3XcoHtruO0xoJrOWCs19sj/R3HzmS/n r+zc -----END CERTIFICATE----- -----BEGIN CERTIFICATE----- MIIDwzCCAqugAwIBAgIJAL3dRH5DNkOqMA0GCSqGSIb3DQEBBQUAMHgxCzAJBgNV BAYTAlVTMQswCQYDVQQIDAJUWDEPMA0GA1UEBwwGRGFsbGFzMREwDwYDVQQKDAhX aGFtdGVjaDELMAkGA1UECwwCQ0ExCzAJBgNVBAMMAkNBMR4wHAYJKoZIhvcNAQkB Fg9jYUB3aGFtdGVjaC5jb20wHhcNMTgxMjA1MjA1OTQ5WhcNMjEwODMxMjA1OTQ5 WjB4MQswCQYDVQQGEwJVUzELMAkGA1UECAwCVFgxDzANBgNVBAcMBkRhbGxhczER MA8GA1UECgwIV2hhbXRlY2gxCzAJBgNVBAsMAkNBMQswCQYDVQQDDAJDQTEeMBwG CSqGSIb3DQEJARYPY2FAd2hhbXRlY2guY29tMIIBIjANBgkqhkiG9w0BAQEFAAOC AQ8AMIIBCgKCAQEAr0irFq1HWVUOD4djSyPTE90Qz7iSO/qBm4SmiQq092YFuN2y Rk5KQnjicINomPCIjPkHSQGMsCX9Z2vvMu2NIqIuQoazT1e9hnvw1hsEqq5fbyA7 +Ay077SLTOyMlbkqC23PPsiG6ZlJArAyKhqL1jkA2ND7HNitOQWmikhGGfaomsVc OV/IZrDe/VL7HbAFw2qaeYgF8fgEIf7EdTn/Pq6Rpa5ckO/8FwisXsBdt6VWztK9 IlqWb7Df724zhWAFmSqmZxVwXXbwqiWippgucnyzNi5042L0mM6mOKGseKzu83W5 39ZPAzh3XHVf+Lr4mW/EZMXvld5iYHJIxuUa7QIDAQABo1AwTjAdBgNVHQ4EFgQU 7ZXeeeAjEeO51jRJruQ4HccAVyQwHwYDVR0jBBgwFoAU7ZXeeeAjEeO51jRJruQ4 HccAVyQwDAYDVR0TBAUwAwEB/zANBgkqhkiG9w0BAQUFAAOCAQEAeV9bi1zQwLeM J4diAVBk75k/ZL/lhp2sFgtNkciT7ihFVh/nT4AfG2su95b9KeEMgLhYq3QKURjh 7iuAks4aDI/ml9tu/Ot6samR9n0TJskcJQwDioEwuXIXveafo5lJZMuUwDf1WiJO Ti82/hriLF78XUgllw8j8gXzuCB1rpYecbzb1z0RGueg4hXoe7ULEZRD5lWVfOrV RuYCzHbhgeOPFN7WKCtyCkIMCrmvlAAZXNoSEDCRBX9SciXJUg6fslXkH1ONX1vN 3YfPMhVqecwMCfbUwI5z/gvu2NgM1BovpU6CPJiI0p5onKW526bvJFpDIe/qtiJW QLVXe/EIQw== -----END CERTIFICATE----- Restart EIQ Server after making these changes. In the case of client tools with a
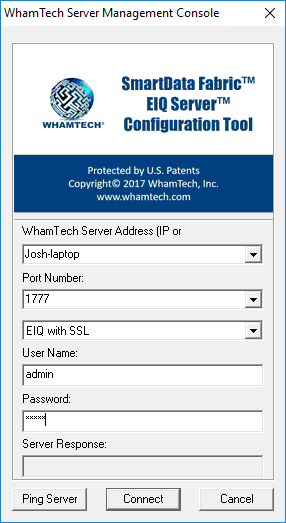
graphical interface, select 'EIQ with SSL' instead of EIQ from the user type
drop-down menu. As shown below, EIQ Server Configuration Tool has an EIQ with
SSL option. Figure 1: EIQ
Server Configuration Tool using ‘EIQ with SSL’ to log in. In the case of client tools with a command line
interface, use the "–usessl" option as
one of the argument to enable SSL communication between client and server. TLS/SSL in SmartData Fabric®
Overview
Configuration Steps
OpenSSL Installation
Generate Self Signed SSL Keys and Certificates
Pre-Configuration
Steps
Client Side Configuration
Remote Client Configuration
Local Client Configuration
Local and Remote Client Configuration
Post-Configuration
Steps
Launching GUI Clients with SSL
Launching CLI Clients with
SSL
Copyright
© 2023 , WhamTech, Inc. All rights reserved. This document is
provided for information purposes only and the contents hereof are subject to
change without notice. Names may be trademarks of their respective owners.