
![]()
EIQ RTI Tool Transformations
Version 8.0.0.490
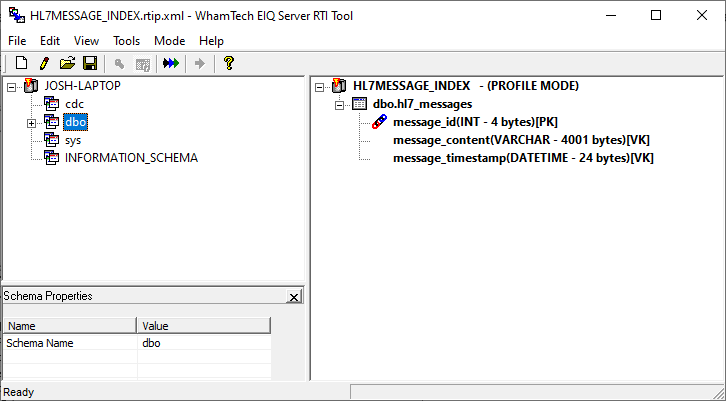
General Flow of Transformations Transformation Configuration Wizard Appendix A: RTI Transforms List (Need Updated ID’s and
Descriptions) One of the many
benefits of the RTI Tool is its ability to transform the data at the EIQ Index
level rather than transforming the actual source data. There are two
types of transforms, Table Transforms and Column Transforms. Transforms created
at the column level will apply directly to that column and replace the value in
the field. Transformations created at the table level may need a derived column
to output the transformation to. Typically, table transformations do not replace
the data source values and the input can be from virtual and non-virtual keys. Column level transforms can be applied in
both Profile and RTI mode while Table transforms can only be applied in RTI
mode. In this documentation, all transforms will be applied while in RTI mode. Transformations do
not have a hierarchy, meaning specific transforms do not take priority over
other transforms. Transforms are applied in the order that they are defined.
The transform order can be changed by selecting a transform and clicking ‘Up’
or ‘Down’ to move it. There is an
exception to the order transforms are applied. Data Source columns apply any
column transforms first and then table transforms. Derived columns always apply
the table transform first because it is populated or initialized by a table
transform. Derived columns also get the benefits of base column transforms plus
any transformations applied to the derived column itself. Selecting a transform doesn’t automatically apply it. The
parameters of the transform need to be edited using a specific configuration
wizard. Each transform has its own wizard, and can be opened through the “Edit”
button once a transform is selected. The transformation configuration wizard has many different
screens and functionalities based on the transformation being created and
applied. The next two sections will work through the available transformations
in the EIQ Server RTI Tool, how to configure them using the wizard, and what
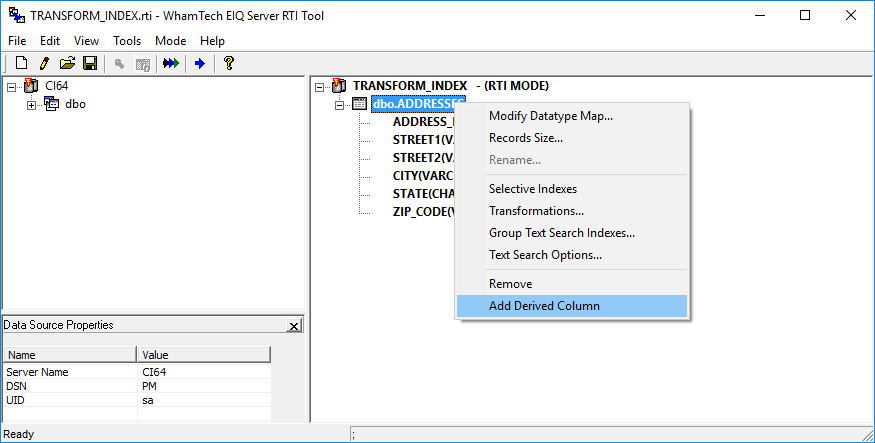
the results look like in a query. Before a table transform is applied, create a derived column
for the transformation output. ·
Right-click the table node and select ‘Add
Derived Column’. Derived columns are
seen while querying in either the SuperSchema or
native schema mode. In native mode, the column appears as it was named in the
tool. With a SuperSchema mapping, the column appears
as the mapped metadata dictionary column. ·
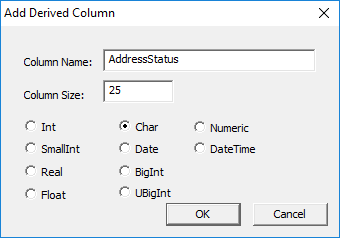
Create a derived column called ‘AddressStatus’ and set the data type as CHAR. Click ‘OK’. ·
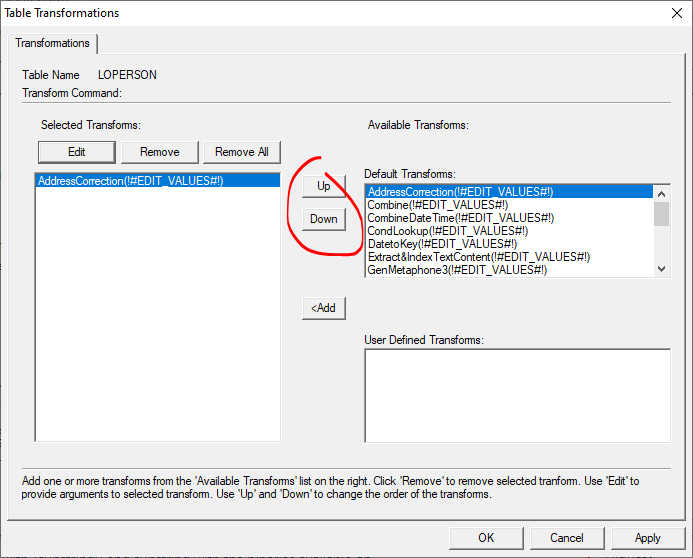
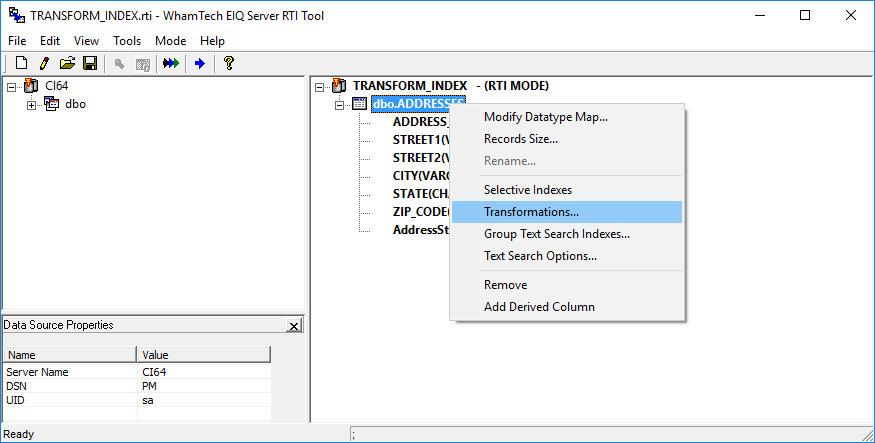
Right-click the table node and select
‘Transformations…’ This opens the ‘Table Transformations’
window. The transforms found here are different from the column transforms. The
process for adding a transform is exactly the same. ·
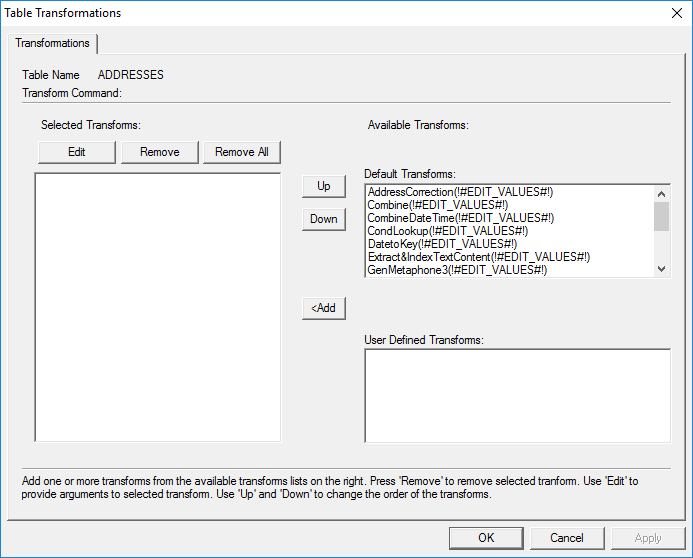
Select
the transform ‘AddressCorrection(!#EDIT_VALUES#!)’
from the list of default transforms. ·
Either
double-click the transform or click ‘<Add’ to move it into the ‘Selected
Transforms’ list. ·
Specify
the parameters of the transform by double-clicking it in the ‘Selected
Transforms’ box or by selecting it and clicking ‘Edit’. This opens the
‘Address Correction’ transform wizard. The following
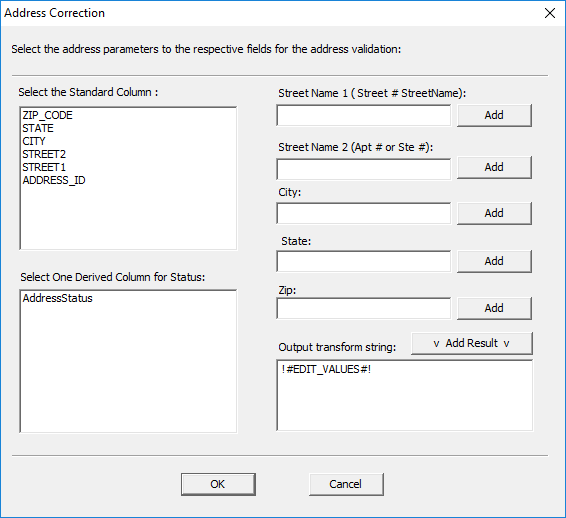
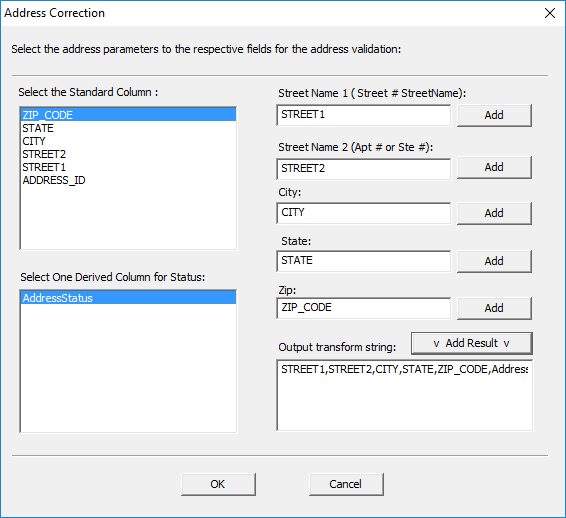
standard columns need to be added to their proper spots for the Address
Correction transform to work as intended. Select the standard column by
clicking it and then click ‘Add’ next to the field it needs to populate. ·
Add
‘STREET1’ to the ‘Street Name 1’ field. ·
Add
‘STREET2’ to the ‘Street Name 2’ field. ·
Add
‘CITY’ to the ‘City’ field. ·
Add
‘STATE’ to the ‘State’ field. ·
Add
‘ZIP_CODE’ to the ‘Zip’ field. Select the derived
column to output the transform. ·
Click
on ‘AddressStatus’ to select it as the output. ·
Click
‘Add Result‘ to create the output transformation string and apply it to the
table. ·
Click
‘OK’ The defined ‘AddressCorrection’ transform now appears in the Table
Transformation window. ·
Click ‘Apply’
to apply the transform and then click ‘OK’. The
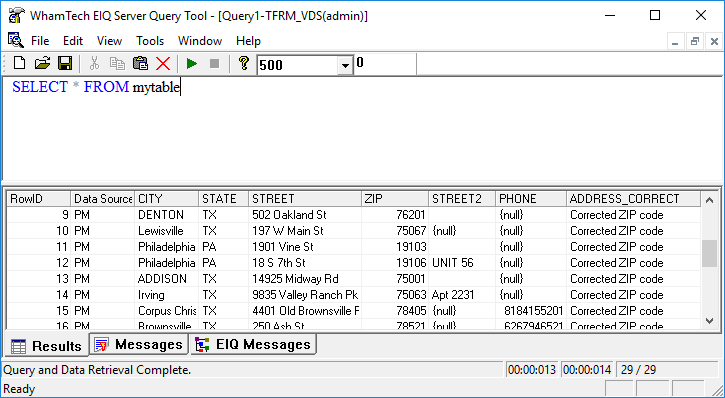
‘ADDRESS_CORRECT’ transform fixed some of the zip codes in the data at the EIQ
Index level and discovered that some of the street names in the data couldn’t
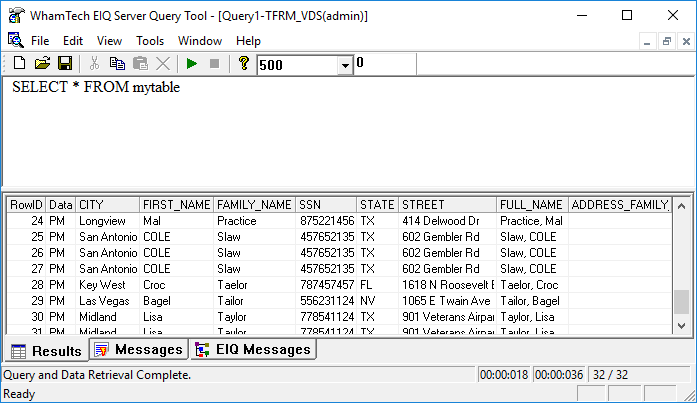
be found. If there are no issues, that record will show “No Error”. The combine transform will combine two or more columns into one single
column. ·
First,
create a derived column for the output. ·
Name
the column ‘Fullname’ and select the CHAR data type. ·
Click
‘OK’. Now, right-click the table node and select ‘Transformations…’. In the
‘Table Transformations’ window, select the default transform
‘Combine(!#EDIT_VALUES#!)’. ·
Double-click
the transform or click ‘<Add’ to select it. ·
Once
selected, double-click it again or click ‘Edit’ to specify the parameters of
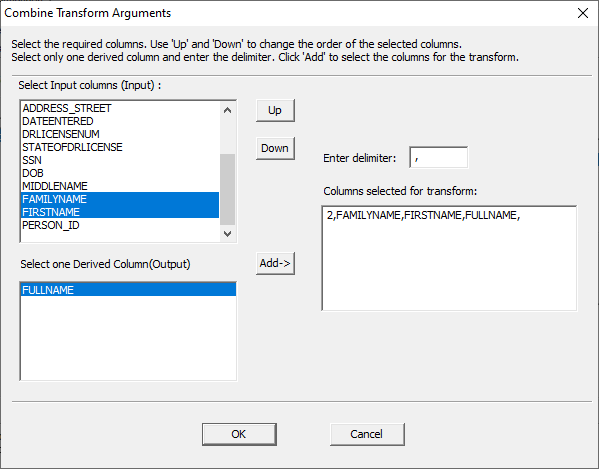
the transform. This opens the Combine Transform Arguments window. This transform requires at least one input column. These input columns
must be columns from the data source. This example uses two columns to create
the full name of a person in one column. Make sure to have the input columns
sorted into the order they need to appear. If FAMILYNAME is above FIRSTNAME,
the last name will appear before the first name in the transform. Use ‘Up’ and
‘Down’ to change the order of the input columns. The transform also requires one output column. The output column will
always be a derived column. Lastly, enter a delimiter. The delimiter is a user-specified character
that will separate the two columns. For example, if the user wants the data to
appear as ‘Burley, Jade’, they would use a comma as the delimiter with
FAMILYNAME above FIRSTNAME in the input column box. If the user wants the data
to appear as ‘Jade Burley’, they would use a ‘space’ as the delimiter with
FIRSTNAME above FAMILYNAME. ·
Once
everything is specified, click ‘Add->’ to create the transform string and
click ‘OK’. ·
Click
‘Apply’ in the ‘Table Transformation’ window to apply the transform. ·
Click
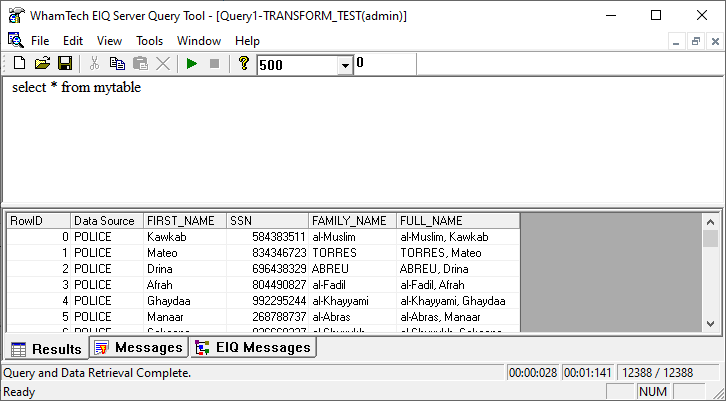
‘OK’. The derived column is mapped using SuperSchema
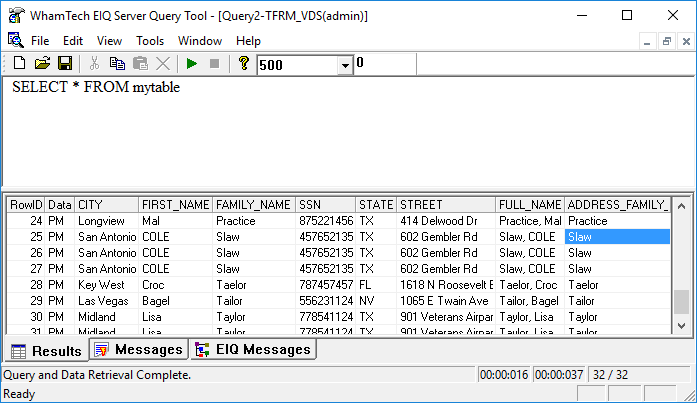
under the metadata dictionary column name ‘FULL_NAME’. When combining columns, it is okay to combine two or more columns that
have different data types. The output will always be a string. The systems
convert non-string data types to string during concatenation. This transform will
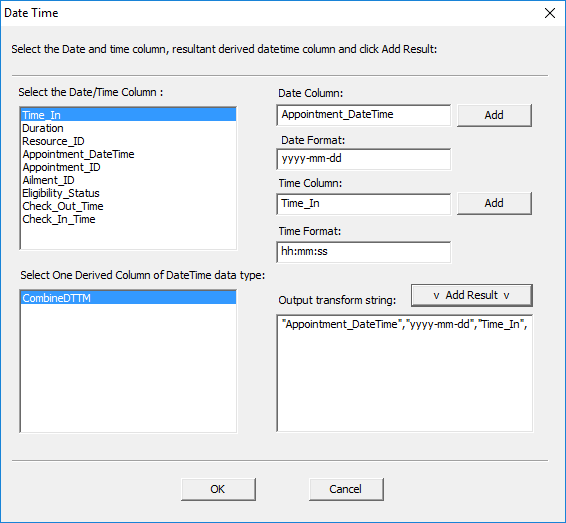
combine date and time columns in a specified format. ·
Create
a derived column called ‘CombineDTTM’ with the
DATETIME data type. ·
Right-click
the table node and select ‘Transformations…’ ·
Select
the ‘CombineDateTime(!#EDIT_VALUES#!)’ default
transform. ·
Double-click
the selected transform to edit the parameters. This opens the Date
Time window. ·
Specify
the parameters. ·
Click
‘Add Result’ to generate the output transform string. ·
Click
‘OK’ ·
Click
‘Apply’ and click ‘OK’ again. The derived column
must have the DATETIME data type to get the desired effect. This transform
replaces an ID or code number with a description from a file. The Conditional
Lookup transform does not support derived column output. Therefore, no derived
column needs to be created. ·
Right-click
the table node and select ‘Transformations…’ ·
Select
‘CondLookup(!#EDIT_VALUES#!)’ from the default
transforms list. ·
Double-click
the selected transform to edit the parameters. This opens the
Conditional Lookup window. ·
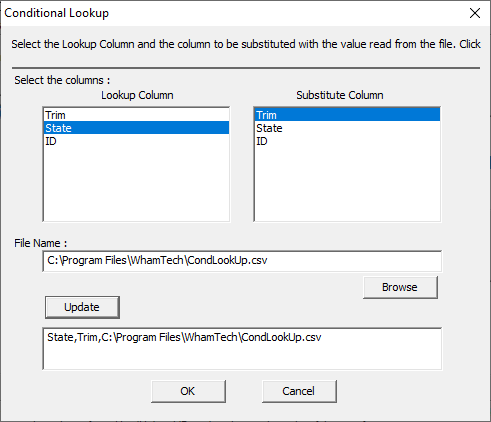
Select
the desired Look up column and Substitute column. ·
Find
the path to the look up file. ·
Click
‘Update’ to select the string. ·
Click
‘OK’ ·
Click
‘Apply’ then press ‘OK’ again. The look up column
is the column that will be looked up under the condition. The substitute column
is the column that will be replaced with the new description. It cannot be a
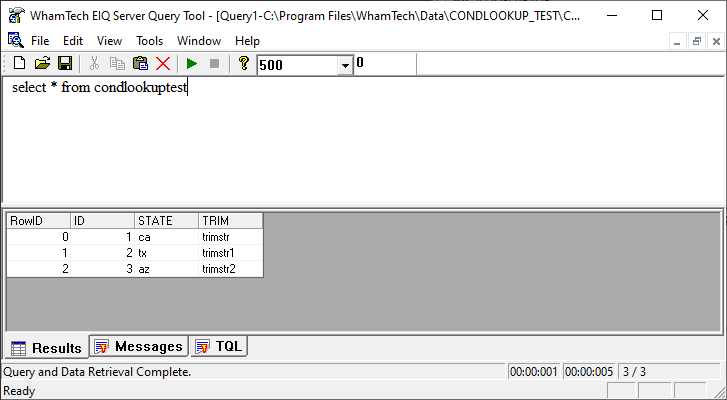
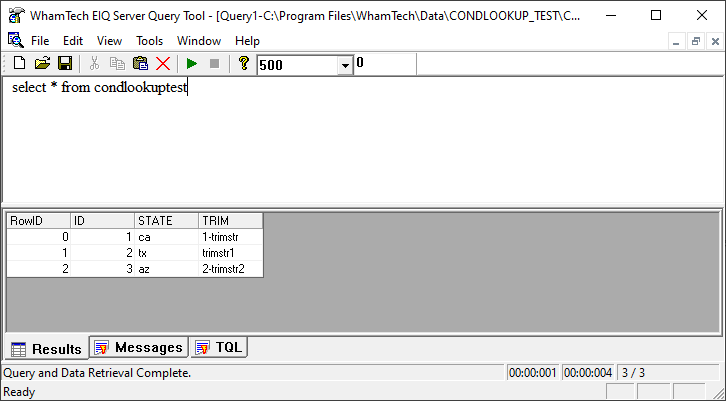
derived column. The File Name will show the path to the look up file. Data in index
before lookup transform: Data in index after
transform: This transform
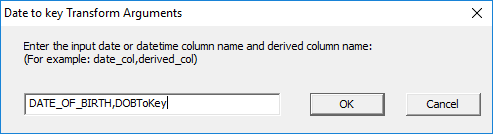
converts the input date/datetime field to the numeric date using the yyyymmdd format. ·
Create
a derived column called ‘DOBToKey’ with an ‘INT’ data
type. ·
Right-click
the table node and select ‘Transformations…’ ·
Select
the default transform ‘DateToKey(!#EDIT_VALUES#!)’. ·
Once in
the ‘Selected Transforms’ box, double-click the transform to specify the
parameters. This opens the
‘Date to key Transform Arguments’ window. ·
Enter
the name of the Date of Birth column as it appears in the table. ·
Enter
the name of the derived column. ·
Click
‘OK’ ·
Click
‘Apply’ and then ‘OK’ again. The transformation
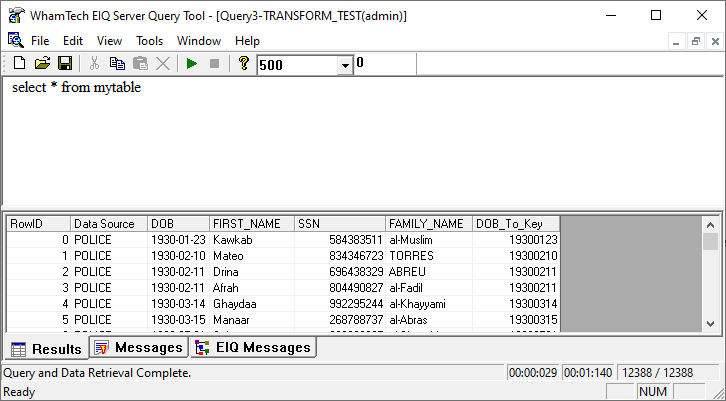
should look like the DOB_To_Key column below. This input column
must be a DATE data type within the map. Make sure that the output column has
an ‘INT’ data type. Other numeric data types return a 0, making the connection
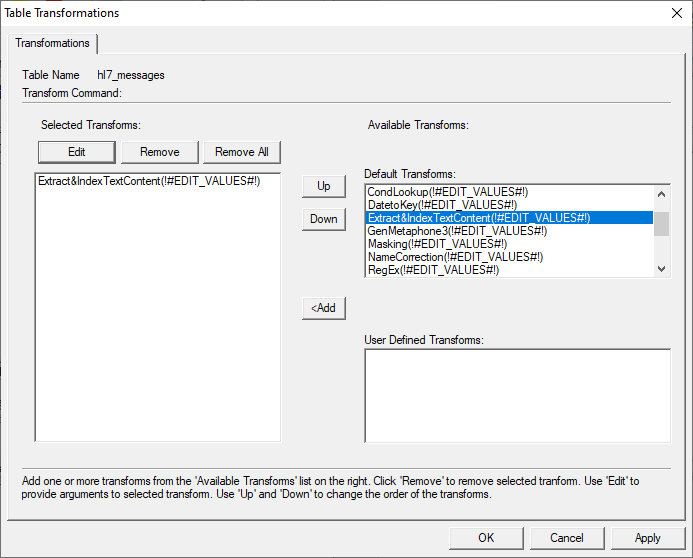
string useless. The Extract and
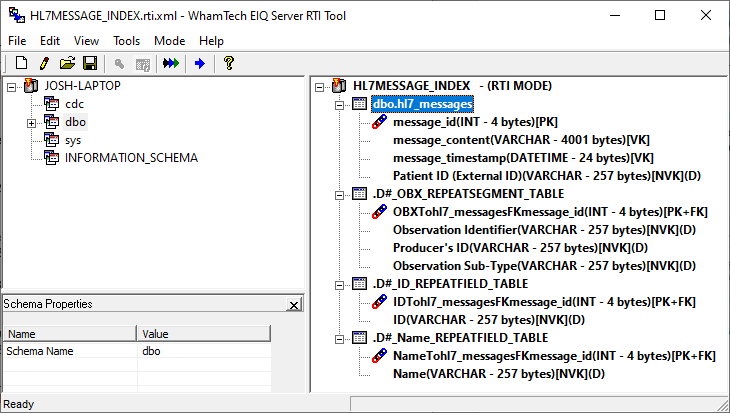
Index Text Content transform can be used to build message parsing indexes. The
data must be in HL7 format for this transform to work properly. ·
Add the
appropriate columns to the indexing pane. ·
Right-click
the table node and select “Transformations” from the context menu. ·
Add “Extract&IndexTextContent” to the left side. ·
Double-click
or select “Edit” to specify the parameters of the transform. ·
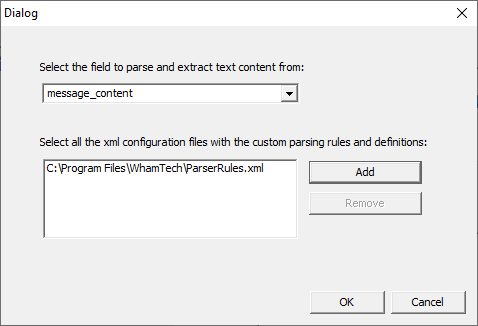
Select which
column will be parsed. ·
Select
the configuration file with the rules and definitions for parsing. When the transform
is applied, the indexing pane will update with the information from the
configuration file. ·
Build
the index to apply the transform. The new tables can
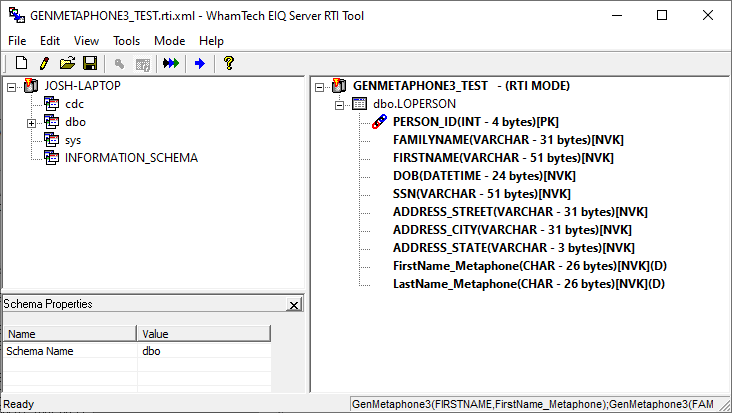
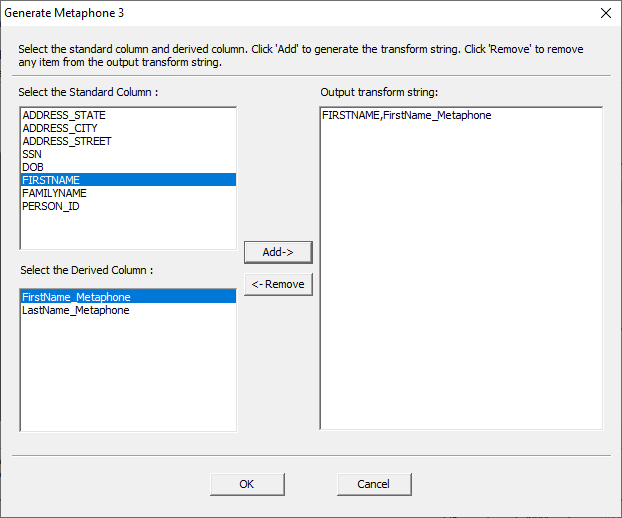
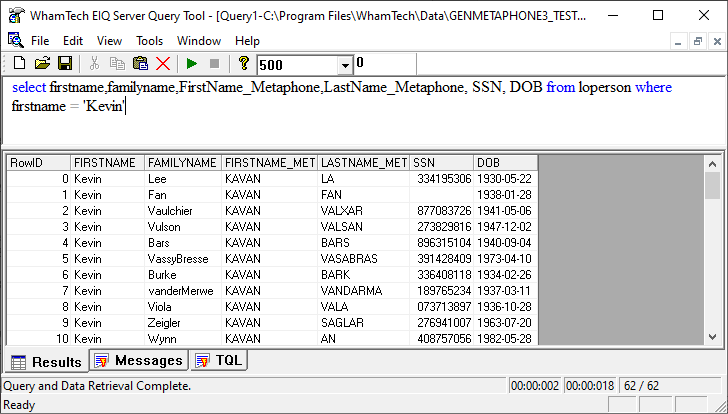
be mapped to a standard data view and queried using the EIQ Server Query Tool. GenMetaphone3
outputs the phonetic spelling of words, such as names, into a derived column. ·
Create
a derived column for each column where Metaphone 3
needs to be generated. ·
In the
transform window, select the appropriate column and the corresponding derived
column. ·
Click
‘Add’. ·
Build
the index to apply the transform. The two derived
columns will show the newly generated Metaphone 3
versions of the names. These transforms
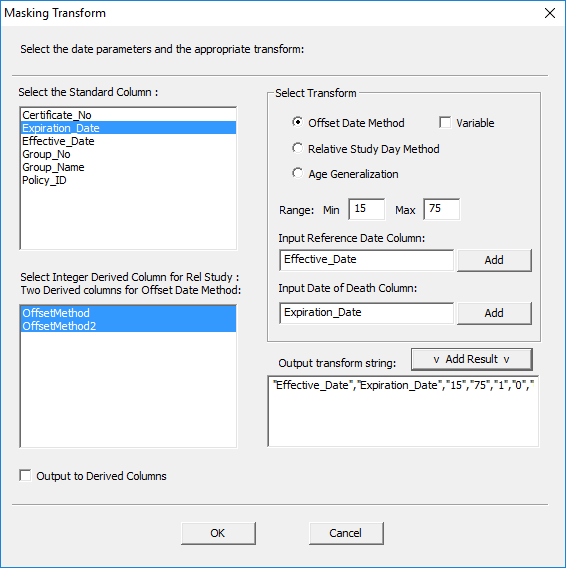
will apply a mask to the data that hides the actual values. Masks can be simple
changes to hide information, or they can be much more complex. The first masking
transform is the Offset Method. Through this transform, all dates are replaced
with a new date generated using a random offset for each value. For example,
when analyzing patient data, if the original reference date is April 1, 2008
and the date of death is May 1, 2008, a random offset will be generated. If this
random offset is 91 days, then the new dates after applying the offset method
transform would be July 1, 2008 and July 31, 2008. The results can be stored in
derived columns or replace the data source attributes. Select the output
columns and select ‘output to Derived Columns’ to save the result to a derived
column. ·
Create
two derived columns: ‘OffsetMethod’ and
‘OffsetMethod2’. ·
Make
sure they have the same data type as the date column being transformed. ·
Right-click
the table node and select ‘Transformations…’ ·
Select
‘Masking(!#EDIT_VALUES#!)’ from the default transforms list. ·
Double-click
the selected transform to edit the parameters. This opens the Masking
Transform window. ·
Make
sure ‘Offset Date Method’ is selected. ·
Specify
the range for the offset date. ·
Select
the input column for the reference date and click ‘Add’. ·
Select
the input column for the end date and click ‘Add’. ·
Highlight
the two derived columns where the output will go. ·
Click
‘Add Result’ to generate the transform string. Apply the transform
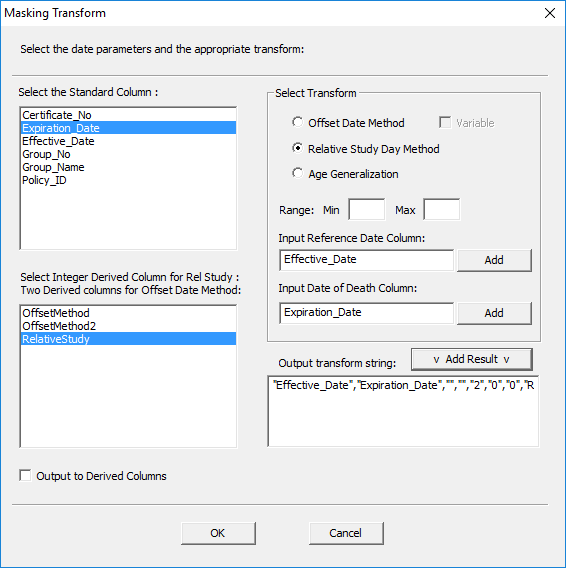
and click ‘OK’ to finish. The next masking
transform is the Relative Study Day Method. This transform calculates the number
of days relative to a reference date. All dates are removed and then results
will be stored in a derived column as an integer. Using patient data as an
example, if the first day of treatment is January 1, 2008 and the date of death
is May 1, 2008, the date of death will be expressed as 120 study days. Continue using the
Policies table for this example. ·
Create
a derived column with the INT data type called ‘RelativeStudy’. ·
Right-click
the table node and select ‘Transformations…’ ·
Select
‘Masking(!#EDIT_VALUES#!)’ from the default transforms list. ·
Double-click
the selected transform to edit the parameters. In the Masking
Transform window: ·
Make
sure ‘Relative Study Day Method’ is selected. ·
There
is no need to specify a range. ·
Select
the input column for the reference date and click ‘Add’. ·
Select
the input column for the end date and click ‘Add’. ·
Select
the ‘RelativeStudy’ output column created earlier. ·
Click
‘Add Result’ to generate the transform string. Apply the transform
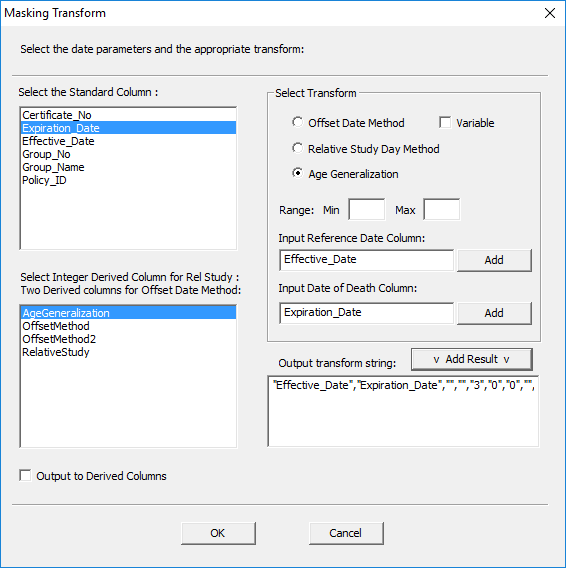
and click ‘OK’ to finish. The final masking
transform is Age Generalization. This masking transform will use the
reference date to generalize the age. Again, use the
Policies table for this example. ·
Create
a derived column called ‘AgeGeneralization’. ·
Right-click
the table node and select ‘Transformations…’ ·
Select
‘Masking(!#EDIT_VALUES#!)’ from the default transforms list. ·
Double-click
the selected transform to edit the parameters. In the Masking
Transform window: ·
Make
sure the ‘Age Generalization’ radio button is selected. ·
There
is no need to specify a range. ·
Select
the input column for the reference date and click ‘Add’. ·
Select
the input column for the end date and click ‘Add’. ·
Select
the ‘AgeGeneralization’ output column created
earlier. ·
Click
‘Add Result’ to generate the transform string. Apply the transform
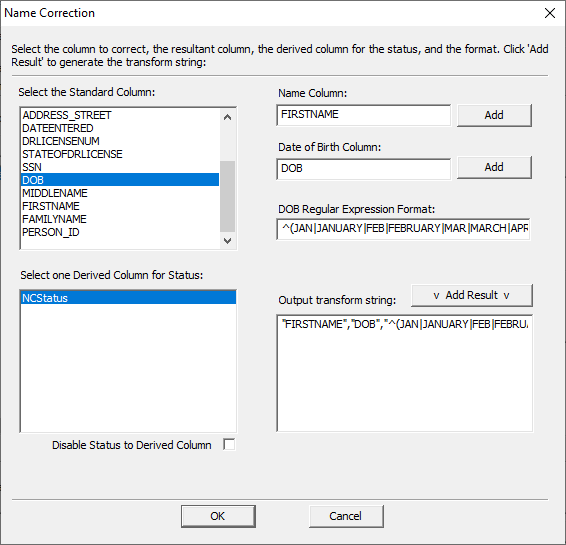
and click ‘OK’ to finish. The NameCorrection transform uses DOB column to find names in
the data associated with that DOB that may be inaccurate or incorrect. The
status of the transform is then output to a derived column. After selecting the
NameCorrection transform from the list, it requires
further specification: ·
Select
the name column to check for errors. ·
Select
the date of birth column. ·
Enter
the regular expression format for the data of birth; if not using the default. ·
Select
the derived column to output the status to. ·
Click “
Add Result “ to generate the output transform string. Once the transform
parameters are defined, the transform will take affect after the next index
build. Remember to map the derived column to the Standard Data View to see the
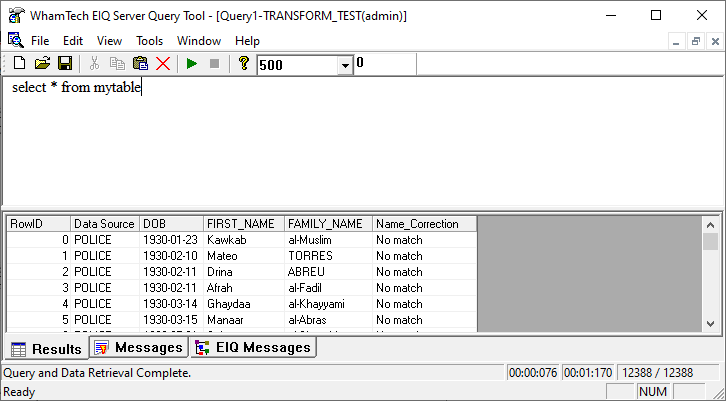
results in the query. The query returned results from the derived column, “No
Match” indicating that there was no issue found between records. The EIQ RTI Tool
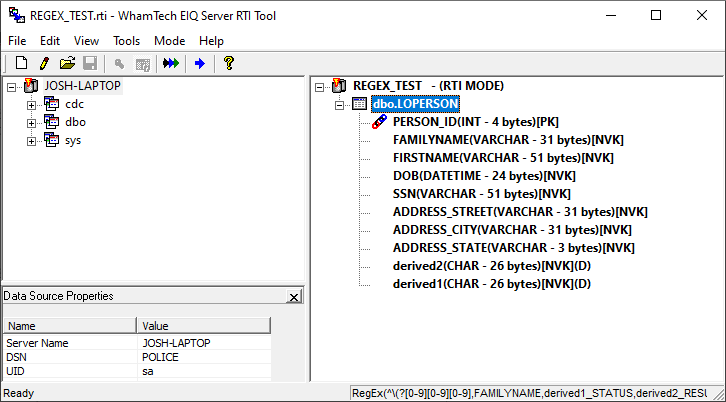
can apply Regular Expressions as table transformation. The following example
will use the expression ^\(?[0-9][0-9][0-9] to find data with at least three
numerical values. ·
First,
create two derived columns with the CHAR data type by right-clicking the table
node and selecting ‘Add Derived Column’ from the context menu. ·
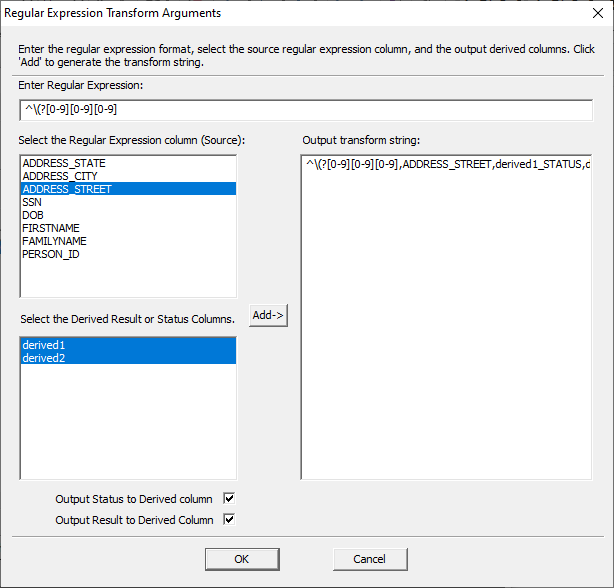
Second,
open the table transform dialog and select the RegEx
transform. ·
Edit
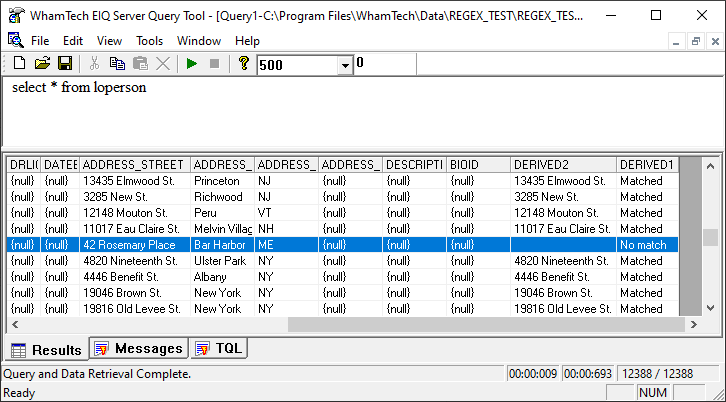
the transform to mimic the following window: When the index is
built, the Regular Expression will find all of the street addresses with three
or more numerical values. One derived column will detail whether a match was
found, and the other will contain the result. In the result, one
column was found to not match the criteria while the rest of the columns were
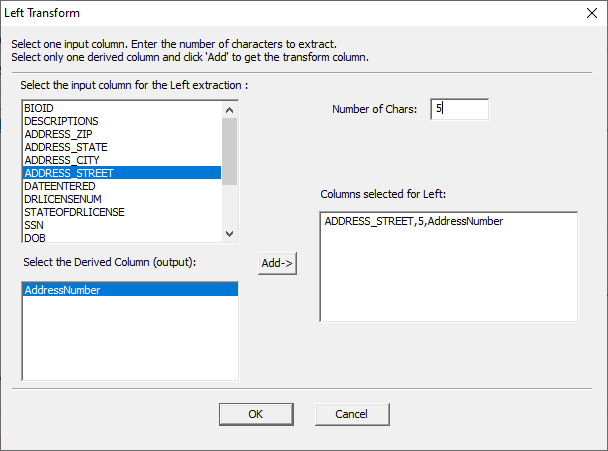
found to match. The “Left”
transform is used to pull a specified number of characters starting from the
left most point in the chosen column, and then outputs that information to a
derived column. In the example below, the “Left” transform is used to take the
street number from the “ADDRESS_STREET” column. ·
First,
select the input column. ·
Then,
select the derived column for output. ·
Finally,
specify the number of characters to move in from the left. ·
Click
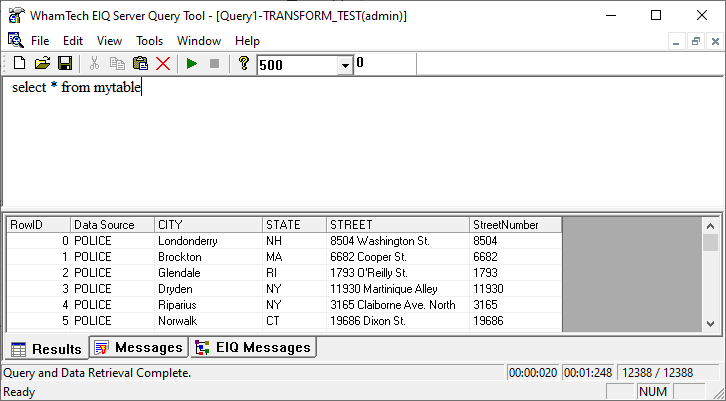
“Add->” to generate the string. After building the index
to apply the transform and mapping the derived column to “StreetNumber”,
the index can be queried for the results. The image below shows the street
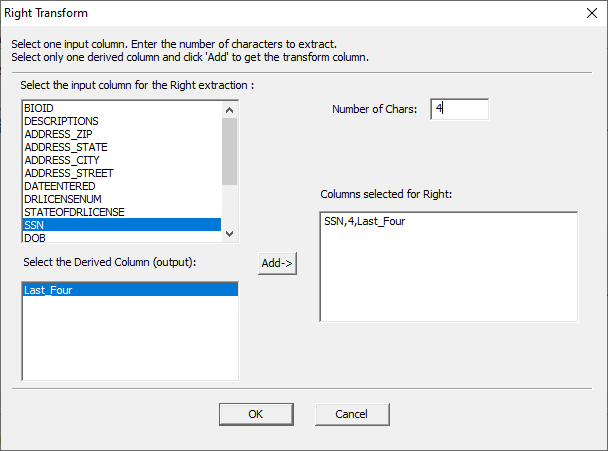
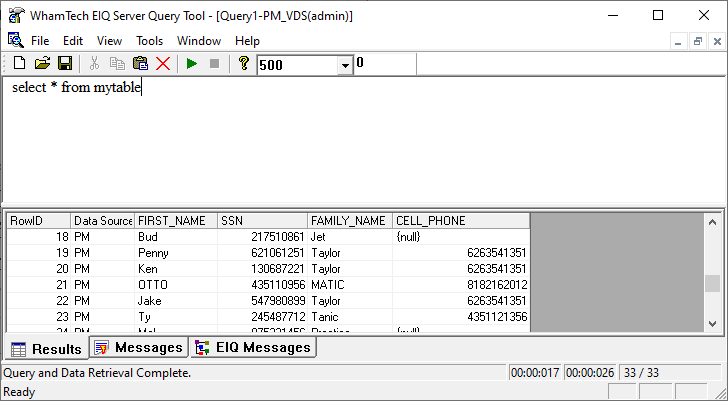
number now alone in its own column. The “Right” transform is just like the left transform, except
that it starts from the right side of the data rather than the left. In the
example below, the “Right” transform is used to select the last four numbers of
a social security number and output them to a derived column. ·
First,
select the input column. ·
Then,
select the derived column for output. ·
Finally,
specify the number of characters to move in from the left. ·
Click
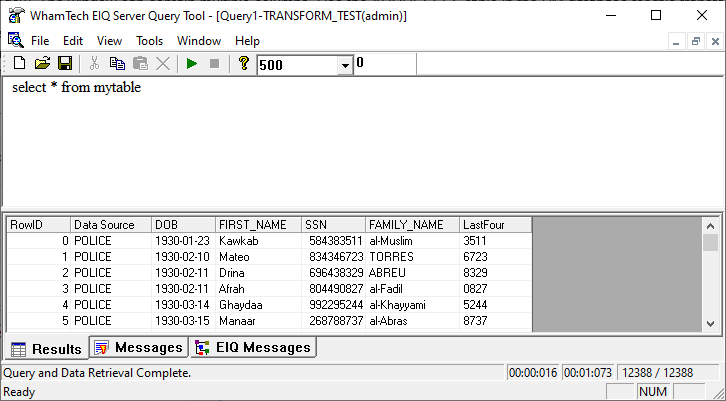
“Add->” to generate the string. After building the
index to apply the transform and mapping the derived column to “LastFour”, the index can be queried for the results. The
image below shows that the last four digits of the socials have been
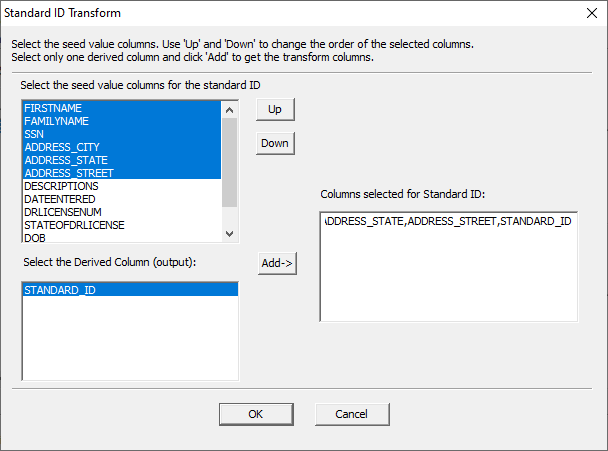
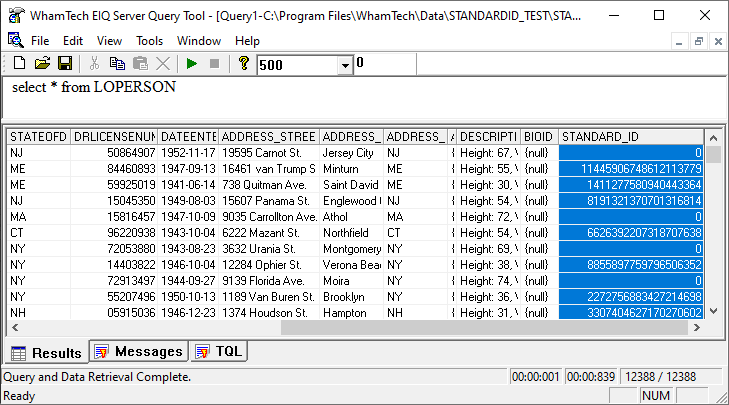
successfully output to a derived column. This transform partitions
the data based on the specified window. The window can contain multiple
columns. ·
Create
a derived column called ‘StandardID’ with the BIGINT
UNSIGNED data type. ·
Right-click
the table node and select ‘Transformations…’ ·
Select
the ‘StandardID(!#EDIT_VALUES#!)’ transform from the
default transform box. ·
Edit
the parameters of the transform. For this transform,
the input columns must be data source columns and must be Non-Virtual Keys. The
output column will store the generated ID. The output column must have a BigintU data type. This transform
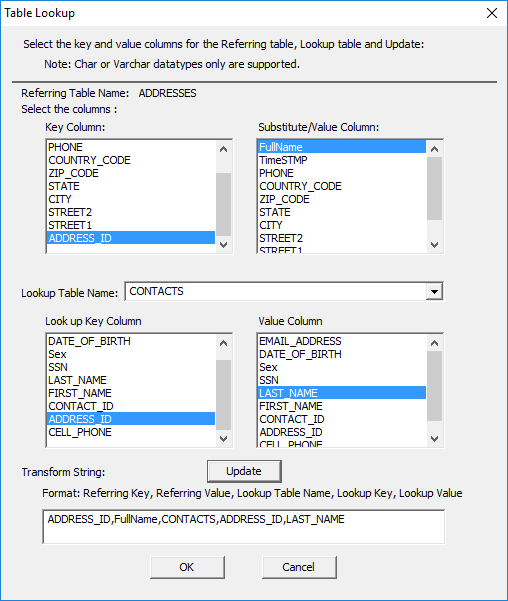
looks up values from one table to be substituted into another table. ·
Create
a derived column called ‘FullName’ in the ADDRESSES
table. ·
Right-click
the table node and select ‘Transformations…’ ·
Select
the ‘TableLookup(!#EDIT_VALUES#!)’ ·
Double-click
the selected transform to specify the parameters. This opens the
Table Lookup window. ·
Specify
the parameters of the table lookup. ·
Click
‘Update’ to generate the transform string. ·
Click
‘OK’ ·
Click
‘Apply’ and click ‘OK’ again to finish. The lookup table and
columns must be indexed table and columns. Only the Substitute column can be a
derived column. This transform
outputs data to a derived column when a specified condition is true. ·
Create
a derived column called ‘NonTX’ with a CHAR or
VARCHAR data type. ·
Right-click
the table node and select ‘Transformations…’ ·
Select
the ‘TypeConditionalOutput(!#EDIT_VALUES#!)’ default
transform. ·
Double-click
the selected transform to edit the parameters. This opens the Type
Conditional Output window. All the parameters
are optional except for the output column. When the type and condition are not
provided, this transform will function as a combine supporting up to five
attributes. ·
Specify
the parameters. ·
Click
‘Add Result’ to generate the output transform string. ·
Click
‘OK’ ·
Click
‘Apply’ and click ‘OK’ again to finish. The TSubstring transform will
extract a substring from a record and output it to a derived column. This
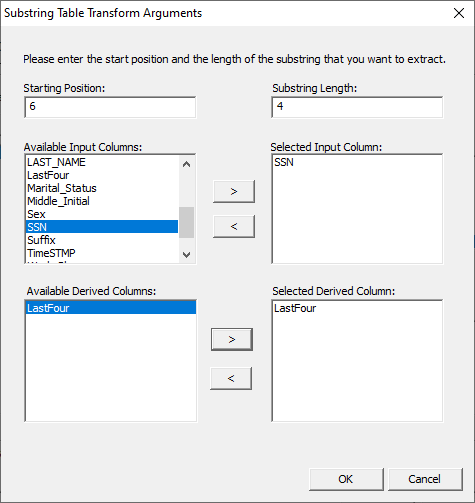
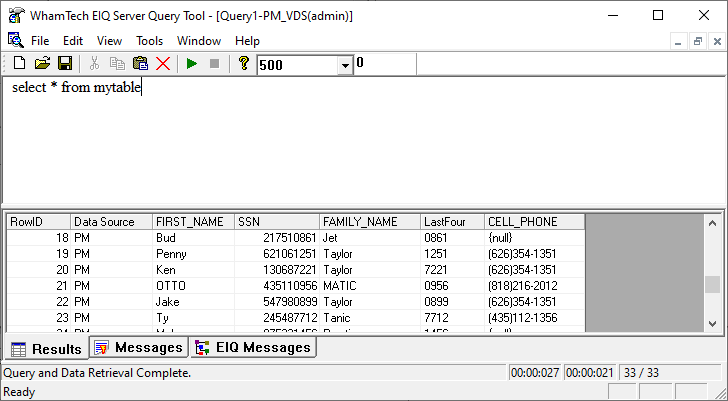
example will extract the last four digits of a social security number. TSubstring requires
additional parameters be set before the transform will work. ·
First, set the starting
position. This is where the extract will begin. ·
Then set the
substring length. This is the length of the extract. ·
Select the input
column and use the right arrow “>” to move it into the box. ·
Select the
derived column and use the right arrow “>” to move it into the box as well. ·
Click “Ok” when
finished. After building the
index to apply the transform and mapping the derived column to “LastFour”, the index can be queried for the results. The
image below shows that the last four digits of the socials have been
successfully output to a derived column. Column level transforms are applied directly to the columns
and don’t require an output column for the transforms to work. Some column
transforms require additional specifications to function correctly, while some
require no specifications at all. Like table transforms, column transforms also
have a hierarchy. This can be changed by moving the transforms up and down in
the selected transforms list of the transform configuration wizard. Note: Column level transforms will be applied after
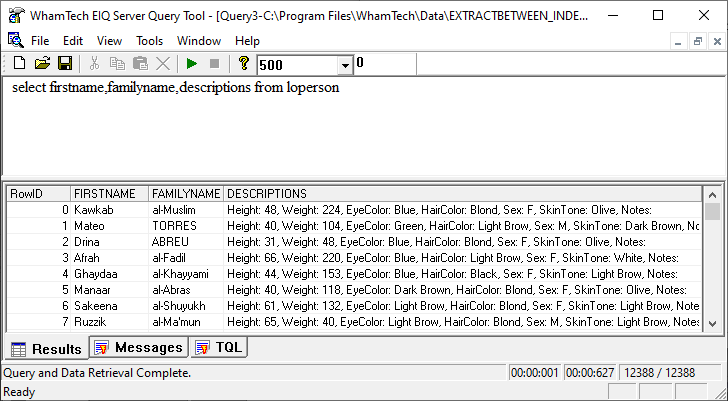
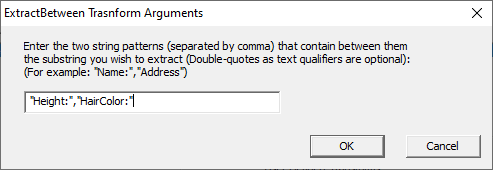
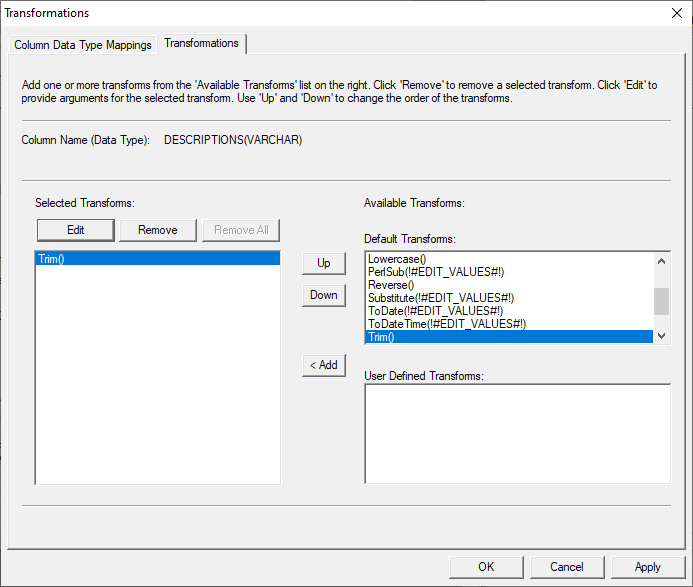
table level transforms. The ExtractBetween transform will
extract data from a column using a specific string. In this example, data will
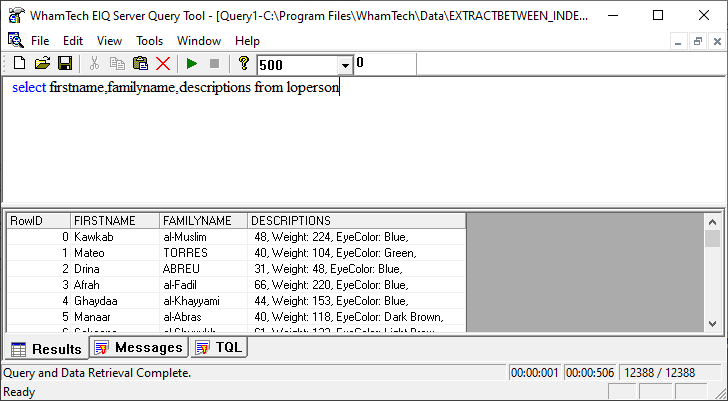
be extracted from the Descriptions column. ·
Right-click the Descriptions column and select
“Transformations” from the context menu. ·
Select “ExtractBetween”
from the available transforms and add it to the left side. ·
Edit the parameters of the transform. It is important to note that the two specified string
patterns will not be part of the transform. Make sure that the two strings used
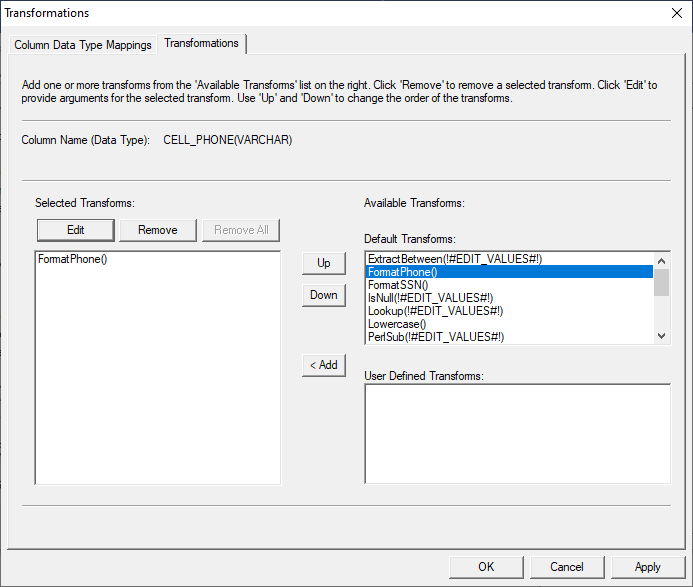
are outside of the data targeted for extraction. Once the index is built, the transform will be applied. The FormatPhone transform will
take non-formatted phone numbers, and re-format them as (XXX)XXX-XXXX. The
example below will use the CELL_PHONE column. This transform doesn’t require any extra specification. The
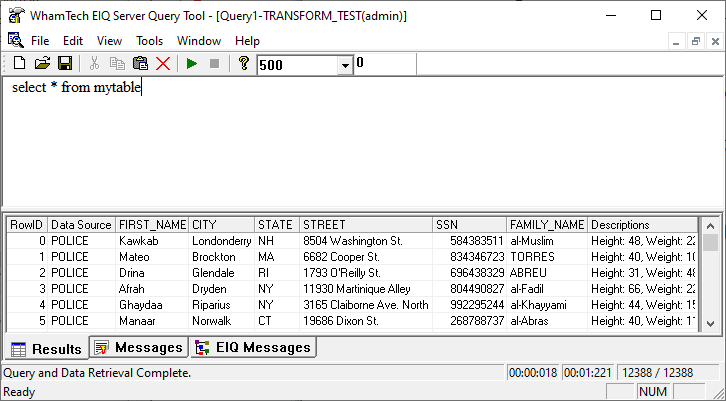
transformation will be applied on the next index build. The numbers in the CELL_PHONE column now appear in the
correct format, with the area code in parenthesis and the last four number
after the dash. This helps clean up the data and make it more legible and
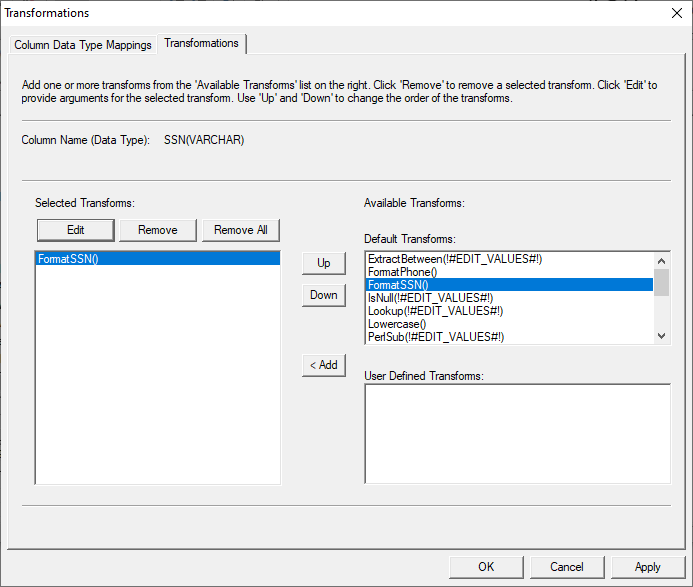
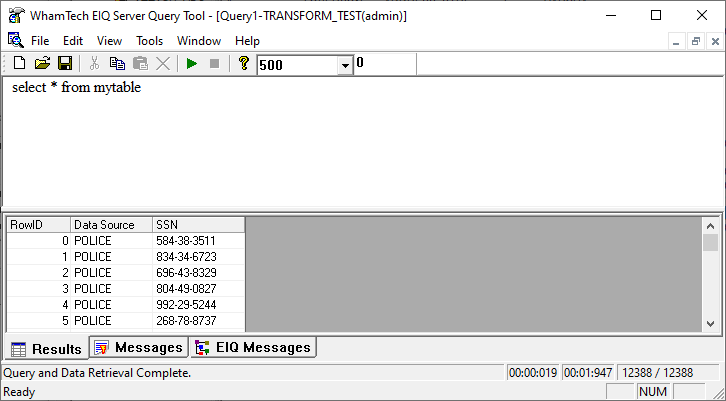
accessible. This transform will convert social security numbers to the appropriate
3-2-4 format. In the image below, the social security number column shows the
numbers bunched together in a single string. Apply the FormatSSN() transform to
the column by selecting it from the transform menu. This transform does not
require any special parameters, so once it has been selected it will be
applied. The SSN column in the image below now shows the social
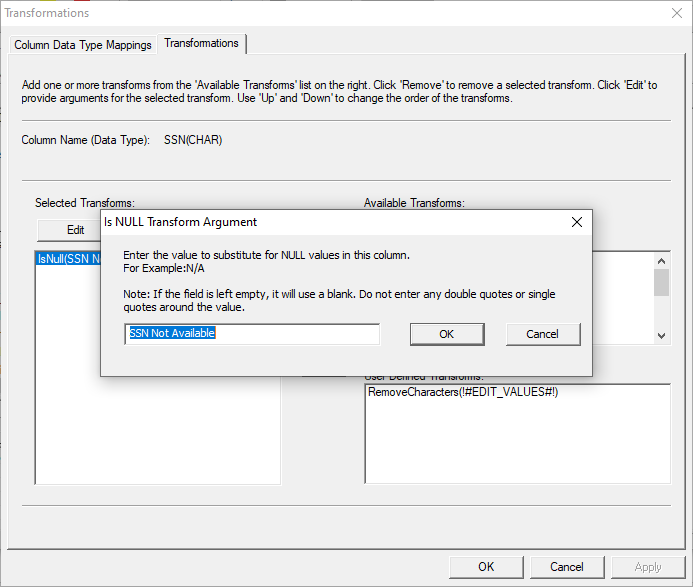
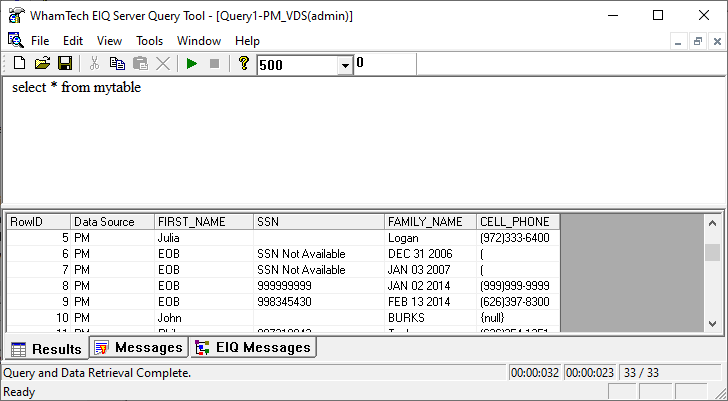
security number correctly formatted and much easier to read. The IsNull transform is designed
to replace the null values in a data set with a specified value on a column
basis. This example will focus on social security number columns. ·
First, select the transform from the menu. ·
Then, edit the values to provide the extra
specification. ·
Enter the value to substitute for {null}. The
example uses “SSN Not Available” ·
Click “OK” to close the window and then “Apply”
and “OK” to finish. The transform will take affect after the next index build.
In the SSN column below, two of the values that were initially {null} now
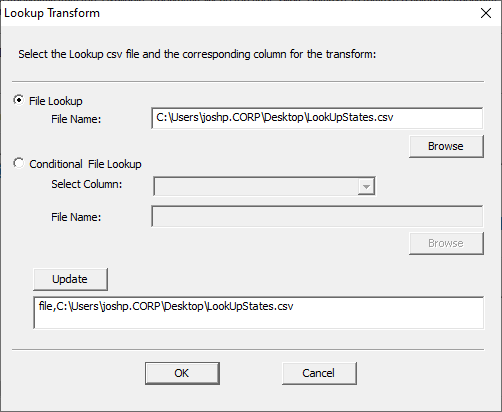
appear as “SSN Not Available”. The “Lookup” transform is used to look-up values from an
outside source and replace the data in the index with those values. The example
below uses a CSV file to replace the two-letter state codes with the full state
name. In the transform configuration window: ·
Select the “File Lookup” radio button if it is
not already selected. ·
Browse for the desired CSV file. The EIQ Product
Suite ships with a “LookUpStates.csv” file for tutorial purposes. ·
Click “Update” to generate the string. ·
Click “OK” to continue. Once the index is built to apply the transform, query the
index for the updated results. In the image below, the STATE column shows the
full state names. These CSV files can also be used to correct data. For
Example, this data source has instances of “BT” for abbreviations of the state
“Vermont” instead of “VT”. By specifying in the CSV file that instances of both
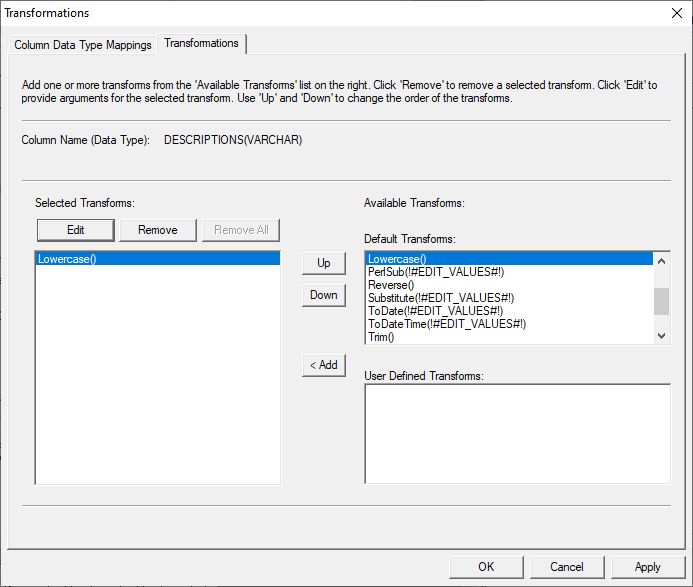
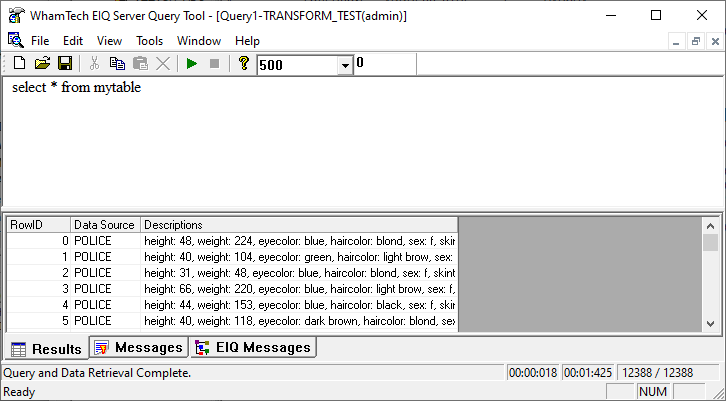
“BT” and “VT” point to “Vermont”, the data will be corrected in the index. The “Lowercase” transform makes all of the characters in the
target column lowercase. This example will apply the transform to the
“Descriptions” column. The “Lowercase” transform is another transform that has no
extra parameters to specify. After selecting the transform for the desired
column, the transform is applied the next time the index is built. Now that the transform has been applied, the “Descriptions”
column no longer has an uppercase letters. Words like “Height” and “Weight”
that were capitalized in the image above are now all lowercase. The PerlSub transform is used to
apply user defined transforms using perl script. The
subroutine is defined by the user and then called by it’s
name when performing the transform. For more information on this transform, and
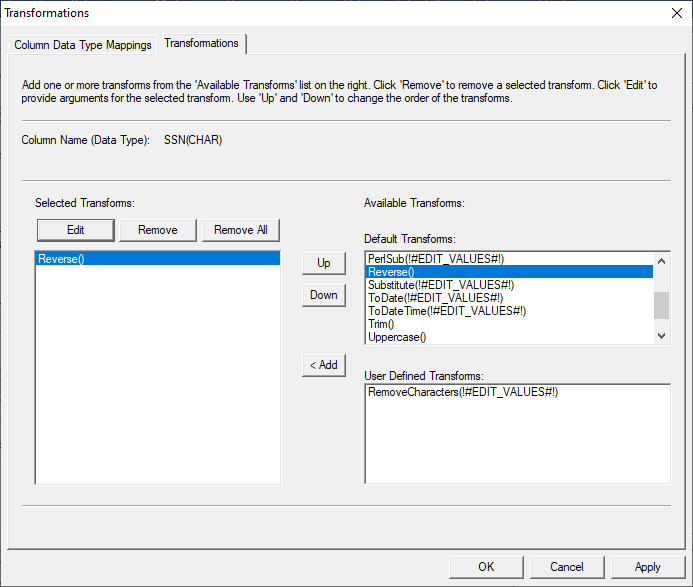
creating user defined transforms in general, see User Transform SDK. The Reverse transform will reverse the information in a
column. The example below will focus on the social security number column. This transform requires no extra specification to work.
After selecting the transform, click “Apply” and “Ok” to finish. The transform
will take affect after the next index build is complete. The social security numbers in the SSN column have now been
reversed. This transform can be used to either correct data that has been
entered backwards by mistake, or can reverse data intentionally as a form of
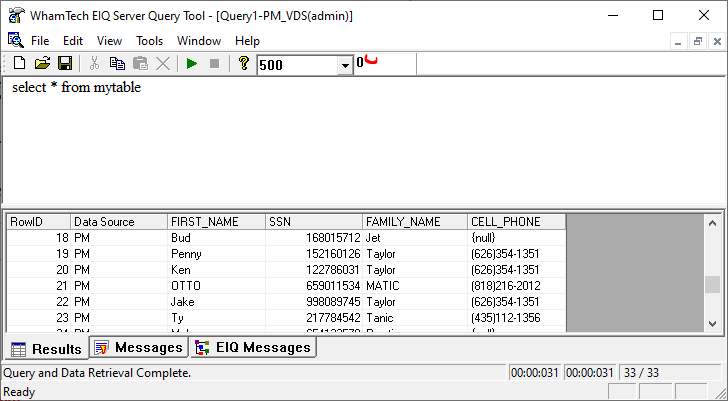
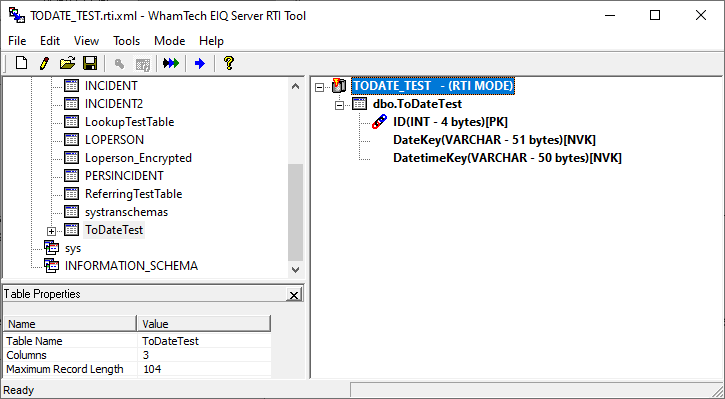
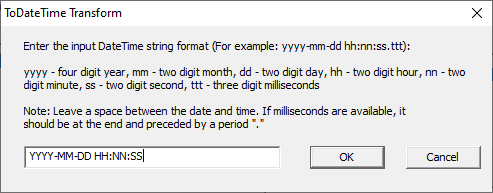
masking or encryption to hide sensitive numerical data. The ToDate and ToDateTime
transforms convert Varchar columns with a date or datetime values into columns
with the Date or Datetime data type. In the example below, there are two
Varchar columns in the data source. One contains date values, the other
datetime values. Usually when transforming the data type of a column, the new
data type can be selected from the Column Data Type Mapping window. However,
transforming columns to date and datetime require extra formatting so it cannot
be done this way. Instead, apply the “ToDate”
transform to the desired Date column, and the “ToDateTime”
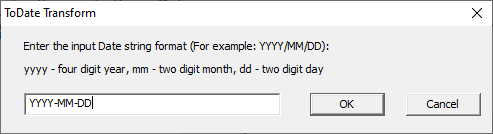
transform to the desired DateTime column. Make sure
the format of the date and datetime string match the same format of the data in
the varchar columns. For example: if the data in the desired datetime column is
2020-05-08 11:01:42 then the specified string should be YYYY-MM-DD HH:NN:SS. ToDate: ToDateTime: The RTI Tool window will now reflect the updated data types. The “Trim” transform trims the data of any trailing or
leading spaces. Like some of the other transforms, “Trim” doesn’t require any
extra parameters. Once it is selected, it is applied the next time the index is
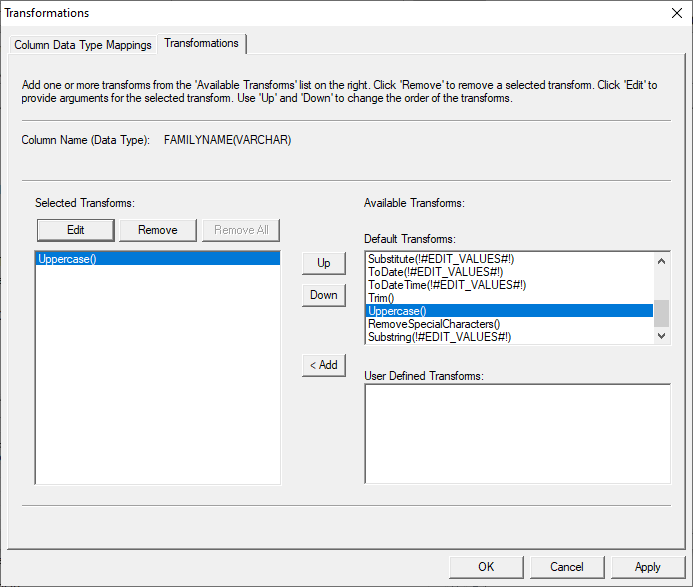
built. The “Uppercase” transform is the exact opposite of the
“Lowercase” transform. It capitalizes all of the letters in the string. This
example applies the “Uppercase” transform to a column of last names. The “Uppercase” transform is another transform that has no
extra parameters to specify. After selecting the transform for the desired
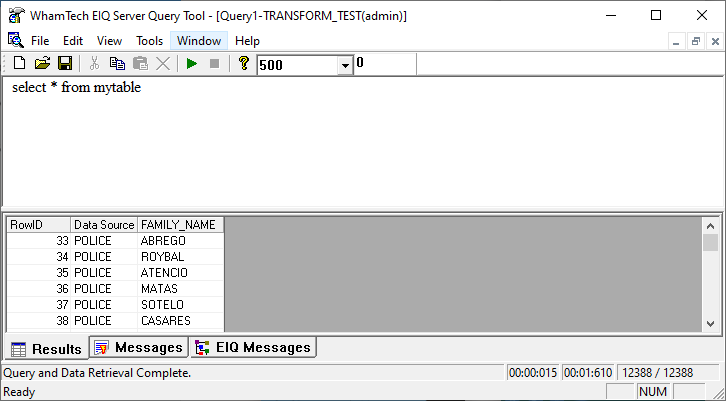
column, the transform is applied the next time the index is built. Now that the transform has been applied, the “Family_Name” column no longer has any lowercase letters.
The initial image showed a few Uppercase names with a majority of lowercase
names, but now all names in the column appear as
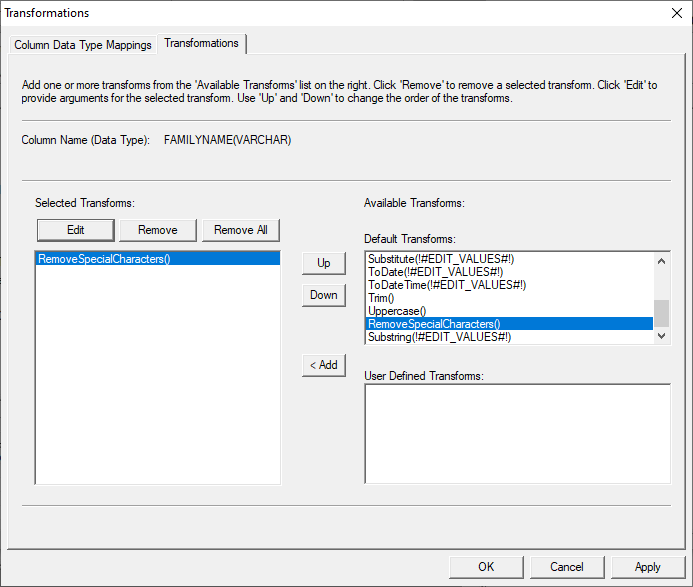
uppercase. The “RemoveSpecialCharacters”
transform eliminates characters like “-“, “=”, “+”, “@”, etc. from the column
it is applied to. This example will focus on the FAMILY_NAME column in the
following image. Some of the last names in this column has dashes in it. Hypothetically,
if those needed to be removed, the “RemoveSpecialCharacters”
transform will cut the character out. This transform does not replace the
removed character with a space or any other placeholder – keep that in mind
when using it. “RemoveSpecialCharacters” does not
have any special parameters to specify, so once it is applied to a column it
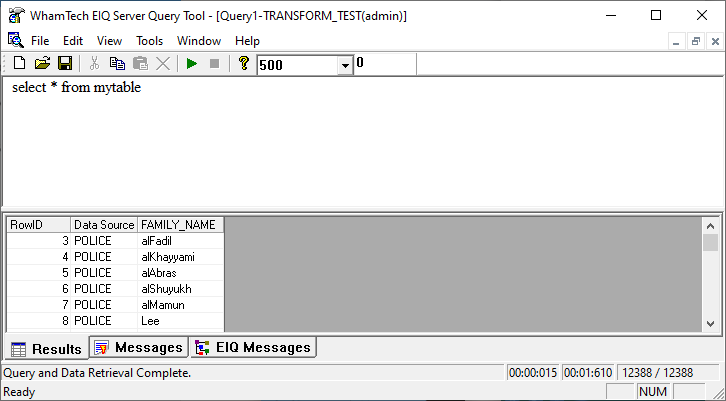
will take affect after the next index build completes. The FAMILY_NAME column now shows the last names without the
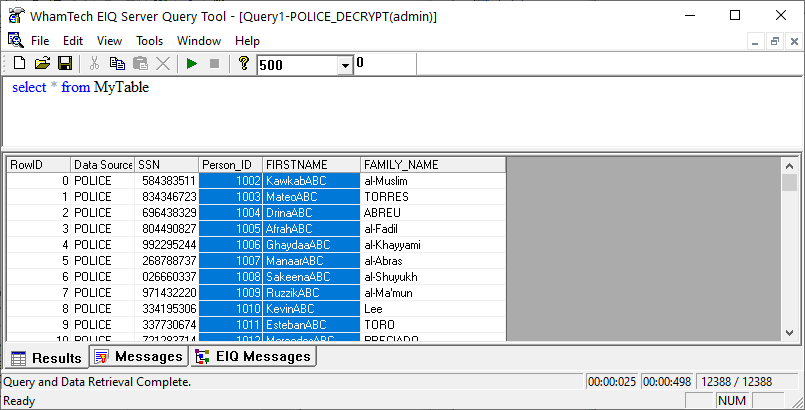
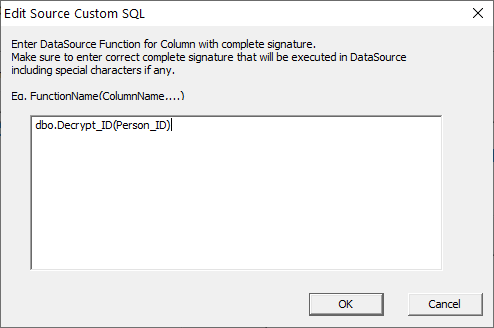
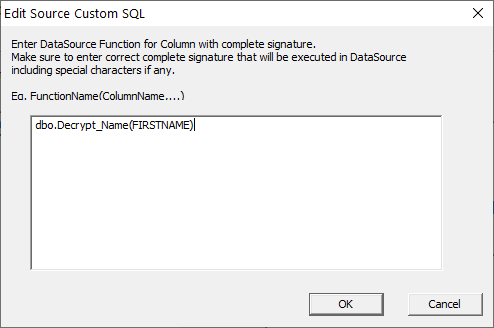
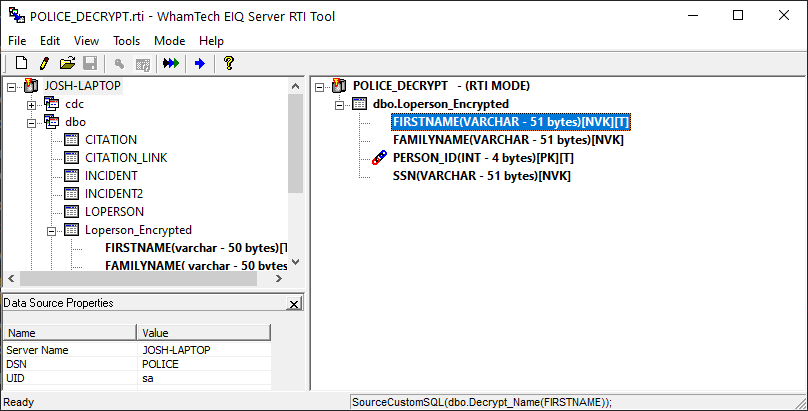
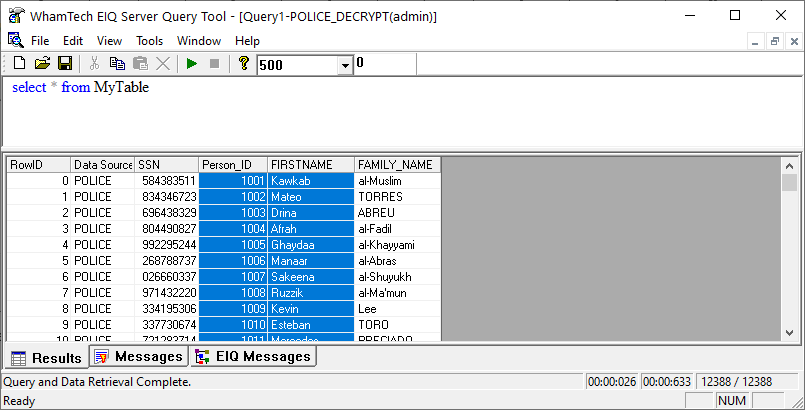
dashes. SourceCustomSQL applies data
source functions to the indexed data as a transform. As of right now, the
support is only for VARCHAR and INT data types, and the data must be a
Non-Variable Key(NVK). In this scenario, two columns in a SQL Server data
source have been encrypted using two user-defined functions and will be
decrypted using two more user-defined functions applied as transforms during
indexing. The two encrypted columns are the Person ID and FIRSTNAME
columns. The Person ID has been altered by one number using the user-defined dbo.Encrypt_ID function. FIRSTNAME has been altered with an
‘ABC’ using the user-defined dbo.Encrypt_Name
function. To decrypt the indexed data, two more user-defined functions
will be applied – dbo.Decrypt_ID and dbo.Decrypt_Name. These functions must call the selected
data source column. Remember, the columns in the
index need to be NVK for the transform to work if the data type is VARCHAR.
PERSON_ID is the primary key column in the index, which is also fine for the
transform to work. After applying the transforms, either rebuild or refresh the
index or build it for the first time if it is a new index. Then, query the index and the
columns should now appear decrypted. Now that the transform configuration wizard has been
demonstrated in detail, it is important to demonstrate frequently encountered
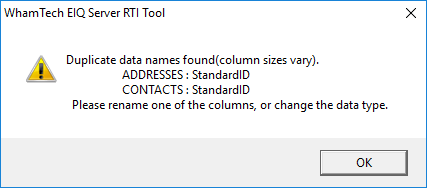
errors in the RTI Tool and how to fix them. You tried to build the index and received this error: ·
ADDRESSES.StandardID (NUMERIC) ·
CONTACTS.StandardID
(INT) There are two
different options to resolve this issue. ·
Rename
one of the columns to something else. (This is the correct solution.) ·
Change
the data type to match across all the attributes. (This will cause the next
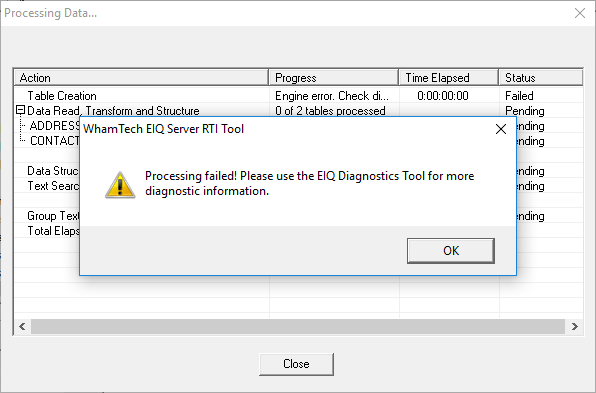
issue.) You’ve completed
your map and are ready to build the index. On processing, you receive the error
below: <514> Global keys are not allowed in GROWable
tables:%.64s This problem is fixed by changing the name of one of the duplicate
derived columns. <514> Global keys are not allowed in GROWable tables:%.64s A column with the same name was added to data source table where the
derived column is defined. This adds the ds column to the index and creates a
duplicate of the derived column. Both attributes look like derived columns in
the index Solution: Rename or
remove the derived columns. <172> Error opening dbd file:%s <231> Zero length field%.25s [Error] Syntax Error: Unrecognized token
[Records] near [, Records CHAR] for SQL… A reserved word (Records) was used in a derived column name. For more
information on reserved words, see Appendix D of the EIQ Server RTI Tool
help. Solution: Rename the
column. Some errors can be
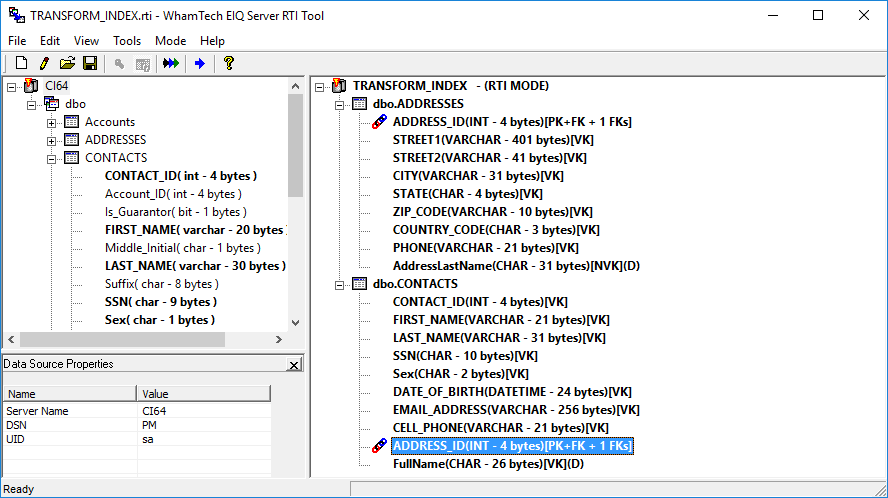
caused by processing issues when building the indexes. Here, there are two
table transforms. In the CONTACTS table, the Combine transform creates a full name from FIRST_NAME and
LAST_NAME. In the ADDRESSES table, a Table
Lookup on the CONTACTS column for the last name is output to a derived
column. A
query on this index presents an issue. The table transform
that creates the full name is working as intended, but the table transform
preforming the lookup is not. This is because there is an issue with how the
two tables are communicating. The two tables need to have the proper
relationships set up through Primary Keys and Foreign Keys and the ID columns
need to have the correct data type. If the tables aren’t connected properly,
transforms that go between tables will fail. The other issue is that the ID
columns have the ‘INT’ data type. ID columns need to be CHAR in order for this
to work. After setting up the proper relationship and changing the data types,
the transform will go through. ID Function Name Type Description Example/Use-Case 1 Combine Table Combine multiple columns
into one. Ex. Fullname
= Lastname + Firstname 2 StandardID Table Partition rows over the
specified window. Window specification can be of any data type. The same
value is given to each partition 3 DatetoKey Table Converts date to their
numeric representation. Accepts date input and returns integer 4 Masking Table 3 methods available Relative Study: Replaces
date with day diff between the start and end of event. Offset Date method: All
dates are replaced with a new date generated using a random offset for each
record. Age Generalization: This masking transform will use
the reference date to generalize the age Note: Date of birth (event start date) and Date of death (event end date )
are always required, regardless of the method. Ex. Event Start Date:
1/1/2010, enddate: 2/1/2010, offset 30 Relative Study: 31 Offset method: Start: 1/31/2010 end =3/3/2010 5 TableLookup Table Look up data from another
table within the data source (referenced table must be indexed). Can replace
existing column or add a new column (Derived Column) 6 RegEx Table Matches a pattern in an
input string. Can return the status of the match using the status column as
well as the match value to a derived column. Ex. Name: O’Toole ReqEx: ^[a-zA-Z] Status:no match Value: “” 7 GenMetaphone3 Table Creates the sound
representation of a word. Ex: James Result: Jams 8 AddressCorrection Table Accepts Address
information from user in sub parts to correct and standardize the address.
Returns a status column identifying the works done. Applies to U.S Address
only and requires a custom dll file, not included
in out of the box installation Ex. 12001 N Central Expy, Fort
Worth, TX, 75243 Corrected to: 12001 N Central Expy, Dallas,
TX, 75243. This is applicable to
U.S. address only 9 NameCorrection Table This is a Date
correction, not a Name as the transformation name implies. Accepts 2 input
columns and an output column. Regex expression must
match Name column. Accepting the default regex then input must be this
format: Jan 12 2010. 10 TypeConditionalOutput Table Conditionally checks the
value of a column and returns the specified attributes when matched. 11 CombineDateTime Table Combines date and time
attributes to a datetime column. The format string is the format of the input
not output. ·
Column level transformation is two part ·
Part 1 requires converting the attribute data type to a data type
acceptable for transformation ·
Part 2 is the actual transformation to be applied. The available
transformation(s) is/are specific to the data type ·
The column been transformed is the input string 12 Isnull Column Replaces null values with
the specified value. Must configure the replacement value 13 Lowercase() Column Converts attribute data
to lower case string. e.g. James = james 14 Uppercase() Column Converts attribute data
to upper case string. e.g. James = JAMES 15 Trim() Column Removes leading and
trailing blanks Input =
hello world Output = hello world 16 Substitiute(searchstring,
replacement) Column Search a value and replace
it with a new value. Replaces all occurrences of a search string with a new
value. Substittute(day, Yay) Before: Today is a WednesDay After: ToYay is a Wednesday. It performs a case
sensitive [1] search 17 Lookup Column Lookup data from a file.
Conditional File Lookup allows you to lookup based on another attribute. Both replaces the
selected attribute with the result. Works for base column but
not derived. File Format: Expect two
columns where the first is the matching key and the second is the return
value 18 Reverse() Column Reverse the order of the
attribute data e.g. eman result: name 19 FormatSSN() Column Standardize the SSN
attribute Standard: 123-45-6789 20 ToDate(format string) Column Formats the attribute
data to standard EIQ date format. Format string is the format of the input
data not output. Input can be both date and string Issues: invalid values
returned for dates not matching specified format 21 ToDateTime(format string) Column Formats the attribute
data per a specified date and time format Ex. Yyyy-mm-dd
hh:nn:ss.ttt Default value provided
for non-matching part of the format specified. For e.g. 12-01-2001
12|12|12 Format: yyyy-mm-dd hh|nn|ss Outcome: 1753-01-01
12:12:12 22 FormatPhone() Column Standardize the phone
number (999)-999-9999 23 Extractbetween(startstring,
endstring) Column Extract the values
between start and end string. It is case sensitive. It gets the value between
the first matching pairs. 24 Extract&IndexTextContent(filepath.xml) Table Extract elements from
blob based on the defined input file. HL7 Parser [1] Column
level transformation on derived column is not supported at this time. [2] Column level
transformation are type bound. RTI
Transformations
General Flow of Transformations
Transformation Configuration Wizard
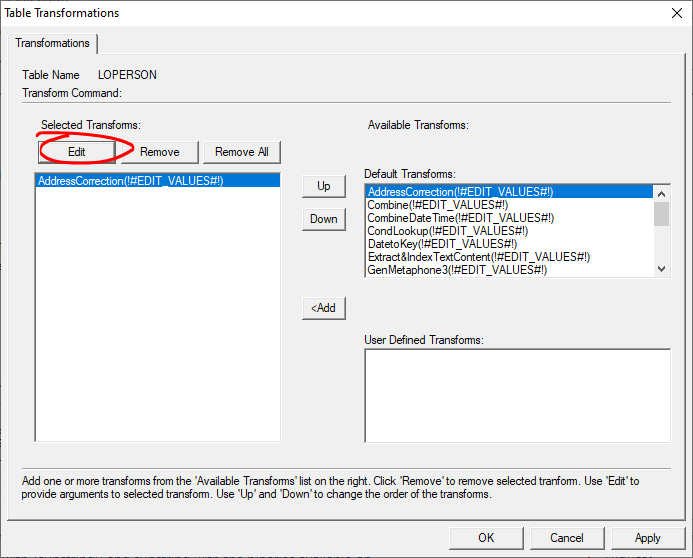
Table Transformations
Address Correction

Combine
CombineDateTime
CondLookup
DateToKey
Extract&IndexTextContent
GenMetaphone3
Masking
NameCorrection
RegEx
Left
Right
StandardID

TableLookup
TypeConditionalOutput
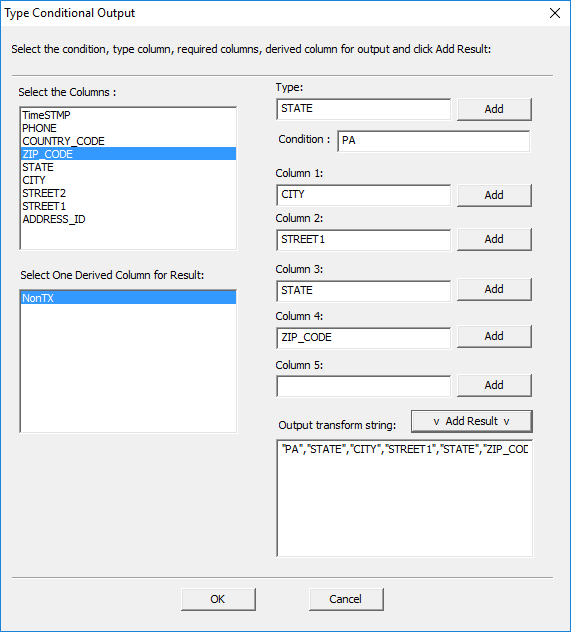
The ‘Type’ field is the specific column where the condition is being applied.
The ‘Condition’ field is the value the transform is looking for. Columns 1-5
are values returned with any results where the condition is met. Those values
are returned like a combine function. The output column, ‘NonTX’,
will store all the values where the condition is true. In this case, the
transform will look for any row where the state is ‘Pennsylvania’ and store
that information, along with the specified columns, in the ‘NonTX’
derived output column.TSubstring
Column Transforms
Extract Between
FormatPhone
FormatSSN
IsNull
Lookup

Lowercase
PerlSub
Reverse
ToDate/ ToDateTime
Trim
Uppercase
RemoveSpecialCharacters
SourceCustomSQL
Frequently Encountered Errors
Issue 1
This means that there are two derived
columns in the map with the same name, but different data types.Issue 2
An examination of the Diagnostics tool reveals: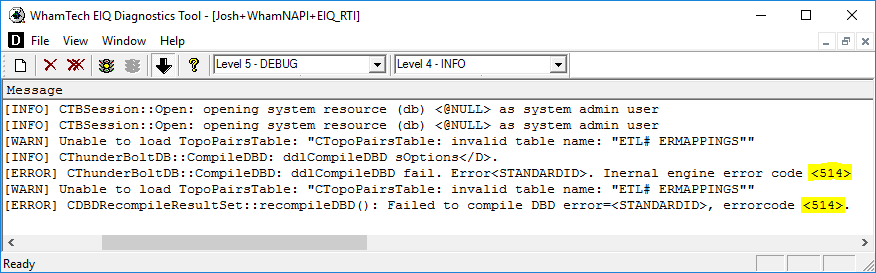
Other
Issues
The DBD file for the index is open somewhere.
Solution: close all connections to the DBD file
A common error with the numeric
data type.Index Processing Order

Appendix A: RTI Transforms List (Need Updated ID’s
and Descriptions)
Copyright
© 2023 , WhamTech, Inc. All rights reserved. This document is
provided for information purposes only and the contents hereof are subject to
change without notice. Names may be trademarks of their respective owners.