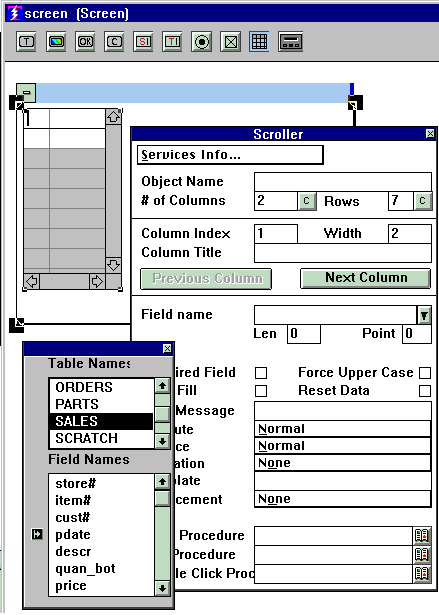

We see the Frame, the Scroller Object, it's properties, and the two-part listpick of Tablenames and Fieldnames. The control to the left of "pdate" tells you that field has either an alias, is broken into subfields, or both. Click on the control and you will see the breakdown.
Notice the Scroller Object starts out with two columns in it. That is always the case. We are going to start adding columns to it. Go to where it says
"# of Columns" and change the 2 to the number of columns you want. In the case of our example, we are going to change it to 7. (Do not worry about being exact, you can always change it again later, or you can insert a new column between two existing columns, or delete a column, and the number will change automatically. Do not read anything special into the 7. The limit on the number of columns is 4000.)
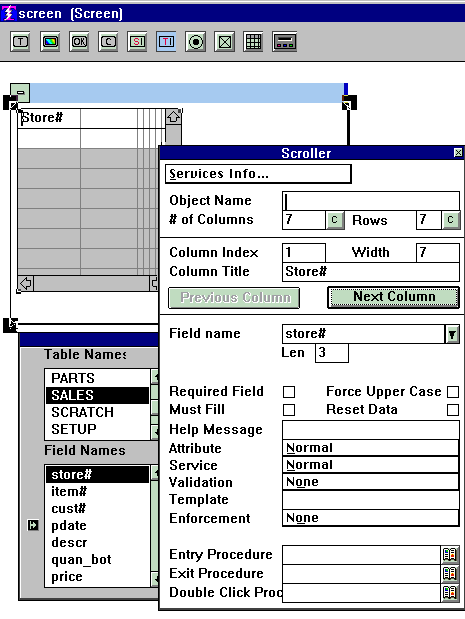
Then click on the "C" ( for commit) next to "# of Columns." You see extra columns added to the object. Select a fieldname from the list and click in the Fieldname slot of the properties box. You see:

Note that when you clicked in the Fieldname slot of the properties box, the Column Title slot and the object itself got a default column title. The default column title is the fieldname with the first character upper case. You may alter it in any manner that you like. Alter it in the properties box, obverve that the object tracks what changes you make. Most of the things that you do in creating the scroller is done in the properties box. You seldom touch the object itself. Of course, later below you will see exceptions to this.
To do the next column, first click the Next Column button, then select another field from the list and click in the Fieldname slot of the properties box. In this manner, get all of the columns defined.
For other validations, special procedures, numeric edit controls, etc., that you can assign to the transfer fields as or after you create them, see
Field Services
and Numeric Field Editing
. The rest of this discussion continues to cover the creation and manipulation of columns in scrollers.
What Shows
Once you have all of the columns defined, the question is how many columns does the user see when the screen is in use? All of them? Or just the first few and then they must scroll wide to see the rest?
The answer is that it is up to you. You control the size of the Frame, and you control the size of the Scroller in the Frame. If you really do have just a few columns and they can be all visible at the same time in your screen real estate, by all means stretch the Scroller out so that they are all visible, and stretch the Frame so that the entire Scroller is included inside it. But if you have defined 100 colums, you can't do that. So decide how much does show, stretch the Scroller and Frame appropriately, and the user will scroll wide to see the rest. Users have other services, such as pane-splitting, which is standard behavior of all Scrollers, to assist them when the screen is in use.
To do:
Inserting, Deleting, and Resizing Columns
If you need to look at the 50th column
Multiple Scrollers, Object Name and the SCROLL Command
Copyright © 2019 , WhamTech, Inc. All rights reserved. This
document is provided for information purposes only and the contents hereof are
subject to change without notice. Names may be
trademarks of their respective owners.